

By popular request by some lewd enthusiast shmup/jong farmers, I am posting how to build your own Mahjong Controller. It uses a teensy board as its controller, which is versatile enough to use the same to build a arcade stick with custom auto fire, or a IIDX/Beatmania or even a midi controller. This post will focus on the jongtroller, but with a little basic programming knowledge you can transform it into anything else you want.
Things required:
- a teensy board (i recommend 2.0 since its cheap with 24 I/O pins, get one with pins attached if you cant do fine solder)
- buttons (push momentary kind, sanwa OBSF-30 will do fine)
- bunch of wires or connections
- soldering iron, solder wire, tweezers, wire cutters
Step 1 MOUNTING
I am not going to go too much in detail on this one. You might have your own ideas of what design, buttons or layouts you want. Just build something that can take a bit of a pounding, and some way to secure the teensy board so it doesnt move around and cause wires to break. I suggest draw out the layout first, think of what you want in the controller and how you want it to look. Mines built from a Converse shoebox
Step 2 WIRING
This is where you will need to learn to solder. If you dont know to solder buy a board with pin stands. Like this one. The ones with pins are more expensive. Then you can use Arduino jumper wires for directly connecting to the teensy board. If you know how to solder and are confident in your abilities, you can solder directly to the board like it did. It does get busy, be careful not to damage the pcb prints.
How the buttons are wired: (dont look at the extra holes at the bottom, they were a failed attempt at hole making)

How the teensy is wired:

Teensy 2.0 pin layout.
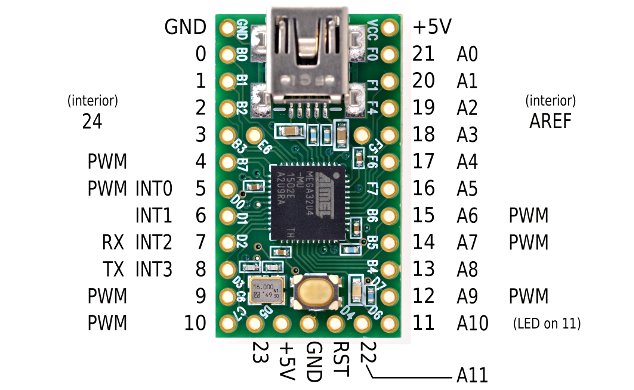
The basic gist of the wiring is, all buttons share a common ground. In the first picture, its the top row pins on the buttons. They are all daisy chained to the bottom GND connection on the Teensy diagram. The bottom row of the buttons are wired individually to pins 0 to 21 on the teensy board. So, all buttons share a common ground, then are individually linked to pins 0 till 21 on the teensy.
Step 3 PROGRAMMING THE TEENSY
This is the easiest step. You need two different installers, one is the Arduino dev software and the other is the teensy compat software. The teensy installs on top of the Arduino software, it adds teensy libs to the arduino software. The teensy libs are only compatible with certain versions of Arduino dev software. Get the teensy dev software here and download the Arduino dev program, you need version 1.6.13 for the as of this date version of the teensy program.
This is to compile the program that needs to be loaded on to the teensy. This is the program you need to compile and load into the teensy for a 21 button controller. Follow this guide how to setup for a joystick. Basically, select open the arduino IDE and open the supplied program file and then select Tools > USB Type > "Keyboard + Mouse + Joystick". Also select Tools > Board > your version of teensy.
The teensy 2.0 is setup to a bunch of slider, analogs and buttons. Its in the guide above. You can just program the buttons you need, the rest will show up blank. IF you decide the change that and only show the things you need then look at this post. Its a lot more hard work than you might be up for.
The supplied program, uses bounce, basically it checks for hysteresis. That means it only turns on the button when its been pressed for more than 10ms, which is less than 16ms which is one frame, so you should be fine. You can try and reduce it. The rising and falling edge is described in the code.
For windows users, Teensyduino uses a graphical program to upload the compiled hex onto the teensy board called the teensyloader. Its usually installed along with teensyduino over the arduino IDE. Sometimes it will not detect teensy at all. In such cases you will have to use the commandline version. That works fine.
And thats it, once that done, you should see teensy show up as a joystick. So first mount the components, then wire the teensy and buttons, then re program the teensy and you are done. If you have any questions or suggestions let me know. You can catch me hanging around discord or irc chat.
Things that can be done more with this. You can set up an arcade stick, you can wire and program the stick to be either analog joystick or POV hat with flip switch. You can add in a potentiometer and set up autofire rate per button. you can do anything with it really. Have fun
