
Project: SanMitsuBoxGun
-
shmuppyLove

- Posts: 3708
- Joined: Thu Apr 07, 2011 1:44 pm
- Location: Toronto
Project: SanMitsuBoxGun
It begins, GET HYPE
Last edited by shmuppyLove on Tue Nov 01, 2011 11:28 pm, edited 1 time in total.

-
shmuppyLove
- Posts: 3708
- Joined: Thu Apr 07, 2011 1:44 pm
- Location: Toronto
Re: Project: SanMitsuBoxGun
Wow, can't believe I was able to complete it so quickly  lol.
lol.
I now present:
SanMitsuBoxGun
Project: SanMitsuBoxGun
I had parts left over from a previous custom-built joystick that I ended up scrapping because I didn't like it. Now with the recent acquisition of a Neo Geo MV1F motherboard, I was extra motivated to build a 4-button stick to use with my Vogatek supergun (Mark II).
I also have a couple of other PCBs (Strikers 1945 and Stider Hiryu 2), so I didn't want to build the stick with a DB15 connector that would only work with the MV1F. And I needed to accomodate 10 lines in total -- 4 joystick directions, 4 buttons, Start and ground.
After some digging around in my bits n pieces drawers, I found a PS2 extension cable. Hmm 9 pins ... but wait! I opened up the connector housing (not an easy thing to do btw), and discovered (with the assistance of a multimeter) that there are basically two grounds -- one of the pins is wired in series with a small metal contact on top of the connector, which I assume is a common ground.
So I snipped the small jumper wire connecting the two, and now I had 10 separate lines! I cut the cable about 5-6" from the female side, stripped some of the insulation back and connected the 9 wires and the ground to the terminals on the Vogatek. Then I took the male side and did the same thing to a terminal block. I checked everything for continuity with my multimeter as I went, and so far everything was perfect.
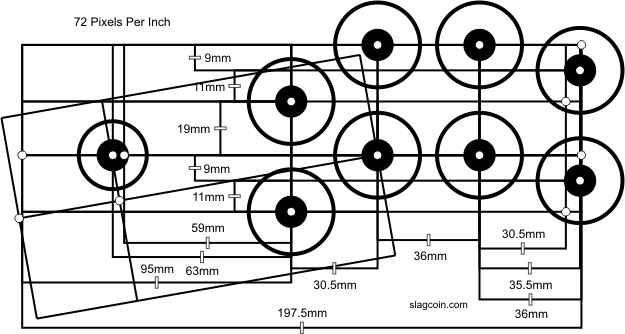
Now I needed to find the right box to mount the controls in. I looked around in the office and found one that looked like it would be perfect. Not too bulky, and a nice sturdy construction. It seemed to hold up to quite a bit of weight very well, and had a nice large surface. I browsed the control panel templates on slagcoin.com, and ended up choosing the Sega player 2 layout.
Right! So, positioned the template on the top panel and lightly cut through to mark the panel:


After that, removed the template and cut out the holes:

Popped the buttons in:


Not sure how well this would work with snap-ins -- I don't think the cardboard would hold them properly.
I used the original metal mounting plate that came with the JLF to mark the location for the four mounting screws -- if the cardboard had been any thicker I would have had to come up with something else, these screws are really short:

Of course the dustwasher covers up the rough hole and the screws anyway

LOVE THAT JLF SQUARE GATE

So here's the beautiful thing -- this particular box has a 'hinged' lid design, so it's super easy to pop it open and fiddle with the wiring if needed.
Here's the male end of the PS2 cable wired to the terminal strip, and the joystick wiring harness and buttons all wired up. The spare button is wired for 'Start', not sure yet if I want to mount it on top or maybe on the side instead.

Closeup of the terminal strip, pretty basic stuff:

LOVE THOSE QD'S

Some companies charge extra for a hinged top and built-in storage, with the SanMitsuBoxGun, it's standard!

Full album on Flickr, if you want to see the full-res pics.
I now present:
SanMitsuBoxGun
- Sanwa JLF-TP-8YT joystick
- Seimitsu PS-14-GN pushbuttons (black/white plungers swapped)
- Cardboard box
Project: SanMitsuBoxGun
I had parts left over from a previous custom-built joystick that I ended up scrapping because I didn't like it. Now with the recent acquisition of a Neo Geo MV1F motherboard, I was extra motivated to build a 4-button stick to use with my Vogatek supergun (Mark II).
I also have a couple of other PCBs (Strikers 1945 and Stider Hiryu 2), so I didn't want to build the stick with a DB15 connector that would only work with the MV1F. And I needed to accomodate 10 lines in total -- 4 joystick directions, 4 buttons, Start and ground.
After some digging around in my bits n pieces drawers, I found a PS2 extension cable. Hmm 9 pins ... but wait! I opened up the connector housing (not an easy thing to do btw), and discovered (with the assistance of a multimeter) that there are basically two grounds -- one of the pins is wired in series with a small metal contact on top of the connector, which I assume is a common ground.
So I snipped the small jumper wire connecting the two, and now I had 10 separate lines! I cut the cable about 5-6" from the female side, stripped some of the insulation back and connected the 9 wires and the ground to the terminals on the Vogatek. Then I took the male side and did the same thing to a terminal block. I checked everything for continuity with my multimeter as I went, and so far everything was perfect.
Now I needed to find the right box to mount the controls in. I looked around in the office and found one that looked like it would be perfect. Not too bulky, and a nice sturdy construction. It seemed to hold up to quite a bit of weight very well, and had a nice large surface. I browsed the control panel templates on slagcoin.com, and ended up choosing the Sega player 2 layout.
Right! So, positioned the template on the top panel and lightly cut through to mark the panel:
After that, removed the template and cut out the holes:
Popped the buttons in:
Not sure how well this would work with snap-ins -- I don't think the cardboard would hold them properly.
I used the original metal mounting plate that came with the JLF to mark the location for the four mounting screws -- if the cardboard had been any thicker I would have had to come up with something else, these screws are really short:
Of course the dustwasher covers up the rough hole and the screws anyway
LOVE THAT JLF SQUARE GATE
So here's the beautiful thing -- this particular box has a 'hinged' lid design, so it's super easy to pop it open and fiddle with the wiring if needed.
Here's the male end of the PS2 cable wired to the terminal strip, and the joystick wiring harness and buttons all wired up. The spare button is wired for 'Start', not sure yet if I want to mount it on top or maybe on the side instead.
Closeup of the terminal strip, pretty basic stuff:
LOVE THOSE QD'S
Some companies charge extra for a hinged top and built-in storage, with the SanMitsuBoxGun, it's standard!
Full album on Flickr, if you want to see the full-res pics.
-
Korszca

- Posts: 152
- Joined: Wed Mar 23, 2011 3:08 pm
- Location: Capital District, NY
Re: Project: SanMitsuBoxGun
The JLF really stays put with only those 4 screws?
-
kernow

- Posts: 1225
- Joined: Mon May 26, 2008 8:26 pm
- Location: Plymouth, Devon, UK
Re: Project: SanMitsuBoxGun
Wheres the supergun bit? Looks like you just cut some holes and popped some buttons in. Sounds like the first time you've seen joysticks and buttons too going by your post 
-
emphatic

- Posts: 8037
- Joined: Mon Aug 18, 2008 3:47 pm
- Location: Alingsås, Sweden
- Contact:
Re: Project: SanMitsuBoxGun
Looks like you've found a nice box! Protip: put some stuff inside that's roughly the same inner height as your box to support the weight of your hands. You could make some "pillars" out of empty toilet paper rolls for example.
 | My games - http://www.emphatic.se
RegalSin wrote:Street Fighters. We need to aviod them when we activate time accellerator.
-
yosai

- Posts: 274
- Joined: Wed Jun 11, 2008 9:37 pm
- Location: London

-
shmuppyLove
- Posts: 3708
- Joined: Thu Apr 07, 2011 1:44 pm
- Location: Toronto
Re: Project: SanMitsuBoxGun
Heh no it's not the first time, as I mentioned the parts are out of another stick I built:kernow wrote:Wheres the supergun bit? Looks like you just cut some holes and popped some buttons in. Sounds like the first time you've seen joysticks and buttons too going by your post

Which later became this (removed the PCB and wired to an HD15 connector):

I was using this with my supergun for a bit (wired up another HD15 connector to the supergun, then was using a VGA cable), and also with the original PS2/USB PCB, but it was too bulky and heavy.


That PCB recently went into a Hori Tekken 6 PS3 joystick that I got cheap off eBay because it wasn't working. Well, it's working much better now, but the buttons are complete shit so they have to go. The stick I can live with for now, but I'd like to replace with an LS-33 eventually.


Here's the PS2 cable wired to the Vogatek:

And a while ago I got two SNES Super Advantage joysticks, and decided to mod one of them with a RetroKit from RetroZone

http://www.retrousb.com/product_info.ph ... ucts_id=44
-
shmuppyLove
- Posts: 3708
- Joined: Thu Apr 07, 2011 1:44 pm
- Location: Toronto
Re: Project: SanMitsuBoxGun
It does, surprisingly. The box is very sturdy, and I made sure not to position it too close to the edge.Korszca wrote:The JLF really stays put with only those 4 screws?
If I had screws long enough, I think I would have preferred to put the mounting plate underneath the panel. But then the stick would be mounted a bit lower, and the height it's at right now is perfect.
-
shmuppyLove
- Posts: 3708
- Joined: Thu Apr 07, 2011 1:44 pm
- Location: Toronto
Re: Project: SanMitsuBoxGun
I thought that I might have to initially, but the "flaps" at the sides really seem to add a lot of rigidity to the box. Time will tell!emphatic wrote:Looks like you've found a nice box! Protip: put some stuff inside that's roughly the same inner height as your box to support the weight of your hands. You could make some "pillars" out of empty toilet paper rolls for example.
-
emphatic
- Posts: 8037
- Joined: Mon Aug 18, 2008 3:47 pm
- Location: Alingsås, Sweden
- Contact:
Re: Project: SanMitsuBoxGun
So the PS2 extension cord has 10 wires inside? I think I have at least one of those laying around doing nothing, should be perfect for my Vogatek MK III.  Do you have any more pictures of the innards and how did you pry it open?
| My games - http://www.emphatic.seRegalSin wrote:Street Fighters. We need to aviod them when we activate time accellerator.
-
emphatic
- Posts: 8037
- Joined: Mon Aug 18, 2008 3:47 pm
- Location: Alingsås, Sweden
- Contact:
Re: Project: SanMitsuBoxGun
Or just add microswitches with the small blade, like these:shmuppyLove wrote:The stick I can live with for now, but I'd like to replace with an LS-33 eventually.

http://www.arcadeshop.de/Microswitches- ... a_525.html
I put those along with a JLW spring into my HORI stick and it almost feels like an LS-32 now.

Ignore the SANWA gate and custom parts, just look at the switches proximity to the actuator.
| My games - http://www.emphatic.seRegalSin wrote:Street Fighters. We need to aviod them when we activate time accellerator.
-
shmuppyLove
- Posts: 3708
- Joined: Thu Apr 07, 2011 1:44 pm
- Location: Toronto
Re: Project: SanMitsuBoxGun
I have lots of pictures of the innardsemphatic wrote:So the PS2 extension cord has 10 wires inside? I think I have at least one of those laying around doing nothing, should be perfect for my Vogatek MK III.


In the 2nd one especially, you can see how the brown wire is connected to one of the pins, and then to the small metal tab on top, which is the 'bare' wire in this pic:

So if you include that bare wire (which is insulated at the connected ends, but not inside the cable itself), you have 10 wires in total. But you have to snip the small jumper wire connecting that pin to the metal tab, otherwise that pin will be connected to ground all the time, which you obviously don't want.
I'm not sure the best way to open the connector housing ... I just used the small blade on my Swiss Army knife to pry it open. It wasn't easy, I'm surprised it didn't crack at all, but luckily the plastic flexed quite a bit.
-
emphatic
- Posts: 8037
- Joined: Mon Aug 18, 2008 3:47 pm
- Location: Alingsås, Sweden
- Contact:
Re: Project: SanMitsuBoxGun
Thanks!
| My games - http://www.emphatic.seRegalSin wrote:Street Fighters. We need to aviod them when we activate time accellerator.
-
shmuppyLove
- Posts: 3708
- Joined: Thu Apr 07, 2011 1:44 pm
- Location: Toronto
Re: Project: SanMitsuBoxGun
Just to make Kernow happy, here is the supergun inside:

-
emphatic
- Posts: 8037
- Joined: Mon Aug 18, 2008 3:47 pm
- Location: Alingsås, Sweden
- Contact:
Re: Project: SanMitsuBoxGun
To make him happy you should post a picture of your Vogatek running off a proper JAMMA power supply.shmuppyLove wrote:Just to make Kernow happy, here is the supergun inside:
| My games - http://www.emphatic.seRegalSin wrote:Street Fighters. We need to aviod them when we activate time accellerator.
-
bencao74

- Posts: 328
- Joined: Mon Aug 30, 2010 9:49 am
- Contact:
Re: Project: SanMitsuBoxGun
this thread just made my day, thx
-
kernow
- Posts: 1225
- Joined: Mon May 26, 2008 8:26 pm
- Location: Plymouth, Devon, UK
Re: Project: SanMitsuBoxGun
Its not got any power supply and how are you going to connect it to PCBs with it just floating around in there?shmuppyLove wrote:Just to make Kernow happy, here is the supergun inside:
-
shmuppyLove
- Posts: 3708
- Joined: Thu Apr 07, 2011 1:44 pm
- Location: Toronto
Re: Project: SanMitsuBoxGun
LOL well, unfortunately because it's a Vogatek it uses an ATX power supply. I suppose I could still grab a real PSU and slap a 20-pin molex connector on itemphatic wrote:To make him happy you should post a picture of your Vogatek running off a proper JAMMA power supply.shmuppyLove wrote:Just to make Kernow happy, here is the supergun inside:
-
shmuppyLove
- Posts: 3708
- Joined: Thu Apr 07, 2011 1:44 pm
- Location: Toronto
Re: Project: SanMitsuBoxGun
I'm planning on testing it later today with my Strider Hiryu 2 board. Will post picskernow wrote:Its not got any power supply and how are you going to connect it to PCBs with it just floating around in there?shmuppyLove wrote:Just to make Kernow happy, here is the supergun inside:
http://farm7.static.flickr.com/6212/630 ... 998bee.jpg
Last edited by shmuppyLove on Thu Nov 03, 2011 2:30 pm, edited 1 time in total.
-
emphatic
- Posts: 8037
- Joined: Mon Aug 18, 2008 3:47 pm
- Location: Alingsås, Sweden
- Contact:
Re: Project: SanMitsuBoxGun
This is what I did:


| My games - http://www.emphatic.seRegalSin wrote:Street Fighters. We need to aviod them when we activate time accellerator.
-
shmuppyLove
- Posts: 3708
- Joined: Thu Apr 07, 2011 1:44 pm
- Location: Toronto
Re: Project: SanMitsuBoxGun
Yup, exactly what I was thinking. Hmm then I could get a G-Net board as well ...emphatic wrote:This is what I did:
http://www.emphatic.se/supergun/power_on.jpg
http://www.emphatic.se/supergun/PSU.jpg
-
shmuppyLove
- Posts: 3708
- Joined: Thu Apr 07, 2011 1:44 pm
- Location: Toronto
Re: Project: SanMitsuBoxGun
Woot, Strider Hiryu 2:


I keep meaning to try the s-video out on the Vogatek, but even the composite looks very good. Just wish my TV had some fine tuning controls.
I keep meaning to try the s-video out on the Vogatek, but even the composite looks very good. Just wish my TV had some fine tuning controls.
-
Estebang
- Posts: 1437
- Joined: Sat Oct 17, 2009 8:22 pm
Re: Project: SanMitsuBoxGun
Only four buttons? You're screwed for Daioh and most Capcom fighters.
-
shmuppyLove
- Posts: 3708
- Joined: Thu Apr 07, 2011 1:44 pm
- Location: Toronto
Re: Project: SanMitsuBoxGun
Well the Vogatek is "optimized" for four buttons, and at the moment I haven't got anything that needs more.Estebang wrote:Only four buttons? You're screwed for Daioh and most Capcom fighters.
But yes, eventually I will probably add another 3 buttons. It's easy with the SanMitsuBoxGun! Just cut a couple more holes, pop those buttons in, and I'd probably build the kick harness from an ethernet cable.