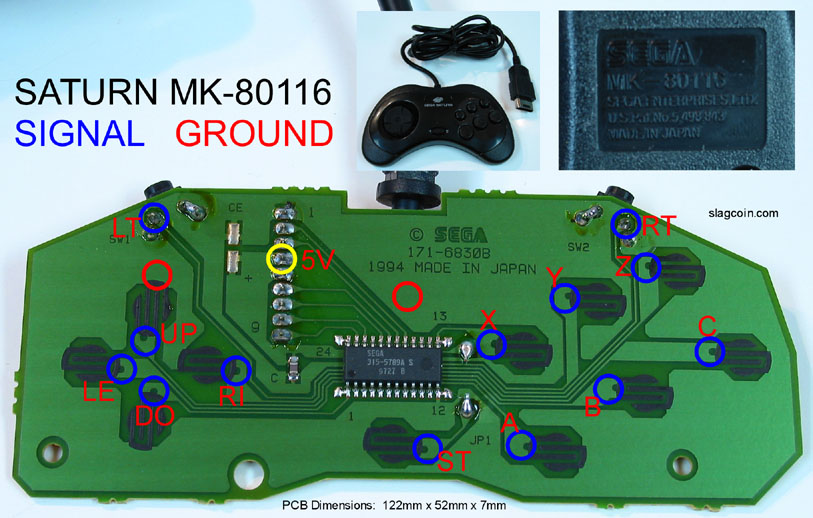
I just padhacked a model 2 controller (blasphemy, I had spares) last night. It wasn't that hard. Use these diagrams depending on what model controller you're using.
http://slagcoin.com/joystick/pcb_diagra ... agram1.jpg
http://slagcoin.com/joystick/pcb_diagra ... agram2.jpg
You want to scrape off some of the black conductant on each circled solder point with an exacto knife. What I did then was tin my wire (stranded works much better than solid for this) and also put solder directly on the pcb as best I could. Then I just bonded the tin wire to the board. After all the connections are made I would plug the controller in and make sure all the connections work. Once you're sure all the connections are good, cover all your solder points in hot glue. The connections will be pretty fragile otherwise.
From there you can either attach the wires directly to the buttons/stick via quick disconnects or hook them up to a terminal strip first. I'd reccomed that, so any stress put on the wires pulls on the terminal strip and not the pcb.
For getting parts, try Lizardlick. They're pretty good. Can get sticks/buttons/quick disconnects there. Just keep in mind, if you're using a joystick that isn't using a 5 pin harness, they require a larger sized quick disconnect than the buttons. I forgot that, and had to solder directly to the tabs on the stick.
Hope this helped.
