The 2plus is pretty good already. The signal is a bit less stable, but this eventually depends on the display the XRGB is used with. An advantage of the XRGB-3, even if you don't use upscaling to higher resolutions, is, that it accepts 480p from games which support it, so you don't have to switch cabling when playing a 480p PS2 game.
If you prefer the ultra-sharp upscaling of the XRGB-3's B0 mode and don't need/want scanline emulation, they - on the other hand - the XRGB-3 is considerably better.
XRGB-3
-
zap

- Posts: 153
- Joined: Sun Jan 06, 2008 5:31 pm
- Location: Sweden
- Contact:
Thanks guys. Might be obvious things for some people, but I'm still learning! So please forgive me if I have alot of questions. Just bought a XRGB-3 unit, so really looking forward to hooking up my retro games. Now I'm gonna try read the first 14 pages of this topic to see if I can learn/pick up some useful stuff. 
-
cvaniafan

- Posts: 447
- Joined: Thu Sep 25, 2008 11:03 pm
- Location: Франция !
zap wrote:Thanks guys. Might be obvious things for some people, but I'm still learning! So please forgive me if I have alot of questions. Just bought a XRGB-3 unit, so really looking forward to hooking up my retro games. Now I'm gonna try read the first 14 pages of this topic to see if I can learn/pick up some useful stuff.
Check Fudoh's page: http://retrogaming.hazard-city.de/
He wrote a very useful XRGB3 beginner's Guide
-
zap
- Posts: 153
- Joined: Sun Jan 06, 2008 5:31 pm
- Location: Sweden
- Contact:
Very good and helpful guide. Kudos to Fudoh and everyone involved for writing that up. Now I finally know what a D-terminal iscvaniafan wrote:Check Fudoh's page: http://retrogaming.hazard-city.de/
He wrote a very useful XRGB3 beginner's Guide
Think I'll use that for PS2 and Wii, and the scart socket for older stuff like PSX and Super Famicom. Just curious about the N64 and Saturn though. First, for the N64 I did the RGB mod a few years ago, but it caused the picture to get dark, and I didn't bother enchanting the scart lead with color booster. Would activating those resistors on the XRGB fix this, or would it be like Fudoh's PC-Engine problem. Anyone tried?
Secondly, for the Saturn I tried Google "saturn rgb" but that gives me both official RGB scart cables for it and various RGB mods. On some Japanese sites I've found that they use "pure RGB cables". Does this mean that official ones are just "fake" RGB?
Link
(Also note that he uses "pure RGB" for Super Famicom as well.)
-
Fudoh

- Posts: 13047
- Joined: Mon Mar 06, 2006 3:29 am
- Location: Germany
- Contact:
Saturn: there are original Sega RGB cables. I use them. They are available from Japan with japanese scart layout and from Europe with european layout. They work fine out of the box. They are "real" RGB cables.
N64: It all depends on the RGB cable and the color booster involved. In theory it works fine, but you might experience problems which need you to modify your cabling depending on your result. You have good chances that it will work right away, if you don't have a color booster. Still most Nintendo Scart cables had some capacitors inside the scart plug and those might cause problems.
Super Famicom is fine with the original Nintendo RGB scart cable (japanese layout).
-
zap
- Posts: 153
- Joined: Sun Jan 06, 2008 5:31 pm
- Location: Sweden
- Contact:
-
Konsolkongen

- Posts: 2400
- Joined: Fri May 16, 2008 8:28 pm
- Location: Denmark
My original EU RGB cable did not work with a Japanese console. I don't know if that applys when using a JAP cable on an EU console, but i thought i would mention that.Fudoh wrote:Saturn: there are original Sega RGB cables. I use them. They are available from Japan with japanese scart layout and from Europe with european layout. They work fine out of the box. They are "real" RGB cables.
Yea, Lords Of Thunder. Pretty basic gameplay and unfortunately way too easy even on super hard, but the Heavy Metal soundtrack is just amazing and its well worth picking up the game just for thatzap wrote: And now I know where your avatar is from, been curious about it for awhile
The Mega CD version of the game can also be used in a normal cd player, which is good if you like that kind of music, as much as i do
The guide for modding the RGB socket is coming along slowly. My desktop pc is having a problem with the fan on the GFX card so i don't have it on much these days. I should have it finished within a few days i hope.
-
Fudoh
- Posts: 13047
- Joined: Mon Mar 06, 2006 3:29 am
- Location: Germany
- Contact:
I have a japanese system (Hitachi) and it works fine with both the japanese and the european cable. Out of curisosity: do you have an original Sega RGB cable or a 3rd party cable ?My original EU RGB cable did not work with a Japanese console. I don't know if that applys when using a JAP cable on an EU console, but i thought i would mention that.
I've been playing in rather nonstop since it's release (nonstop in the sense of a few times per year). Probably my favorite non-score shmup.Yea, Lords Of Thunder. Pretty basic gameplay and unfortunately way too easy even on super hard, but the Heavy Metal soundtrack is just amazing
The PCE CD works as audio as well, just skip the 2nd track.The Mega CD version of the game can also be used in a normal cd player, which is good if you like that kind of music, as much as i do Smile
-
Konsolkongen
- Posts: 2400
- Joined: Fri May 16, 2008 8:28 pm
- Location: Denmark
Eventhough the gameplay is basic and its easy, its still a very solid shooter and fun to play. The soundtrack adds a lot to the game and thats probably the reason why i have played it many times since i bought it about 6 months ago.Fudoh wrote:Its an original. An unoriginal cable seemed to work fine although the picture quality was much worse. Might have been a problem with the JAP machine?I have a japanese system (Hitachi) and it works fine with both the japanese and the european cable. Out of curisosity: do you have an original Sega RGB cable or a 3rd party cable ?
I've been playing in rather nonstop since it's release (nonstop in the sense of a few times per year). Probably my favorite non-score shmup.
-
Fudoh
- Posts: 13047
- Joined: Mon Mar 06, 2006 3:29 am
- Location: Germany
- Contact:
@zap:
better get one of those for your Satan then:
http://img183.auctions.yahoo.co.jp/user ... c66475.jpg
They are not this hard to find and you can use them on your XRGB without any adapter(s).
better get one of those for your Satan then:
http://img183.auctions.yahoo.co.jp/user ... c66475.jpg
They are not this hard to find and you can use them on your XRGB without any adapter(s).

-
Konsolkongen
- Posts: 2400
- Joined: Fri May 16, 2008 8:28 pm
- Location: Denmark
I don't have a web page i can put the guide on so i'll just put it here:
To open the XRGB-3 remove the six screws at the bottom of the unit. The unit won't just pop open as its hold together by clips. So press here and you should be able to bend the side in and open it up:
http://i40.photobucket.com/albums/e236/ ... 1237392666
Now remove the thin cable that connects to the front panel. Its glued in for protection but it should be easy to rip it out of its socket.
This next picture should explain everything pretty good (i hope) otherwise feel free to ask. The first part shows the motherboard from above and the second part (with the squares) shows the motherboard from underneath:
http://i40.photobucket.com/albums/e236/ ... 1237399214
Start by cutting the pins except for 13, 15 and 21 all are on the bottom row, and then solder to the pins of the same color and/or mark on the bottom side, except for those that are marked with a blue line or a red cross, these should not be soldered to anything.
When you are done soldering you will have a lot of loose pins. These need to be glued in place so they wont get loose and short with pins they are not supposed to.
Double check it to make sure you did everything right and then glue right away. The pins look like they could be pushed out of the socket if you plug in a RGB cable so hot glue before testing the unit!
Hold the hot glue gun right above the pins and start gluing. We want the glue to enter from above so every pin in both rows are covered in it. Should something go wrong it should be possible to break the glue apart later.
Hopefully you should get something like this:
http://i40.photobucket.com/albums/e236/ ... 1237393303
Let me know of any mistakes in the guide if you come across something. Best of luck!
EDIT: I changed some colors in the drawing.
Last edited by Konsolkongen on Sat Mar 21, 2009 12:48 am, edited 6 times in total.
-
Fudoh
- Posts: 13047
- Joined: Mon Mar 06, 2006 3:29 am
- Location: Germany
- Contact:
-
Konsolkongen
- Posts: 2400
- Joined: Fri May 16, 2008 8:28 pm
- Location: Denmark
-
zap
- Posts: 153
- Joined: Sun Jan 06, 2008 5:31 pm
- Location: Sweden
- Contact:
Cool guide. Thanks for making it.
I just recieved mine today, and so far I'm happy with it. I don't have the USB-cable to update the firmware, but I played around with some settings. And made a quick comparison with my HD Box Pro, which I will most likely never set up again. Take note that I'm using both VL_H and VL_V to seting 199 in B1 mode here. Still trying stuff out until I find settings that I'm satisfied with. Will probably post more pictures later. Just wanted to say thanks to everyone for always quick replies and help.
(Click to enlarge)

-
Fudoh
- Posts: 13047
- Joined: Mon Mar 06, 2006 3:29 am
- Location: Germany
- Contact:
-
Konsolkongen
- Posts: 2400
- Joined: Fri May 16, 2008 8:28 pm
- Location: Denmark
-
zap
- Posts: 153
- Joined: Sun Jan 06, 2008 5:31 pm
- Location: Sweden
- Contact:
For that moment, I was just playing around with settings and I liked it. After playing some, I do see what's there to not like about it. Especially on the "?" box you can see this.Fudoh wrote:Explain to me why you're using the VL_H setting (vertical interference stripes) ? I mean, I see what it does, but I can't understand what's to like about it ?


-
Fudoh
- Posts: 13047
- Joined: Mon Mar 06, 2006 3:29 am
- Location: Germany
- Contact:
-
Konsolkongen
- Posts: 2400
- Joined: Fri May 16, 2008 8:28 pm
- Location: Denmark
Yes. I'm in B1 mode as we speak and i tried to shoot a video of it with my phone but as expected it won't show in the video. Its not much really, but i just don't like that its there. There is an unstable picture when using VGA in B0 mode too, although i think its worse in B1.
The Dreamcast has a rocksolid picture with VGA so i doubt it has anything to do with my tv.
Anyway its in B1 mode now and i'm planning to use that for a while. Hopefully i will come to like it.
The Dreamcast has a rocksolid picture with VGA so i doubt it has anything to do with my tv.
Anyway its in B1 mode now and i'm planning to use that for a while. Hopefully i will come to like it.
-
Konsolkongen
- Posts: 2400
- Joined: Fri May 16, 2008 8:28 pm
- Location: Denmark
No wait it IS my tv the same thing actually happens on Dreamcast.
My tv does this annoying thing with a VGA in signal in 640x480 it seems. The picture seems to be devided into vertical lines about 5cm each and whitin every second of these the picture is softer than the other one. Thats what it looks like on DC. Here it seems that within the uneven lines the picture is less stable and shakes a bit. The sharpness looks the same though...
If i adjust the phase option on my tv i can move the lines to the left or right of the screen but never remove them as they are all over the screen. Thats how i noticed that it was the TV's fault in the XRGBs case too.
Here is a drawing of the screen:
http://i40.photobucket.com/albums/e236/ ... 1237646676
The blue lines are supposed to be the FU lines that causes a softer picture in DC and an unstable picture in XRGB.
Can i do anything about this? I have tried every option on my tv and nothing helps.
My tv can accept normal PC input through HDMI, how likely is it that it will accept VGA with an adaptor cable?
-
Fudoh
- Posts: 13047
- Joined: Mon Mar 06, 2006 3:29 am
- Location: Germany
- Contact:
@Konsolkongen: the VGA phase settings should get rid of this. Do you have an automatic setting (auto adjust) on your TV ? If yes, trying to do it with some other screen content. It might react differently depending on what is displayed right now.
@zap: your screenshots show heavy moire pattern, so I cannot really judge which effect's coming from your digicam and what's added by the XRGB-3. I've thrown in Gradius III to make the shots comparable and I still can't understand how anybody can honestly use the VL_H option. Here are my shots:
B1 - VL_H 255, VL_V 255 ->

B1 - VL_H 255, VL_V 175 (typical scanline setting) ->

B1 - VL_H 175 (interference pattern), VL_V 255 ->
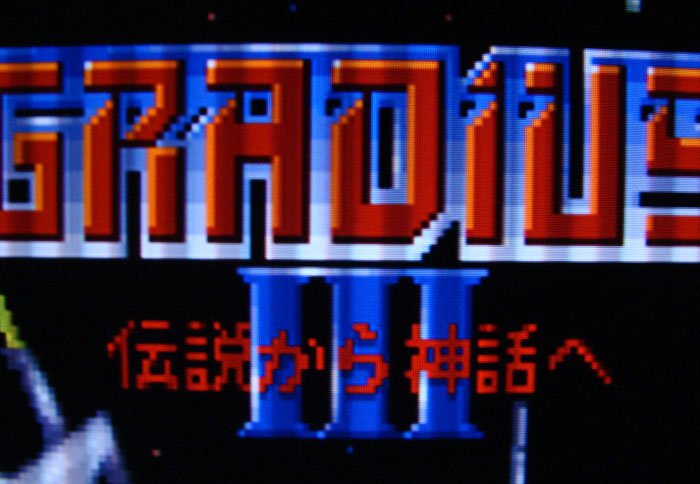
B1 - VL_H 175 (interference pattern), VL_V 175 (scanlines) ->
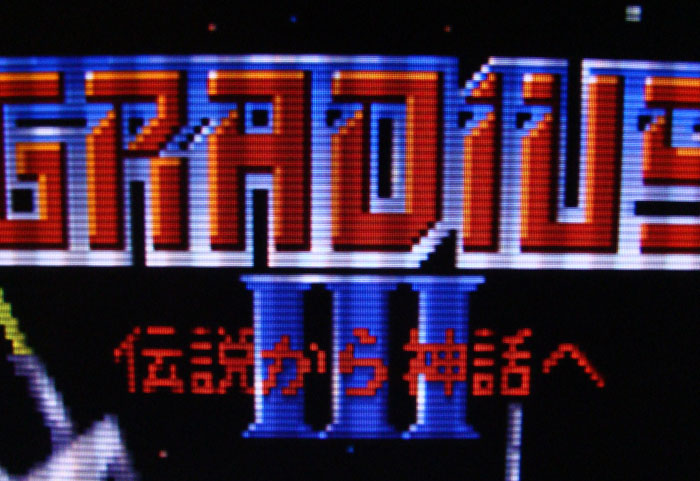
B1 - VL_H 175 (interference pattern), VL_V 255 ->
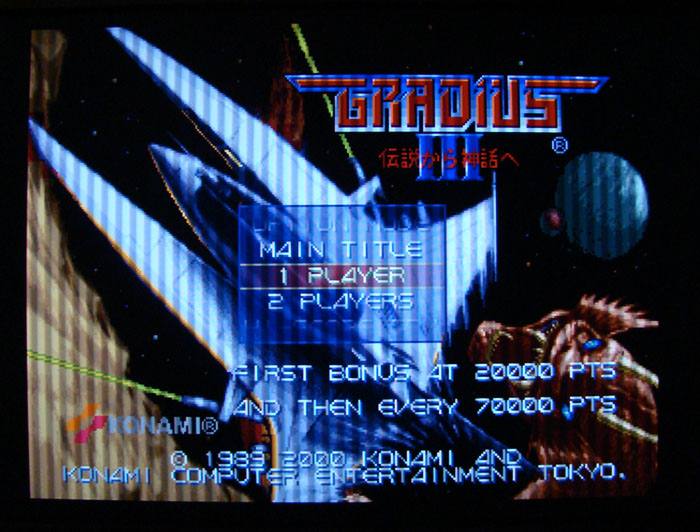
Maybe I'm just missing something here, but I've never seen a CRT which showed anything like it's done by the VL_H option (?!)
@zap: your screenshots show heavy moire pattern, so I cannot really judge which effect's coming from your digicam and what's added by the XRGB-3. I've thrown in Gradius III to make the shots comparable and I still can't understand how anybody can honestly use the VL_H option. Here are my shots:
B1 - VL_H 255, VL_V 255 ->
B1 - VL_H 255, VL_V 175 (typical scanline setting) ->
B1 - VL_H 175 (interference pattern), VL_V 255 ->
B1 - VL_H 175 (interference pattern), VL_V 175 (scanlines) ->
B1 - VL_H 175 (interference pattern), VL_V 255 ->
Maybe I'm just missing something here, but I've never seen a CRT which showed anything like it's done by the VL_H option (?!)
-
Fudoh
- Posts: 13047
- Joined: Mon Mar 06, 2006 3:29 am
- Location: Germany
- Contact:
-
Konsolkongen
- Posts: 2400
- Joined: Fri May 16, 2008 8:28 pm
- Location: Denmark
The phase setting only moves the unstable areas around it never improves it. I have tried auto adjustment in a lot of different games now and it newer helpsFudoh wrote:@Konsolkongen: the VGA phase settings should get rid of this. Do you have an automatic setting (auto adjust) on your TV ? If yes, trying to do it with some other screen content. It might react differently depending on what is displayed right now.
-
Fudoh
- Posts: 13047
- Joined: Mon Mar 06, 2006 3:29 am
- Location: Germany
- Contact:
If you don't mind the extra money, you could try a simple VGA to HDMI converter (around $40 on ebay). There's no such thing as a bad phase or pixelclock on HDMI and can't think of any problems involved. I've tried the same with the Gefen VGA to HDMI converter I have and it works fine, but it's hard to say the same about other displays without trying them...
-
Konsolkongen
- Posts: 2400
- Joined: Fri May 16, 2008 8:28 pm
- Location: Denmark