Do VGA to RGB adapters exist?
-
8 1/2

- Posts: 1014
- Joined: Tue Mar 29, 2005 10:51 am
- Location: Los Angeles, CA
- Contact:
Do VGA to RGB adapters exist?
I got a big old crt monitor from work for free, but when I got home I realized that my supergun has a totally different pin-out. It's thinner and longer than a vga port, and looks to have only two rows of pins instead of the three on vga. Is that just simply called "RGB" because I keep finding pics of monitors with scart connnetions when I search for it.
FULL LOCK is BOMB
-
PC Engine Fan X!
- Posts: 9784
- Joined: Wed Jan 26, 2005 10:32 pm
How about describing the brand name and manufacturer of your old CRT monitor first? And providing a pic of said RGB input would help out even more for your fellow shmuppers to mull over and try to help out.
If your Supergun does have RGB output, then matching Red, Green, Blue, Sync and Ground lines from it to said CRT monitor shouldn't be a problem. The trick to find the proper pinout of said RGB input though on the CRT monitor though. ^_~
PC Engine Fan X! ^_~
If your Supergun does have RGB output, then matching Red, Green, Blue, Sync and Ground lines from it to said CRT monitor shouldn't be a problem. The trick to find the proper pinout of said RGB input though on the CRT monitor though. ^_~
PC Engine Fan X! ^_~
Last edited by PC Engine Fan X! on Thu Aug 07, 2008 6:25 pm, edited 1 time in total.

-
8 1/2
- Posts: 1014
- Joined: Tue Mar 29, 2005 10:51 am
- Location: Los Angeles, CA
- Contact:
-
8 1/2
- Posts: 1014
- Joined: Tue Mar 29, 2005 10:51 am
- Location: Los Angeles, CA
- Contact:
-
8 1/2
- Posts: 1014
- Joined: Tue Mar 29, 2005 10:51 am
- Location: Los Angeles, CA
- Contact:
-
Icarus

- Posts: 7321
- Joined: Mon Jan 31, 2005 2:55 am
- Location: England
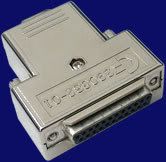
Is this what it looks like?
How many pins does it take?
If it is 23pin apparently these guys have a convertor to a VGA standard connector in stock.
How many pins does it take?
If it is 23pin apparently these guys have a convertor to a VGA standard connector in stock.

-
8 1/2
- Posts: 1014
- Joined: Tue Mar 29, 2005 10:51 am
- Location: Los Angeles, CA
- Contact:
-
cody

- Posts: 274
- Joined: Fri Mar 25, 2005 7:52 am
- Location: Texas
-
sven666

- Posts: 4545
- Joined: Wed Feb 02, 2005 2:04 am
- Location: sweden
- Contact:
i have the same type of supergun, a regular adapter wont do as there is some fuss with the way the sync is drawn from the supergun aswell.8 1/2 wrote:It turns out that on the supergun it's 8 pins across on top and 7 on the bottom, for 15 total.
The monitor is an old NEC Multisync FE 1250, which uses a vga cable just like the standard PC ones. The supergun is the weirdo.
not sure what the solution to teh problem is but if you find out do post it as id love to get mine working aswell
the destruction of everything, is the beginning of something new. your whole world is on fire, and soon, you'll be too..
-
PC Engine Fan X!
- Posts: 9784
- Joined: Wed Jan 26, 2005 10:32 pm
Ah yes, since I have a Matt Ross Supergun Special, he would use such a DB-15 pinout for analog RGB output on his superguns.
I would have to go look for the Matt's Supergun instruction manual that does list pinout specs on it and report back as to what pins the five common signals for RGB are.
PC Engine Fan X! ^_~
I would have to go look for the Matt's Supergun instruction manual that does list pinout specs on it and report back as to what pins the five common signals for RGB are.
PC Engine Fan X! ^_~
-
8 1/2
- Posts: 1014
- Joined: Tue Mar 29, 2005 10:51 am
- Location: Los Angeles, CA
- Contact:
-
PC Engine Fan X!
- Posts: 9784
- Joined: Wed Jan 26, 2005 10:32 pm
Any good analog CRT-based RGB monitor will do the trick. The real question is how big of a monitor screen do you want?
The Mitsubishi Diamondscan RGB monitors are very nice with both RGB & VGA inputs. I've played the Sega Naomi game of Super Monkey Ball on a 32" Diamondscan monitor and the graphical presentation was breathlessly beautiful and jaw dropping. All this goodness running at arcade spec framerate of 60fps...no shit.
If you want a 29" sized one, then an NEC XM-29 RGB monitor will do very nicely. It would be in the same class spec as a 29" Nanao monitor endowed Taito Egret II cabinet setup with 27" viewable space-wise for image purposes.
If you want something smaller, then a 19" or 20" Sony PVM monitor would be something to consider. If the Sony RGB monitor has a dedicated 8-pin input port, then it's ready for arcade RGB signal input.
Those versatile 14" Amiga 1080 and 1084S monitors are great for playing with arcade PCBs and have the authentic scan lines present. A 1084S has all the necessary user controls to adjust the screen settings to your liking...plan on spending no more than $30-40 USD for one.
The smallest analog CRT-based RGB monitors I've seen are the Sony Trinitron class 9" CPD-9000 series -- the Neo-Geo MVS games looking super sharp and crystal clear on it when using RGB output from a Matt Ross supergun setup via a custom-made RGB cable, of course. ^_~
PC Engine Fan X! ^_~
-
8 1/2
- Posts: 1014
- Joined: Tue Mar 29, 2005 10:51 am
- Location: Los Angeles, CA
- Contact:
-
PC Engine Fan X!
- Posts: 9784
- Joined: Wed Jan 26, 2005 10:32 pm
-
8 1/2
- Posts: 1014
- Joined: Tue Mar 29, 2005 10:51 am
- Location: Los Angeles, CA
- Contact:
-
undamned

- Posts: 3273
- Joined: Sat Jan 29, 2005 9:27 am
- Location: Phoenix
I can make you a cable, doood. Just get me the pinout of that whacky supergun o' yours (probably some other kids here still have their manual from the thing).
Here are some monitor lists for 15kHz monitors (low rez. RGB, i.e. what your supergun puts out):
http://forum.arcadecontrols.com/index.php?topic=81249.0
http://www.msxpro.com/mon15khz.html
-ud
Here are some monitor lists for 15kHz monitors (low rez. RGB, i.e. what your supergun puts out):
http://forum.arcadecontrols.com/index.php?topic=81249.0
http://www.msxpro.com/mon15khz.html
-ud
Righteous Super Hero / Righteous Love
-
8 1/2
- Posts: 1014
- Joined: Tue Mar 29, 2005 10:51 am
- Location: Los Angeles, CA
- Contact:
Sweet. Yeah, I'm not sure I even got a manual from good old Matt.
I definitely want a big tate-able, hopefully flat-ish monitor. Time to do some shopping. I used to not care so much, and the S-Video has gotten me by for years, but after getting an HDTV that does 1080p it's hard to sit in front of that old tv I use for verts and not wish it was something a bit better, especially when that potential is right there in the box.
I definitely want a big tate-able, hopefully flat-ish monitor. Time to do some shopping. I used to not care so much, and the S-Video has gotten me by for years, but after getting an HDTV that does 1080p it's hard to sit in front of that old tv I use for verts and not wish it was something a bit better, especially when that potential is right there in the box.
FULL LOCK is BOMB
-
PC Engine Fan X!
- Posts: 9784
- Joined: Wed Jan 26, 2005 10:32 pm
Matt Ross' Supergun pinouts for RGB + Joysticks + manual
For 8 1/2,
Okay, here's the moment you've waiting for...the RGB outputs of your supergun:
RGB out:
Using a DB-15 Female connection interface (sample ASCII art presented below to illustrate the described pinouts in greater detail)
8 <--------------- 1
---------------------
\ o o o o o o o o /
. \ o o o o o o o /
... ---------------
15 <--------- 9
1 - Red
2 - Green
3 - BLue
4 - Luma (S-Vid or S-Video)
5 - Chroma (S-Vid or S-Video)
6 - N/C (Not Connected)
7 - Composite Sync
8 - Composite Video
9 - N/C
10 - N/C
11 - N/C
12 - N/C
13 - N/C
14 - +5 volts
15 - GND (Ground)
--------------------------
The Joystick Input is listed as follows:
Using a DB-15 Male connection interface (sample ASCII art presented below to illustrate the described pinouts in greater detail)
1 -------------------> 8
---------------------
\ o o o o o o o o /
. \ o o o o o o o /
... ---------------
9 ---------------> 15
1 - GND (Ground)
2 - Button 5
3 - Coin
4 - Button 4 (Neo-Geo MVS usage only)
5 - Button 2
6 - Right (Digital Pad or Joystick Input)
7 - Down (Digital Pad or Joystick Input)
8 - +5 volts
9 - N/C (Not Connected)
10 - Button 6
11 - Start
12 - Button 3
13 - Button 1
14 - Left (Digital Pad or Joystick Input)
15 - Up (Digital Pad or Joystick Input)
The two different 5mm x 20mm fuses that are installed in Matt Ross' Superguns are the "fast blow acting" type of fuses and are rated at 7amps and 2amps respectively.
The Supergun is fuse-protected, to prevent damage in case the arcade PCB draws too much power for whatever reason. The 2-amp fuse protects the +12-volt line, while the 7-amp protects the +5v line. Make sure to only replace with the same type and rating of fuse (that previous statement is very true -- I've had to go to my local Radio Shack and buy some replacement 5x20mm sized fuses since the one inside blew because of an accidental line connection which resulted in both the Supergun and PCB not powered up even if it was turned on).
The four push buttons on the front of the Supergun are listed in the following order working from the top towards the bottom:
Button #1 - Test Button
Button #2 - Service Button
Button #3 - Tilt Button (is included for completeness but is really useless)
Button #4 - Select Button (is used to switch between the different Neo-Geo MVS carts on a MVS multiboard setup, is useless on a single MVS cart based motherboard such as the original MVS MV-1 mobo)
--------------------------------------------------------------------------
Here's the Matt Ross Supergun instruction manual in it's entirety:
--------------------------
Jamma Test Rig
Owner's Manual
Table of Contents:
1.) - Introduction
2.) - Set contents
3.) - Operator Controls
4.) - Player Controls
5.) - Video
6.) - Audio
7.) - Fuses
8.) - Operation
9.) - Misc. Stuff
1.) Introduction
Congrats! You're the owner of brand new Jamma test rig, AKA Supergun. Using this device, you will be able to run and play JAMMA-compatible arcade PCBs through your television set or RGB monitor.
Please note that this device was made entirely by hand, and therefore it may be a little rough around the edges in some spots. You may wish to create labels for the switches; I've left them blank, so the style is entirely up to you.
2.) Contents of set
Included in your set:
Jamma test console
A/C power cable
Composite Video cable
2 control pads
Joystick extension cables (two)
3.) Operator controls
The Supergun console is equipped for all operator inputs of a standard Jamma cabinet: test, service, and tilt switches.
Test - The test switch, depending on the PCB, can serve a number of functions. Often pressing it will open up a test screen, where you can test player controls, video levels, etc. On some boards, this is where you change game settings as opposed to DIP switches.
Service - The service switch acts as an auxiliary coin input. This is so an arcade operator or arcade technician can test an arcade cabinet or PCB without inserting a coin. In a home setup, it's rather redundant, but it's included for completeness.
Tilt - The tilt switch doesn't really serve a purpose. Most boards won't use it, but some of them might do something interesting if you press it. Who knows?
Select - The Select switch is used only on Neo-Geo multi-slot boards. It's used to select between the available cartridges.
4.) Player Controls
The console is equipped with joystick ports and start/credit buttons for each player. The start and coin buttons are also mapped to the controllers, so you may not need to use them. Pressing the coin button simulates a coin being inserted in the respective coin slot. If the board is set to "Free Play", the coin buttons won't do anything and the machine will effectively have unlimited credits loaded (some Cave arcade shmup PCBs such as the early ones don't have such a "Free Play" mode and you will have to hit the coin button to register such credits up to 9 credits maximum - Don Pachi, DoDonpachi, Dangun Feveron, & Guwange PCBs).
Input for the player controls is provided via 2 Neo-Geo style DB-15 connectors. I've made the joystick ports compatible with Neo-Geo AES sticks, so if you happen to find one, it will work perfectly. Likewise, the pads provided will work in a Neo-Geo Advanced Entertainment System (AES) console with some slight alteration to the plugs (however, autofire won't work).
The button layout of the controllers is as follows:
Saturn D-pad controls ---- Arcade control panel
-------------------------------------------------------------------------
Left --- --- Left
Right --- --- Right
Up --- --- Up
Down --- --- Down
A button --- --- Button 1
B button --- --- Button 2
C button --- --- Button 3
X button --- --- Button 1 (no autofire)
Y button --- --- Button 2 (no autofire)
Z button --- --- Button 4 (Neo-Geo MVS only)
L button --- --- Coin
R button --- --- Button 3 (no autofire)
Start --- --- Start
Autofire switches are located in the center of the controller. Up is rapid-fire, down is standard. Keeping in mind that many games will require both rapid button presses and charge shots where the fire button is held down to excute them, buttons X, Y, and R are duplicates of buttons 1, 2, and 3 respectively. This will easily allow you to use both types of shots if needed.
5.) Video
The Supergun has outputs for composite, S-Video and RGB video. (On some of Matt's later 3rd generation produced superguns, they also have Component Video outputs as well, mine is an older one and it only outputs in Composite Video, S-Video and RGB only.) To use any of the video modes, simply connect the unit to your monitor via appropiate cable. Please note that composite and S-Video are both a step down in quality from the PCB's RB output, and therefore you may see a fair deal of colour distortion, dot crawl, etc. S-Video will give a much cleaner picture, and is recommended if supported by your monitor.
Different arcade game PCBs can differ slightly in their video output levels, so you may wish to adjust your monitor/TV's brightness and colour saturation on certain boards. The default setting should work fine for most PCBs.
For best image quality, an analog CRT-based RGB monitor is recommended.
6.) Audio
Sound is provided by an internal speaker setup, and there is also a set of Right and Left RCA phono jacks in case you wish to connect your own speakers to it. The internal speakers gives very satisfactory sound (indeed, it's comparable to what you'd hear from a typical arcade gane cabinet setup using such 20watt to 30watt speakers), but if you have a good set of speakers, you should be able to get nicer sound!
NOTE: Do NOT run the audio out from the Supergun through a stereo, amplified computer speakers, or any other amplifying device. The sound output of Jamma boards is already amplified: doing so can damage your stereo system, speakers, or PCB. Most likely it will just blow a fuse. Jamma boards are meant to be connected directly to speakers, with no further amplification needed.
You can use any standard speaker -- if you have an old stereo, boom box, etc. kicking around, you could use the speakers from it. Use 8 ohm speakers for best results! Computer speakers probably won't work -- headphones should, but make to sure to turn the volume on the PCB all the way down so as not to hurt your ears. (I use a pair of Sony stereo bookshelf speakers rated at 100w at 8 ohms and it sounds great!)
There are two switches on the back of the Supergun. The top switch will disable the internal speakers. Switch it to the down position to turn the sound off.
The bottom switch will select between stereo and mono sound. This is really only for use with Neo-Geo MVS motherboards; most boards which do provide stereo don't do it in the same manner as the MVS. If you do have a MVS mobo, flip the switch down for stereo sound. Needless to say, the internal speaker setup will still be presented in mono. (The best way to get stereo output from a MVS mobo is to directly hook up a pair of speakers to the stereo output located on the mobo itself for best results -- and be sure to flip the stereo switch setting to stereo as well.)
90% of Jamma PCBs only have monaural sound output, so you'll probably just be leaving it in mono for the most part.
Many stereo boards (e.g. Capcom CPS2, Sega Titan ST-V, Taito G-Net, MVS, Konami, Sega Naomi etc.) have a seperate audio connector; in this case, it's best to run the audio straight from the PCB to your sound system. You'll probably get better sound this way.
Arcade boards typically have the volume controlled by a small potentiometer on the board itself. Most are easily adjustable by hand, but in some cases, you may need a small screwdriver.
7.) Fuses
The Supergun is fused-protected, to prevent damage in case the PCB draws too much power for whatever reason. The 2-amp fuse protects the +12 volt line, while the 7-amp fuse protects the +5 volt line. Make sure to replace with the same type and rating of fuse. (You would need to buy both 2-amp & 7-amp 5mm x 20mm international sized metric fuses if they blow. Buy such fast acting type fuses are recommended.)
8.) Now that you've read through all this boring stuff and caveats of certain death, it's now time to run everything.
Very simple, really. Just plug everything in with the included power cords, connect the video, and attach the speakers of your choice (or not). Now your're ready to plug in the arcade PCB. Make sure that your board is properly protected and insulated. I like to keep bare PCBs in anti-static poly bags, which protects them if they're out in the open and running. Make sure to handle them carefully, and avold static electricity at all costs. I've never had any static problems myself (knock on wood!), but do be careful. Don't put the board on a carpet, or any other place that might generate such static shock. Most definitely do not shuffle around on a rug wearing wool socks before you touch it.
Keep metal items away from PCBs that are powered up, as a careless placed metal object can cause a short and possibly kill a perfectly good working PCB.
The Jamma connector should be obvious -- it's the edge connector on the end of the big long colourful bundle of wires. Make sure that it is securely connected to your PCB, and turn on the power. As long as everything's set up properly, the game will start, and you'll be treated to the game's opening antics; this may include a memory check, regional warning (Not for use outside of Japan) etc.
Insert your coins, press Start, and play -- that's about it. When you're finished playing, just turn off the power switch and everything will shut down. Most boards will lose their high scores after the power's been switched off, unfortunately. (Some modern-day PCBs can save high scores via a back-up battery, huge capacitor or flash memory setup.)
9.) Misc stuff
Hope you enjoy everything! If you're into arcade-style gaming, this is the purest form of it. Doesn't get any better than this really; nothing's closer to the arcade than a real arcade board, no? Feel free to contact me if you want parts, service, extra joysticks, etc. If (God forbid!) something happens to the supergun, let me know and I'll see what I can do as far as fixing it up goes. While I'm not a business, and therefore, cannot offer a form of legal "warranty", I will stand by my work and, should any defect arise, I will repair the supergun free of charge.
My contact address:
Matt Ross
Honolulu, HI 96822
USA
--------------------------------------------------------------------------
PC Engine Fan X! ^_~
-
8 1/2
- Posts: 1014
- Joined: Tue Mar 29, 2005 10:51 am
- Location: Los Angeles, CA
- Contact: