My Guwange has Graphical Errors! HELP PLZ!!

The place for all discussion on gaming hardware
User avatar
califoreigner
Posts: 114
Joined: Sun Aug 14, 2005 11:10 pm

My Guwange has Graphical Errors! HELP PLZ!!

Post by califoreigner »

so i got this board recently. long story short- i already knew of the troubles w/ it, but couldn't resist the offer i received.

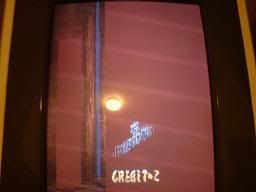
i noticed some chips had a liquid residue that had dried up around them. could this be a sort of acid burn-out? as far as the game fucntionality it plays fine, loads up and has sound like any other game, but it appears the background is completely missing. below are a few examples. i can provide pics of the board if need be. any help or suggestions on the route i should take would be greatly appreciated.

Image

Image


Image

:cry:
User avatar
robivy64
Posts: 899
Joined: Wed Jul 25, 2007 11:12 pm
Location: Fort Worth, TX

Post by robivy64 »

u send 2 me i try and fix 4 u
User avatar
segasonicfan
Posts: 446
Joined: Tue Jul 04, 2006 5:20 am
Contact:

Post by segasonicfan »

write down the part numbers of the chips with residue around them. They probably need to be replaced. Also, resocket anything that is socketed on the board.
I design retro gaming add-ons and repair old consoles :)
My Website: Segasonicfan Designs http://www.segasonicfan.wixsite.com/retro
User avatar
Dave_K.
Posts: 4570
Joined: Wed Jan 26, 2005 5:43 am
Location: SF Bay Area
Contact:

Post by Dave_K. »

This may also be the result of the board flexing during shipment, with cracks in the traces, or legs of surface mount chips lifting from their traces.

With the PCB powered up and outside of the cab (on the floor), use a pencil to lightly push down on each of the surface mount chips, with the eraser end, and watch if any of the graphic glitches changes.
User avatar
undamned
Posts: 3273
Joined: Sat Jan 29, 2005 9:27 am
Location: Phoenix

Post by undamned »

Dave_K. wrote:With the PCB powered up and outside of the cab (on the floor), use a pencil to lightly push down on each of the surface mount chips, with the eraser end, and watch if any of the graphic glitches changes.
Great suggestion.

As far as the residue, it may or may not be effecting the game. Some residues can act as a thin film resistor across components (I've heard soda pop spills on boards do this). You may not be brave enough, but I've done this countless times: wash your board in hot water. Use an old toothbrush or scrub brush to get that residue off. Dry it promptly with a towel and then maybe a hair dryer for underneath the chips.

If its non-water soluble, try rubbing alcohol. If the gunk is underneath the chip and is to blame for the glitches, you may be kinda hosed.

I have experience in this kinda stuff, so if you want me to take a look at it for you and see what I can do, let me know (for the record, I have a Guwange of my own, so you wouldn't need to worry about me taking yours ;) )
-ud
Righteous Super Hero / Righteous Love
User avatar
califoreigner
Posts: 114
Joined: Sun Aug 14, 2005 11:10 pm

Post by califoreigner »

thanks for all the input guys. when i get home from work tonight i'll try a few things. i'll be sure to take note of which chips are soiled before cleaning. haven't thought of applying pressure to the chips while its powered on and this another thing i'll try. thanks for the offers to help fix rob and ud, but i'm going to hold off and see if this is something i can handle myself. much appreciated
PC Engine Fan X!
Posts: 9100
Joined: Wed Jan 26, 2005 10:32 pm

Make sure arcade Jamma edge connections are super clean!

Post by PC Engine Fan X! »

For califoreigner,

Please do make sure that your 56-pin Jamma edge connection interface is super shiny and clean.

And how does one go about doing this?

Step 1.) Take an gray-colored artist kneadable eraser -- this can be found at a local artist supply store (i.e. -- Aaron's Brothers Art Mart, Michael's, etc.) and knead so that it's nice, flexible and soft to the touch and simply rub it against the contacts for that super clean look -- be sure to do this on both sides of the Jamma edge connection interface, of course.

Step 2.) Take a Q-tip and dip it in some rubbing alcohol -- apply this fairly wet Q-tip on both sides of edge connection interface for that super shiny and new look! Just be sure that the rubbing alcohol is completely dried before plugging into the Jamma harness and powering it up.

This above mentioned little nifty trick does solve 90% of arcade PCB woes due to former PCB owners neglecting them when they are used in the arcade business -- simple upkeep and general maintenance of such PCBs "goes out the window". The other remaining 10% of PCBs woes would require the services of someone with some arcade PCB repair expertise.

I've dealt with some 20+ year old arcade Jamma PCBs and they were some of the most filthy ones I've ever seen (especially on the Jamma edge connection interface) -- got them all super shiny and clean for that almost brand new factory fresh look and they work 100% flawlessly to this very day..... ^_~

PC Engine Fan X! ^_~
MKL
Posts: 422
Joined: Wed Feb 02, 2005 9:33 pm
Location: Pordenone, Italy

Post by MKL »

This has obviously nothing to do with a dirty jamma connector which cannot cause graphical glitches, missing backgrounds, etc. The video out on the jamma connector is just red green and blue (sync doesn't matter here): if one of these pins doesn't make contact with the jamma harness then you simply don't have that color showing up on the screen, e.g. if red isn't making contact you'll get a green-blueish picture, etc.
This means that sorting the problems of this Guwange PCB will take a bigger effort than just rubbing alcohol on the jamma connector.
User avatar
rtw
Posts: 1949
Joined: Wed Jan 26, 2005 6:46 pm
Location: Norway
Contact:

Post by rtw »

Did you buy this board broken ?

Since the is no BG picture at all I would check voltages, same thing
happened to my Donpachi a while back. Turned out I needed
to clean the connector.

rtw
http://world-of-arcades.net
The future of ST-V rests upon our work and your work
User avatar
califoreigner
Posts: 114
Joined: Sun Aug 14, 2005 11:10 pm

Post by califoreigner »

yeah, i got the board in the condition its in. i knew about it prior, but couldn't refuse the one-sided trade offer i received.

rtw- i've sent you a pm.

thanks everyone for the input!
User avatar
rtw
Posts: 1949
Joined: Wed Jan 26, 2005 6:46 pm
Location: Norway
Contact:

Post by rtw »

califoreigner wrote:yeah, i got the board in the condition its in. i knew about it prior, but couldn't refuse the one-sided trade offer i received.

rtw- i've sent you a pm.

thanks everyone for the input!
In order to measure the 5V & the 12V follow this chart.

http://www.jammaboards.com/jcenter_jamma_pinout.html

Voltage should not be higher than 5.1 & 12.1

If you got this board like this my, hopes dwindle. It's most likely
the chip which controls the background plane which is not working.
Try flexing the PCB while it is powered and try pressing down on
GFX chips on the PCB (the ones with the most pins)

Also run your fingernail along all the soldered legs on the GFX
chips to determine if there are any bad contacts.

Good luck!

rtw
http://world-of-arcades.net
The future of ST-V rests upon our work and your work
User avatar
califoreigner
Posts: 114
Joined: Sun Aug 14, 2005 11:10 pm

Post by califoreigner »

okay guys! :D

i've located the problem. applying pressure to the chip shown below makes the background reappear! besides cleaning it thoroughly, is there any ideas on what i can do to remedy this? i'd hate to have to put a paperweight on it everytime i want to play it. although i surely will if theres no other way.

i'm still a bit concerned about the residue. all the caps appear to be in good shape so its not that. also since i've been tinkering w/ the board it has spewed no new liquid. here's hoping whatever caused that won't happen again and that this poor game has plenty of play left in it before it kicks the bucket.

a round of beers for all the kind gentlemen!

Image
User avatar
rtw
Posts: 1949
Joined: Wed Jan 26, 2005 6:46 pm
Location: Norway
Contact:

Post by rtw »

Very good news :)

Now the residue is not really dangerous unless it's corrosive
like Coca Cola. But if you want to clean your PCB there exists
a certain product called a PCB cleaner. I have no idea of the
brand since I am not familiar with American products.

Now to fix your PCB permanently you have to find out
exactly where the pressure works. It just sounds like you
have an unsoldered pin. Do the fingernail trick and run it
down on all the pins. Since it suddenly springs to life
it might be the power supply to the chip.

Or you could just solder all the joints on that chip again but
it's an SMD with a very tight pitch so you have to use a
microscope and proper tools.

Good luck!

rtw
http://world-of-arcades.net
The future of ST-V rests upon our work and your work
zakk
Posts: 1407
Joined: Wed Jan 26, 2005 6:04 am
Location: New York, NY
Contact:

Post by zakk »

rtw wrote:Very good news :)

Or you could just solder all the joints on that chip again but
it's an SMD with a very tight pitch so you have to use a
microscope and proper tools.

Good luck!

rtw
Pfft.

That or you bridge a bunch of pins with solder and then hit them with a desoldering wick. Surface tension leaves all the good solder in place.

A hot air gun would probably work too.
User avatar
Strider77
Posts: 4732
Joined: Thu Jul 27, 2006 7:01 am

Post by Strider77 »

good deal.... how much did you get that board for or what did you trade. if you got it working i bet you made out like a bandit.
Damn Tim, you know there are quite a few Americans out there who still lives in tents due to this shitty economy, and you're dropping loads on a single game which only last 20 min. Do you think it's fair? How much did you spend this time?
User avatar
rtw
Posts: 1949
Joined: Wed Jan 26, 2005 6:46 pm
Location: Norway
Contact:

Post by rtw »

zakk wrote:That or you bridge a bunch of pins with solder and then hit them with a desoldering wick. Surface tension leaves all the good solder in place.
That sounds like a very neat trick :D Thanks for sharing!

rtw
http://world-of-arcades.net
The future of ST-V rests upon our work and your work
User avatar
system11
Posts: 6290
Joined: Tue Jan 25, 2005 10:17 pm
Location: UK
Contact:

Post by system11 »

That's a really terrible suggestion. It's better to go with the original advice of working out which pin(s) are the problem and fixing them with fine tools.

One way to work it out is get a craft knife or other very very thin blade. Try to move each one sideways, but very very gently, usually youll find one or two that aren't anchored to the PCB properly anymore, and just holding them down while heating them with a soldering iron will reflow the pin just fine. Obviously this is a powered off method...
System11's random blog, with things - and stuff!
http://blog.system11.org
User avatar
Dave_K.
Posts: 4570
Joined: Wed Jan 26, 2005 5:43 am
Location: SF Bay Area
Contact:

Post by Dave_K. »

I'll offer the most sane advice, as I had to do exactly this for two chips on my G-Stream board. Bring it to an SMT professional to get reflowed. Trust me this is not something you want to try to do yourself. I tried the hot air gun, and even making my own homemade SMT reflow station (some tips on the net are bogus).

Go into your phonebook and lookup electronics component repair, or search your local craigslist for "SMT" and "electronics". I found a location near me that took my board, and did it right in front of me in 30 minutes. You can usually negotiate the price as you are paying an hourly rate even if it takes less than that.
User avatar
califoreigner
Posts: 114
Joined: Sun Aug 14, 2005 11:10 pm

Post by califoreigner »

i managed to fix this last night w/ my trusty soldering iron.

thanks again for all the help! couldn't have done it w/o you :)
User avatar
pixeljunkie
Posts: 342
Joined: Thu Mar 03, 2005 8:11 pm
Location: Dallas, TX

Post by pixeljunkie »

wishi-power saved it
Image
User avatar
rtw
Posts: 1949
Joined: Wed Jan 26, 2005 6:46 pm
Location: Norway
Contact:

Post by rtw »

califoreigner wrote:i managed to fix this last night w/ my trusty soldering iron.

thanks again for all the help! couldn't have done it w/o you :)
Excellent news, glad to help :D

Now tell us how much you paid for it, and I'll tell you how much I paid for mine :D

rtw
http://world-of-arcades.net
The future of ST-V rests upon our work and your work
User avatar
Battlesmurf
Posts: 1436
Joined: Mon Oct 09, 2006 8:14 am
Location: California

Post by Battlesmurf »

lol..call...come on now..don't leave us hanging : )
My trade/wanted list
http://shmups.system11.org/viewtopic.ph ... 1#p1135521

Twitch.tv/RedHotHero
User avatar
califoreigner
Posts: 114
Joined: Sun Aug 14, 2005 11:10 pm

Post by califoreigner »

okay okay-
califoreigner wrote:one-sided trade offer
:lol:
User avatar
Dewclaw
Posts: 259
Joined: Sat Mar 26, 2005 4:47 am
Location: Texas

Post by Dewclaw »

Interesting, my Esprade has a problem that seems alot like this..I'll have to try these tips too :D Of course, in my case I didn't get a deal because the damage occurred in-transit(allegedly)
LARGE KRO
Posts: 63
Joined: Mon Oct 09, 2006 10:52 am
Location: Paris ,France

Post by LARGE KRO »

To Califoreigner :

It's crazy, a friend of mine got me one from ebay a few weeks ago and it appears to have the same problem, I discovered the problem a few days after the first test when I removed the baord feets that were keeping it a little curved.
What is the most interesting is that the problem is located on the same ATLUS chip as on your baord, now I suspect that it's a serial defect. My board number is GU0803.

Anyway I'm glad for your board, I still need to find some one that could fix it for me in France I don't have the proper material and skills to do it mmyself :(
User avatar
mastercello
Posts: 353
Joined: Thu Mar 15, 2007 12:24 pm
Location: Switzerland

Post by mastercello »

Sorry to derail this thread, but i have a similar problem on my Uo Poko pcb, wich is pretty the same hardware like the guwange board.
As you can see in the following pictures, i have some kind of interference shown as lines running around on the screen.

Image

Image

Here you can see the whole pcb.
Image

The picture gets even worst, if i push the legs of the big chip in the lower section in the middle of the board.
Image


Just bad soldered legs, or is this chip damaged?
Any help is very useful :oops:

Thanks a lot :!:
User avatar
rtw
Posts: 1949
Joined: Wed Jan 26, 2005 6:46 pm
Location: Norway
Contact:

Post by rtw »

mastercello wrote:Sorry to derail this thread, but i have a similar problem on my Uo Poko pcb, wich is pretty the same hardware like the guwange board.

The picture gets even worst, if i push the legs of the big chip in the lower section in the middle of the board.

Just bad soldered legs, or is this chip damaged?
Do you get the screen error in the setup screen as well ?

Use a magnifying glass and look at the legs on the chip
see if any of them are lifted from the PCB.

rtw
http://world-of-arcades.net
The future of ST-V rests upon our work and your work
User avatar
mastercello
Posts: 353
Joined: Thu Mar 15, 2007 12:24 pm
Location: Switzerland

Post by mastercello »

rtw wrote: Do you get the screen error in the setup screen as well ?

Use a magnifying glass and look at the legs on the chip
see if any of them are lifted from the PCB.

rtw
The error is in the setup screen as well.

So do you believe it is a unsoldered pin problem, not a bad chip?
User avatar
mastercello
Posts: 353
Joined: Thu Mar 15, 2007 12:24 pm
Location: Switzerland

Post by mastercello »

Checked the pins under a microscope, they look clean and are soldered fine also.

Anyone another idea what could be the problem?
User avatar
rtw
Posts: 1949
Joined: Wed Jan 26, 2005 6:46 pm
Location: Norway
Contact:

Post by rtw »

mastercello wrote:Checked the pins under a microscope, they look clean and are soldered fine also.

Anyone another idea what could be the problem?
If you get a change when you apply pressure, you have a loose
pin or a broken track.

rtw
http://world-of-arcades.net
The future of ST-V rests upon our work and your work
Post Reply