Finally :) I did it! (Homemade cabinet)

The place for all discussion on gaming hardware
Post Reply
User avatar
lmn4096
Posts: 87
Joined: Wed Jan 26, 2005 8:38 pm
Location: ex-Osaka

Finally :) I did it! (Homemade cabinet)

Post by lmn4096 »

I'm so happy, from yesterday night I can enjoy my home made cabinet !!

1 month of hard work sawing, brushing, painting... :p

here is my 21" tv demanteled
Image

placing the speaker and then the tv mother board
ImageImage

connecting the crt
Image

a little test with gunbird PS2
Image


and in all it's glory... Igu-chan !!
Image
as you can see here, I followed the Egret 3 design (minus the very round shape)

btw : thanx Japtor for his info ;)
Last edited by lmn4096 on Tue Dec 15, 2009 8:51 pm, edited 2 times in total.
User avatar
zlk
Posts: 562
Joined: Wed Jan 26, 2005 4:10 pm

Post by zlk »

That cabinet looks great.
User avatar
Ord
Posts: 954
Joined: Wed Jan 26, 2005 1:10 am
Location: Edinburgh Scotland
Contact:

Post by Ord »

SUPERB! Well done that's great stuff man. :)
Ikaruga review now up in PLASMA BLOSSOM
User avatar
Thunder Force
Posts: 1773
Joined: Wed Jan 26, 2005 11:21 am
Location: research and development facility for Vasteel Technology.

Post by Thunder Force »

Nice! :)
User avatar
raiden
Posts: 862
Joined: Tue Jan 25, 2005 11:41 pm
Location: Cologne
Contact:

Post by raiden »

very impressive. I was wondering why you didn´t plug the hori sticks from their original casing like you did with the TV tube, but of course you keep the comfort of being able to carry them to other people´s houses that way.
Looks incredibly neat, and inspires me to go further with my own selfmade cab, thanks for posting your pictures.
User avatar
lmn4096
Posts: 87
Joined: Wed Jan 26, 2005 8:38 pm
Location: ex-Osaka

Post by lmn4096 »

thank you :)
Infact one joystick is mine the other one is her... my wife didn't allow me to take apart her Real Arcade Pro
but I still have some sanwa parts and could create a real joystick panel in the future. but only 8 butons, 4 for each payer.

also the Real Arcade Pro are realy well done and I still have my 29" horizontal TV near the cabinet, so I can use them on it when playing other game in horizontal mode 8)
japtor
Posts: 367
Joined: Wed Feb 02, 2005 9:16 am

Post by japtor »

i still say you should get one of these :P

Image
or egret or whatever, sega sanwa panels seem to be the easiest to find. comes with all the parts preassembled and its smaller than the 2 hori sticks side by side i think.
but I still have some sanwa parts and could create a real joystick panel in the future. but only 8 butons, 4 for each payer.
if its only gonna be used for verts, how many even use 4 buttons (or are you including start)? i have 3 useless buttons/player on my cab because i dont have the wiring for them, and none of my games need the extra buttons (couldnt find a 2p/3 button panel).
User avatar
Diabollokus
Posts: 1267
Joined: Wed Jan 26, 2005 3:22 pm
Location: United Kingdom
Contact:

Post by Diabollokus »

Wow thats cool, wish I had the inspiration to build something like that, Black carbon fibre panels would look pretty cool on er tho.
Vidi Vici Veni
User avatar
Trevor spencer
Posts: 1058
Joined: Sat Jan 29, 2005 1:17 pm
Location: UK
Contact:

Post by Trevor spencer »

if your based in the UK ive got one of these for sale

sega saturn astro stick , damn thing got damaged in transit , i paid £155 for it , if you can over look the damage or make your own panel up for it you can have it for £75 inc delivery .. but if your in the US the postage would be something stupid like an extra $100

you could probably even replace the panel with one of these

http://www.riverservice.co.jp/PARTS/conpane_e.html

The stick comes with 3 inserts virtua kids , virtua fighter and fighting vipers (no user manual tho)

anyway heres some pics


Image


Image

Image

[/img]
User avatar
lmn4096
Posts: 87
Joined: Wed Jan 26, 2005 8:38 pm
Location: ex-Osaka

Post by lmn4096 »

very tempting :p

but I live in switzerland. and need to check with my wife ;)

by the way, what are the external dimensions of it ? (HxLxW)
User avatar
SheSaidDutch
Posts: 1092
Joined: Tue Mar 15, 2005 12:46 am

Post by SheSaidDutch »

Looks lovely 8) The plant Is deffiently the finishing touch :wink:
User avatar
Trevor spencer
Posts: 1058
Joined: Sat Jan 29, 2005 1:17 pm
Location: UK
Contact:

Post by Trevor spencer »

lmn4096 wrote:very tempting :p

but I live in switzerland. and need to check with my wife ;)

by the way, what are the external dimensions of it ? (HxLxW)
ill check it out tommorrow and let you know

cheers
Trev
User avatar
Dylan1CC
Posts: 2323
Joined: Wed Jan 26, 2005 12:23 am

Post by Dylan1CC »

Very nice work, lmn4096! Just looking at the pics makes me wanna try it out. :)
japtor
Posts: 367
Joined: Wed Feb 02, 2005 9:16 am

Post by japtor »

i measured the panel itself yesterday, i think it was around 25" wide, the full thing (white casing area) is around 27-29", i forget (whole astro cab max width is 29.5" or so). looks like ~8" deep or so, height should be around 2-3" for that thing. otherwise for a bare panel w/the sticks/buttons/wiring is under 2" high (from panel to bottom of wiring). some wild guesses from memory there but should be more or less close.
User avatar
Trevor spencer
Posts: 1058
Joined: Sat Jan 29, 2005 1:17 pm
Location: UK
Contact:

Post by Trevor spencer »

right measured it up today

lengh 740mm width 225mm depth 75mm


if your interested ill find out how much it will be for airmail

ta
Trev
User avatar
lmn4096
Posts: 87
Joined: Wed Jan 26, 2005 8:38 pm
Location: ex-Osaka

Post by lmn4096 »

thank you Trevor and Japtor for the info :)
and thank you everyone for the feedback.

after debating with my wife we think it will fit better if I create it by my self in wood, using the same material and paint, as used for the cabinet.

also as I still got Sanwa parts to create the 2 players pannels.

by the way if it's not too much asking, what are the dimensionsof the 2 plexi board ? the one for the flyer, and the one for the joystick. :)
japtor
Posts: 367
Joined: Wed Feb 02, 2005 9:16 am

Post by japtor »

well technically its 'instruction sheet', but its 3" high, forgot to measure the width (its 2:20 am and didnt turn the lights on when i checked). the panel is 5"x24-25" or so. if you look at the pictures with those numbers in mind, the width of the instruction sheet area is probably around 20 inches, counting the metal pieces holding the glass cover piece.

and now that i type that, gotta correct you in that neither thing is plexi. havent taken it apart in a while but i think the instruction sheet glass with held down by those 2 metal end pieces, held to the frame w/nuts.

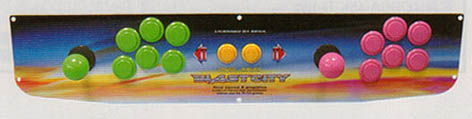
the joystick panel is just 1/8" metal or so (maybe thinner) and buttons just clip on while sticks are mounted to plates underneath, im guessing your hori sticks are exactly the same (which looks like you might be familiar with already with swapped buttons on yours).

not so good picture of the inside of the blast city panel in my cab:

Image

nice gratuitous mirror finish on it i wasnt expecting, my old astro panel was just flat metal with a large chunk of rust. different top finishes too.

anyways since youre using wood (and plexi?), you know how to mount the sanwa stuff in it? or are you gonna make your own metal panel perhaps?
User avatar
Trevor spencer
Posts: 1058
Joined: Sat Jan 29, 2005 1:17 pm
Location: UK
Contact:

Post by Trevor spencer »

lmn4096 wrote:thank you Trevor and Japtor for the info :)
and thank you everyone for the feedback.

after debating with my wife we think it will fit better if I create it by my self in wood, using the same material and paint, as used for the cabinet.

also as I still got Sanwa parts to create the 2 players pannels.

by the way if it's not too much asking, what are the dimensionsof the 2 plexi board ? the one for the flyer, and the one for the joystick. :)
ok no worries ill stick this up on ebay once i get my digi cam back
User avatar
lmn4096
Posts: 87
Joined: Wed Jan 26, 2005 8:38 pm
Location: ex-Osaka

Post by lmn4096 »

thanks for the reply :)

I plan to do the panel with 2 material. 1 plate of aluminium 2mm thick, then a plexi of 1.5mm thick on top. and place a picture sheet in between.

of course those plate would be mounted on a wooden box using the correct dimension. as you mentioned.

well I will have some work for the next weeks :D

oh Japtor your photo are very instructive, if you have one of your joystick panel taken perpendiculary top to down, without angle. like that I could calculate the ratio and positioning of the joy and buttons :)
japtor
Posts: 367
Joined: Wed Feb 02, 2005 9:16 am

Post by japtor »

Image

might be able to print the big picture out if you get the dpi right, at least the 1p buttons (2p buttons a little distorted by perspective/lens). can sorta tell in the pic, but the 2p layout is a little different from the 1p one (top left and bottom left buttons are set a little lower relative to the other 4), but its not a huge difference. otherwise the whole 2p layout is slightly angled out compared to 1p (like if youre sitting off to the side instead of directly in front, the layout seems angled for that).

forgot to put these on the pic, but some more measurements:
space to the left from the left of the joystick holes: ~3 1/4"
space to the right of bottom right buttons: 1 3/4"
from top of joystick hole to top: ~1 7/8"
from right of joystick hole to nearest button: ~1 1/4"
User avatar
lmn4096
Posts: 87
Joined: Wed Jan 26, 2005 8:38 pm
Location: ex-Osaka

Re: Finally :) I did it!

Post by lmn4096 »

Hoo, long time without update...

Anyway, I just post my latest update of my Igu-chan version2:
Image

and some more indepth work:
Image
Image
Image
Image
Image
Image

with some paint:
Image

the connectics of the panel:
Image
Image

The Igu-chan with a real good game in it....
Image

and the panel with inside pictures inserted:
Image
User avatar
emphatic
Posts: 7984
Joined: Mon Aug 18, 2008 3:47 pm
Location: Alingsås, Sweden
Contact:

Re: Finally :) I did it!

Post by emphatic »

Very awesome. Is the monitor bezel made of wood as well?
Image | My games - http://www.emphatic.se
RegalSin wrote:Street Fighters. We need to aviod them when we activate time accellerator.
User avatar
drunkninja24
Posts: 1802
Joined: Thu Oct 01, 2009 3:27 am
Location: MO

Re: Finally :) I did it!

Post by drunkninja24 »

Nice.....mind letting me, uh....."borrow" that Ketsui for a while? :mrgreen:

Good stuff though. I have an Astro City myself, couldn't see myself actually trying to put one of those together from scratch as my woodworking skills and access to tools are pretty much zip :?
User avatar
dpful
Posts: 1205
Joined: Tue Feb 01, 2005 5:19 pm
Location: SLC, UT, US
Contact:

Re: Finally :) I did it!

Post by dpful »

Oh wow! I just browsed the threat (pics mostly)-- first version looks bad.... second version looks AMAZING! Very cool
User avatar
Necronopticous
Posts: 2129
Joined: Sat Sep 29, 2007 8:50 pm
Location: Baltimore

Re: Finally :) I did it!

Post by Necronopticous »

Awesome work, man. It looks great.
User avatar
mastercello
Posts: 353
Joined: Thu Mar 15, 2007 12:24 pm
Location: Switzerland

Re: Finally :) I did it!

Post by mastercello »

Excellent work man... :mrgreen:

Where in Switzerland do you live?
User avatar
brentsg
Posts: 2303
Joined: Sun Jul 12, 2009 9:01 pm
Location: St. Louis, MO USA

Re: Finally :) I did it!

Post by brentsg »

emphatic wrote:Very awesome. Is the monitor bezel made of wood as well?
So, how do we tell whether she is made of wood?
Breaking news: Dodonpachi Developer Cave Releases Hello Kitty Game
User avatar
lmn4096
Posts: 87
Joined: Wed Jan 26, 2005 8:38 pm
Location: ex-Osaka

Re: Finally :) I did it!

Post by lmn4096 »

thanks for the reply :)
the bezel is made of wood.

@mastercello: I live near Lausanne :D
User avatar
hermosaguy
Posts: 497
Joined: Fri May 26, 2006 10:33 pm
Location: Hermosa Beach, CA

Re: Finally :) I did it! (Homemade cabinet)

Post by hermosaguy »

Bad ass man. I love it!
User avatar
Ed Oscuro
Posts: 18654
Joined: Thu Dec 08, 2005 4:13 pm
Location: uoıʇɐɹnƃıɟuoɔ ɯǝʇsʎs

Re: Finally :) I did it! (Homemade cabinet)

Post by Ed Oscuro »

Nice machine, good work!
Post Reply