Hello Everyone !
This is a good news thread ! With a successful Rgb Mod
Firstly want to thanks all the envolved people that helped with hints and tips, but the special thanks goes to Mark, without him this mod will not suceed, he provides so much detailed information, from where to get the right connections, and help me sometimes to avoid loose the chassi with precious information. Will try to describe bellow, and try to update this thread once on a while if i forgot something to help another guys that should have the same TV set i have.
So this mod were made onto a TV 21" Philips 21Gx1669/78r, Mark has found a very easy way to inject the rgb signal direct onto a "NOTUSED J281" port on the board, some kind of sleep port, so spare me from lift the tiny legs directly on the chip, turn a much easy task to do, this particular J281 has all the inputs you will need (red, green, blue, gnd, and f blank) the sync was get from the AV port.
You will need:
2 pçs = 1k ohms 1/4w
3 pçs = 75ohms 1/4w
1 pot = 10k type B
Vga cable (in my case used a Revenge from Mars db15 male on one point and a pin 10 wells garner default, on the other point)
Remember this mod will work only if you have a PC, with already 15khz output, i used an ATI 5450 patched, Winxp 32bit + CRT_Emudriver + Groovymame (crt special version)
You will need to run the sync from the vga (h and V), and before twist them you will need to install a 1k resistor in each wire, them twist and wire to the AV connector central pin, grounded 3 resistor 75ohms in each color with the same gnd that goes to pin 1 J281
On the middle of the process we change the 5v source, not anymore from J390 pin 3, and now from the BC337 7290 transistor leg "C" this one provides the right stabble 5v we needed.
But when turn on the tv, ,the screen goes black, so we need to add a potentiometer 10k type B, on any external leg you put the 5v source, and in the middle leg you install the wire that will go to the F Blank (purple wire).
I have a google drive with all test and photos so people can see what i´v done, and will update this album with frequency, so stay tunned!
https://photos.app.goo.gl/ROlDzMpabIOwCrV42
Sorry for some mistakes on English write and specialy on speach, lol
Now will restore the OSD wires cutted so i can adjust the vertical size, and horizontal position of the picture thru the service menu.
Things to to in the future:
- Replace those fast connectors with better shield wires, those installed are so thin, have to put some shield wires because a little bit interferance appears sometimes, just on solid colors background you see that, but nothing that overcome the beaulty of the picture.
- Maybe rip off one side of a VGA quality cable an solder direct those wires in the board, take off all crapy low quality wires, with already on vga cable ones, to avoid any kind of interferance.
And Mark thank you again my friend!
Marcos
TV RGB mod thread
-
m.andrade1
- Posts: 39
- Joined: Thu Aug 24, 2017 11:43 am
Re: TV RGB mod thread
Last edited by m.andrade1 on Wed Sep 06, 2017 7:23 pm, edited 6 times in total.

Re: TV RGB mod thread
On my rgb modded sony trinitron the picture is awesome but I have the crank the brightness down a good amount for it to look better but then it effects my other consoles as they end up way to dark.
Is there anything I can add that can decrease the brightness in the mod,was thinking maybe some potentiometers.
Is there anything I can add that can decrease the brightness in the mod,was thinking maybe some potentiometers.
Re: TV RGB mod thread
Ok you can now go back to listing my LG CA-20F80/MC-84A chassis mod as successful again! I found some missing components, soldered them in and it worked!
Details have been updated in thread LG CA-20F80/Chassis MC84A RGB Scart Mod Almost complete...
For people looking for a shortcut to RGB modding this could be the answer for them. Just install a scart port, replace some missing components and change the service menu and you are done.
While I'm here I'd just like to say to Marcos that I really enjoyed helping him with his Phillips 21GX1669 mod. I am still learning a lot about this stuff and going through that process has taken me to another level. It turns out the Jungle I/C on his TV was identical when it came to RGB blanking and this gave me the encouragement to revisit my TV. Marcos said getting my TV working was my reward for helping him and I tend to agree. That and a new friend.
___________________________________________________
MarkOZLAD
OSD/External RGB Mux Diagram
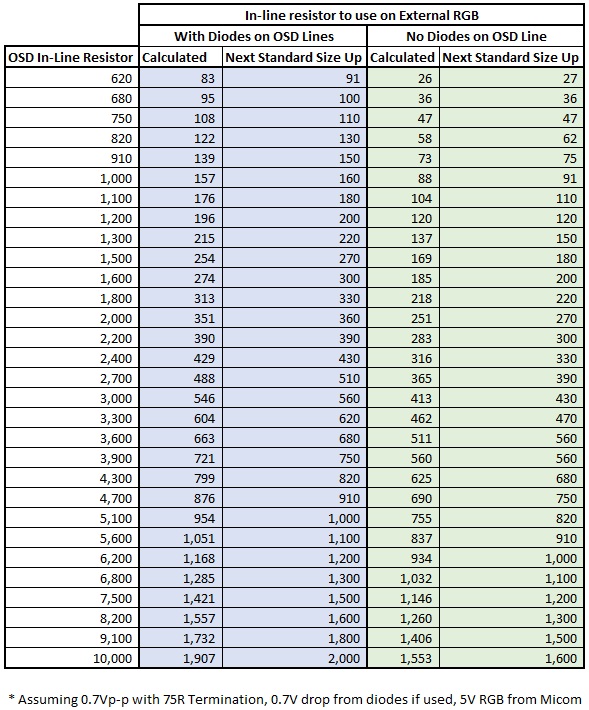
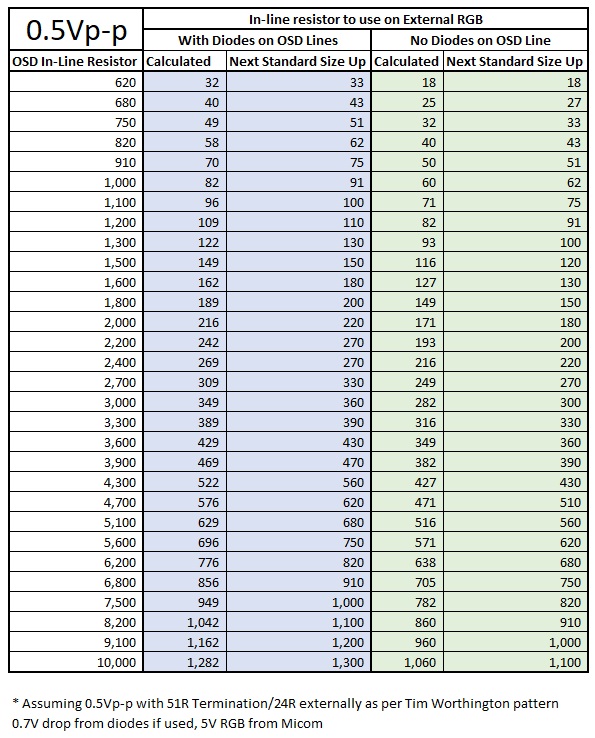
OSD/External RGB Mux Resistor Value Table 0.7Vp-p : 0.5Vp-p
"Imagine toggle switch OSD modding a TV in 2019" - maxtherabbit
MarkOZLAD
OSD/External RGB Mux Diagram
OSD/External RGB Mux Resistor Value Table 0.7Vp-p : 0.5Vp-p
"Imagine toggle switch OSD modding a TV in 2019" - maxtherabbit
-
buttersoft

- Posts: 376
- Joined: Sun Jul 24, 2016 7:49 am
Re: TV RGB mod thread
Just a thought, but does your Jungle IC want 0.7Vp-p or lower, like 05Vp-p?Pikkon wrote:On my rgb modded sony trinitron the picture is awesome but I have the crank the brightness down a good amount for it to look better but then it effects my other consoles as they end up way to dark.
Is there anything I can add that can decrease the brightness in the mod,was thinking maybe some potentiometers.
Re: TV RGB mod thread
Generally the Sony's are 0.7Vp-p. The ones I've modded I've noted the exact same behaviour, definitely brighter from the RGB mod input than when I switch back to composite.buttersoft wrote:Just a thought, but does your Jungle IC want 0.7Vp-p or lower, like 05Vp-p?Pikkon wrote:On my rgb modded sony trinitron the picture is awesome but I have the crank the brightness down a good amount for it to look better but then it effects my other consoles as they end up way to dark.
Is there anything I can add that can decrease the brightness in the mod,was thinking maybe some potentiometers.
Not sure what the answer is. I did decrease the screen voltage on mine, this decreases the RGB brightness but the composite has the same corresponding change so doesn't solve the issue.
___________________________________________________
MarkOZLAD
OSD/External RGB Mux Diagram
OSD/External RGB Mux Resistor Value Table 0.7Vp-p : 0.5Vp-p
"Imagine toggle switch OSD modding a TV in 2019" - maxtherabbit
MarkOZLAD
OSD/External RGB Mux Diagram
OSD/External RGB Mux Resistor Value Table 0.7Vp-p : 0.5Vp-p
"Imagine toggle switch OSD modding a TV in 2019" - maxtherabbit

Re: TV RGB mod thread
It's as simple as increasing the value of the termination resistors.MarkOZLAD wrote:Generally the Sony's are 0.7Vp-p. The ones I've modded I've noted the exact same behaviour, definitely brighter from the RGB mod input than when I switch back to composite.buttersoft wrote:Just a thought, but does your Jungle IC want 0.7Vp-p or lower, like 05Vp-p?Pikkon wrote:On my rgb modded sony trinitron the picture is awesome but I have the crank the brightness down a good amount for it to look better but then it effects my other consoles as they end up way to dark.
Is there anything I can add that can decrease the brightness in the mod,was thinking maybe some potentiometers.
Not sure what the answer is. I did decrease the screen voltage on mine, this decreases the RGB brightness but the composite has the same corresponding change so doesn't solve the issue.
These Sony's seem to look better with 100ohm resistors instead of 75ohm.
-
soviet9922

- Posts: 51
- Joined: Wed Sep 06, 2017 1:46 pm
- Location: Uruguay
Re: TV RGB mod thread
Hi guys im hacking rgb into a jvc tm-h150cg.
Need to get into service mode if someone knows how ?.
Also the service manual could be great if somebody know where to download it ?.
I'm documenting the process here http://shmups.system11.org/viewtopic.php?f=6&t=60736
Also going to do a 17" chasis jvc next the guts look almost the same.
Need to get into service mode if someone knows how ?.
Also the service manual could be great if somebody know where to download it ?.
I'm documenting the process here http://shmups.system11.org/viewtopic.php?f=6&t=60736
Also going to do a 17" chasis jvc next the guts look almost the same.
Re: TV RGB mod thread
Cheers for another great tip. Will give that a shot on the Sony TV I will mod this weekend.Syntax wrote:
It's as simple as increasing the value of the termination resistors.
These Sony's seem to look better with 100ohm resistors instead of 75ohm.
___________________________________________________
MarkOZLAD
OSD/External RGB Mux Diagram
OSD/External RGB Mux Resistor Value Table 0.7Vp-p : 0.5Vp-p
"Imagine toggle switch OSD modding a TV in 2019" - maxtherabbit
MarkOZLAD
OSD/External RGB Mux Diagram
OSD/External RGB Mux Resistor Value Table 0.7Vp-p : 0.5Vp-p
"Imagine toggle switch OSD modding a TV in 2019" - maxtherabbit
Re: TV RGB mod thread
MarkOZLAD wrote:Cheers for another great tip. Will give that a shot on the Sony TV I will mod this weekend.Syntax wrote:
It's as simple as increasing the value of the termination resistors.
These Sony's seem to look better with 100ohm resistors instead of 75ohm.
I should of asked if its just this tv thats being bright for you or if you use more than 1 console on it via RGB.
Could always be the console or the cable not having proper 75ohm terminations. Plug in the cable to the console(turned off) and check the scart end RGB lines to ground for 75ohm.
But if you have a few RGB consoles and a few RGB tv's and this Sony is the only one being a bitch then increase them terminations.
Re: TV RGB mod thread
Thank's for the info Syntax,will definitely give this a try.
With using my snes,genesis and saturn they were all way to bright and the rgb cables are wired correctly.
With using my snes,genesis and saturn they were all way to bright and the rgb cables are wired correctly.
-
nakedarthur

- Posts: 218
- Joined: Tue Jul 21, 2015 8:20 pm
Re: TV RGB mod thread
I finally got together with the TV tech tonight and I'm happy to report the KV-27S42 was successfully modded. Amazingly, it worked on the first try! Huge props to everyone for the great information here and thanks to MarkOZLAD for answering my questions. I posted a small gallery on imgur here, including an updated diagram of some of the things I was questioning.
Re: TV RGB mod thread
Glad it worked. Pleased to help.nakedarthur wrote:I finally got together with the TV tech tonight and I'm happy to report the KV-27S42 was successfully modded. Amazingly, it worked on the first try! Huge props to everyone for the great information here and thanks to MarkOZLAD for answering my questions. I posted a small gallery on imgur here, including an updated diagram of some of the things I was questioning.
___________________________________________________
MarkOZLAD
OSD/External RGB Mux Diagram
OSD/External RGB Mux Resistor Value Table 0.7Vp-p : 0.5Vp-p
"Imagine toggle switch OSD modding a TV in 2019" - maxtherabbit
MarkOZLAD
OSD/External RGB Mux Diagram
OSD/External RGB Mux Resistor Value Table 0.7Vp-p : 0.5Vp-p
"Imagine toggle switch OSD modding a TV in 2019" - maxtherabbit
-
nakedarthur
- Posts: 218
- Joined: Tue Jul 21, 2015 8:20 pm
Re: TV RGB mod thread
I ran into one slight hitch after getting the TV into my setup. Genesis, SNES, PS1, Saturn, PC Engine, and even my GroovyMAME machine all work perfectly, but having a little trouble with my NESRGB. It has one of the 3d printed ports with the SNES style connectors, so I got one of retro_console_accessories pro coaxial SNES cables for it. It worked fine on my previous setup, but with the modded TV I'm getting a very dim pictures in bright scenes. Strangely, it seems to work perfectly on the darker ones..
Edit: Looks like SNES cables have 220uf capacitors in line, guessing that's not playing too well with the other caps..
Edit2: Removed the 220uf caps from the Scart head but it still looks the same..

Edit: Looks like SNES cables have 220uf capacitors in line, guessing that's not playing too well with the other caps..
Edit2: Removed the 220uf caps from the Scart head but it still looks the same..
Re: TV RGB mod thread
For nes rgb cables make sure there are no components inline. Nothing but wires. All resistors, terminations and caps are in the NES.
That picture has me stumped tho. Maybe Tim has seen it before.
That picture has me stumped tho. Maybe Tim has seen it before.
-
nakedarthur
- Posts: 218
- Joined: Tue Jul 21, 2015 8:20 pm
Re: TV RGB mod thread
Thanks for the info. As far as I can tell everything has been removed on the SCART side, but I'm not sure what she has in the mutli-connector side. Is there any way to open those without destroying them? I was just looking at this page on Tim's site and it says to remove 75ohm resistors from SNES cables. I'm guessing if it has those they must be on the multi-connector side? I'm thinking I might just put the caps back in and see if I can get her to send me another cable with nothing inline haha..Syntax wrote:For nes rgb cables make sure there are no components inline. Nothing but wires. All resistors, terminations and caps are in the NES.
That picture has me stumped tho. Maybe Tim has seen it before.
Re: TV RGB mod thread
you can try using the composite out of the NESRGB since it's encoded from RGB and it's only 1 wire.

Re: TV RGB mod thread
I succesfully completed this mod on a Sharp 27sc260 tv. It already had component and it looked good with the retrotek RGB to component converter but I was curious to see what RGB looked like on the TV. There is a definite difference in color but I imagine I could've done some service menu tweaks to get the component colors looking close or even identical to RGB. Here's a few comparison pics.
Rgb on the top, Component on bottom. It looks like there's some jailbars there but that's just the camera.


Rgb on the top, Component on bottom. It looks like there's some jailbars there but that's just the camera.
Spoiler
-
mikejmoffitt

- Posts: 629
- Joined: Fri Jan 08, 2016 7:26 am
- Location: Tokyo, Japan
Re: TV RGB mod thread
The NES RGB problem shown in that picture is a result of the image being shifted far left. As a result, the overscan border color (blue, in the case of the Super Mario Bros sky) is being used as the clamping level for black. The TV subtracts the black level sample from the rest of the line, so if your black level has image data there you'll get strange color subtraction effects in the line. You need to use the service menu to shift the image right, or change the clamping delay. If you have other inputs to try like S-video or Component, try using those for sync.

-
nakedarthur
- Posts: 218
- Joined: Tue Jul 21, 2015 8:20 pm
Re: TV RGB mod thread
Damn, that sucks! I already have HPOS as far as it will go right (0). I guess I will look into using S-video instead of Composite for sync then. It was bothering me anyway to be honest, the picture still seemed about 3/4 inch too far left even after the max adjustment. Thanks a bunch for the info!mikejmoffitt wrote:The NES RGB problem shown in that picture is a result of the image being shifted far left. As a result, the overscan border color (blue, in the case of the Super Mario Bros sky) is being used as the clamping level for black. The TV subtracts the black level sample from the rest of the line, so if your black level has image data there you'll get strange color subtraction effects in the line. You need to use the service menu to shift the image right, or change the clamping delay. If you have other inputs to try like S-video or Component, try using those for sync.
Re: TV RGB mod thread
Out of interest, how is the horizontal position for the other consoles?nakedarthur wrote:Damn, that sucks! I already have HPOS as far as it will go right (0). I guess I will look into using S-video instead of Composite for sync then. It was bothering me anyway to be honest, the picture still seemed about 3/4 inch too far left even after the max adjustment. Thanks a bunch for the info!mikejmoffitt wrote:The NES RGB problem shown in that picture is a result of the image being shifted far left. As a result, the overscan border color (blue, in the case of the Super Mario Bros sky) is being used as the clamping level for black. The TV subtracts the black level sample from the rest of the line, so if your black level has image data there you'll get strange color subtraction effects in the line. You need to use the service menu to shift the image right, or change the clamping delay. If you have other inputs to try like S-video or Component, try using those for sync.
___________________________________________________
MarkOZLAD
OSD/External RGB Mux Diagram
OSD/External RGB Mux Resistor Value Table 0.7Vp-p : 0.5Vp-p
"Imagine toggle switch OSD modding a TV in 2019" - maxtherabbit
MarkOZLAD
OSD/External RGB Mux Diagram
OSD/External RGB Mux Resistor Value Table 0.7Vp-p : 0.5Vp-p
"Imagine toggle switch OSD modding a TV in 2019" - maxtherabbit
-
nakedarthur
- Posts: 218
- Joined: Tue Jul 21, 2015 8:20 pm
Re: TV RGB mod thread
It's definitely a little too far left even with it at zero. Looking at the Genesis grid in 240p Test Suite I could see just outside of the overscan area on the right, and it was near the inside edge of the overscan for the left side. It's not too terrible but in Lightening Force for example, if I move my ship as far as it will go to the left side of the screen I could maybe only see like a quarter of it.MarkOZLAD wrote:Out of interest, how is the horizontal position for the other consoles?
Re: TV RGB mod thread
Had a tricky one today.
LG Flatron.
It seemed to have provision for scart but many components missing and jungle RGB input lines and blanking grounded.
Wired the set like normal and blanking was doing nothing.
Checked the service menu and enabled scart and bam rgb.
But it seemed blanking did not need power. If grounded my rgb injection would stop and if left floating "high" the rgb would blank.
Issue is if I leave it floating no other video inputs can be used till scart is turned off in service.
I didn't want a switch for it so I pulled out a 10k pot and wired it like "5v-blank-ground" turned to full resistance then turned on the set and swept the pot till my RGB picture came through over the comp one.
So the aim was to find out how low I had to pull the blanking pin before blanking would stop and increase the pot till it just blanked,( mainly because i could not find data on what the jungle expects so lowest volts is best) read the pots values and remake it with resistors.
The values I ended up with were
ground - 2.5k - blanking - 7.5k - console 5v
Works as it should now. Unplug it and watch tv or use composite, which I will do neither of.. I just like things to work as expected.
Re: TV RGB mod thread
Just finished another tricky one
Sony Trinitron
If you cut the blanking and let it float you get RGB blanking but with the menu VIDEO 1 on screen also.
If you apply voltage at around 3v it changes to composite.
But if you ground blanking you get RGB without the OSD always displaying the channel number
EDIT Grounding blanking makes the OSD barely visable but stops the TV from turning on ffs..
Update
Ok so I figured out the bloody thing.
Sony CXA2139S
Around 3v or more to the ext blanking pin turns on RGB.
Pressing DISPLAY on the remote removes the OSD..
Seriously WTF?
Why would Sony make it so every time you turn on the TV you have to press DISPLAY on the remote to make the OSD piss off?
If you didn't have a remote you'd be screwed.
Funny thing to note, Ive been getting confused between RGB and composite today on a few tvs and I finally figured out why.
I'm using an old SNES to test not my Famicon Jr.
The difference in RGB quality on these 2 consoles is night and day.
To my eye an old SNES looks closer to composite than it does RGB due to the blur
Sweet picture tho
Last edited by Syntax on Tue Sep 12, 2017 10:47 am, edited 2 times in total.
Re: TV RGB mod thread
Was the jungle in this one a VCT49xyl? Chassis MC-049a?Syntax wrote:Had a tricky one today.
LG Flatron.
It seemed to have provision for scart but many components missing and jungle RGB input lines and blanking grounded.
Wired the set like normal and blanking was doing nothing.
Checked the service menu and enabled scart and bam rgb.
But it seemed blanking did not need power. If grounded my rgb injection would stop and if left floating "high" the rgb would blank.
Issue is if I leave it floating no other video inputs can be used till scart is turned off in service.
I didn't want a switch for it so I pulled out a 10k pot and wired it like "5v-blank-ground" turned to full resistance then turned on the set and swept the pot till my RGB picture came through over the comp one.
So the aim was to find out how low I had to pull the blanking pin before blanking would stop and increase the pot till it just blanked,( mainly because i could not find data on what the jungle expects so lowest volts is best) read the pots values and remake it with resistors.
The values I ended up with were
ground - 2.5k - blanking - 7.5k - console 5v
Works as it should now. Unplug it and watch tv or use composite, which I will do neither of.. I just like things to work as expected.
___________________________________________________
MarkOZLAD
OSD/External RGB Mux Diagram
OSD/External RGB Mux Resistor Value Table 0.7Vp-p : 0.5Vp-p
"Imagine toggle switch OSD modding a TV in 2019" - maxtherabbit
MarkOZLAD
OSD/External RGB Mux Diagram
OSD/External RGB Mux Resistor Value Table 0.7Vp-p : 0.5Vp-p
"Imagine toggle switch OSD modding a TV in 2019" - maxtherabbit
Re: TV RGB mod thread
Nope it was a Philips TDA9361.
The TV is actually brand new, I had to take it out of the box today. Cost a neat $20.
The composite on it is so clean I have to look twice to tell it apart from the new RGB input.
Still having issues with this Sony jungle refusing to remove the OSD from picture.
http://www.datasheetbank.com/datasheet/ ... 2139S.html
EDIT - All sorted
Last edited by Syntax on Tue Sep 12, 2017 4:42 pm, edited 1 time in total.
Re: TV RGB mod thread
Finished up today on a cool old Philips set I found at the tip.
It was rusty and full of mud and worms but the speakers sound great and the picture was nice.
Had to OSD hack this one as there was no external RGB input.
Jungle was a Philips TDA8361 http://www.alldatasheet.com/datasheet-p ... A8361.html
The blanking required sweeping a 10k pot with ground and 5v, wouldn't work with just 5v across a 10k pot.
End result was 2x2.4k resistors as a voltage divider to the blanking. would of been sitting around 3v I never checked.
3 tv's finished in a day I think I should sleep..
Re: TV RGB mod thread
You're doing the lord's work, Syntax!
-
mikejmoffitt
- Posts: 629
- Joined: Fri Jan 08, 2016 7:26 am
- Location: Tokyo, Japan
Re: TV RGB mod thread
Any modders in Ohio?
Re: TV RGB mod thread
Cthulhu? :pcyborc wrote:You're doing the lord's work, Syntax!
I swear you can hear the screens squeak with joy the first time you let them play a game via their RGB inputs
As far as adding sets to a list I'm not sure how well that will work out for other.
I think a list of Jungle ics and how to handle each one is more appropriate. More often than not I find the same jungle in different branded units.
Maybe for brands write a short paragraph for each like.
Sony
display button is a bitch.
Sony tv's with L2Fil can be horizontal tuned.
Lg
Most units have circuit board layout compatible with a scart header. After installing it's usually just a service menu edit.
Philips chips needs divided power not just 5v and a resistor.
Something like that. Already so much info is lost in this thread.
Also is have to open up the sets to accurately show what I did to make each one work, my memory not good enough against to 10 sets I've done.
Got 2 Sony's a rear projection screen and a quintrix to do today. First Quintrix...
Really though once you have the basics under your belt you can mod any set.
I look at jungles now and find 3 similar caps,follow the traces to 3 termination resistors and just know that's RGB input. Data sheets help a tonne though.
It usually just blanking that's a bitch. I may take some pictures and do a short tutorial on the 3/4 different ways jungles accept blanking.
Not sure how much longer I'll be doing this.
The original intention was to find thrown out tv's and mod them till I have a sweet one PER console.
But I've recently lined up about 90× 28 inch RGB crt wall installation sets. All with fk all use but case scratches as they are ex rentals.
Plan is to make a crt wall and put that fake emulator loader movie everyone puts on their front ends to shame.