NESRGB board available now

The place for all discussion on gaming hardware
User avatar
Einzelherz
Posts: 1279
Joined: Wed Apr 09, 2014 2:09 am

Re: NESRGB board available now

Post by Einzelherz »

Guspaz wrote:I can't see how you'd do that, without desoldering the whole RF box, unless you want to cut some traces on the motherboard and run the audio and video into the 5-pin connector that goes off the motherboard. But then you're going through the NES video amp, so I think you'd need to reduce the voltage on the video line. Resistors, I guess?
I recalled being able to get at the pins for the AV on the side without desoldering the box. I assume you can just cut the traces there for the composite and mono plug and just reroute it from the NESRGB.

I could be misremembering though. It was a year ago :|

Image

Over there on the top left, can't you just wire directly to the jacks?
User avatar
Guspaz
Posts: 3150
Joined: Tue Oct 06, 2015 7:37 pm
Location: Montréal, Canada

Re: NESRGB board available now

Post by Guspaz »

You can wire directly to the jacks (it's the big solder joints right next to them), but the traces are on the other side (the solder joints, as you can see here, are surrounded by the ground plane). If you could find a trace farther up the circuit to cut, maybe you could do that, although I'm no electrical engineer, so I don't know if there would be any ill effects to wiring directly to the jack while some or all of the NES' video amp is still connected to the jacks, even if it has no input.

I think I'll wire up some other video connectors in the future anyhow, such as s-video, and maybe component if I can get the component kit without paying more for shipping than the kit itself costs.

I'm going to have to crack the thing open again in a few weeks to install my replacement Blinking Light Win, so at that point I'll definitely be taking leonk's advice and backing the mini-din with hot glue, and maybe I'll do the s-video and switch at the same time.
leonk
Posts: 1080
Joined: Sun Mar 13, 2011 9:29 pm
Location: Toronto, Canada

Re: NESRGB board available now

Post by leonk »

Guspaz wrote:So you push it up through the hole from under? I can see how that would produce a cleaner install.
:lol: :lol: :lol: think outside the box. Solder as if the NESRGB is installed turned 180 degrees. You then end up soldering the wires flat down to the pins - going towards the EXP connector. And then the wire twists 180 degrees under the PCB! You almost don't see any wire.
Guspaz wrote: I should look into the 3D-printed Multi-AV connector, since you can also get composite video and S-Video and component (via HDR cables) on a single connector. Might need to swap out the bottom shell to do that, though.
Yes. Or harvest it from a dead console. I pickup dead gamecube's for about 10-20$ .. very cheap way to get the connector! It's basically the only way I install the NESRGB (using multiAV connector)
Guspaz wrote:There were two pads that needed multiple cables, ground (one to power board, one to audio jack, one to video jack, optionally a fourth to the s-video jack) and +5V (one to the regulator, one to the video socket).
ground is ground is ground. Why go all the way back to the NESRGB if the best ground is the actual NES PCB 5mm away?? Also, you mentioned 5V. I guess you decided to use Tim's 7805 PCB. I throw those out. He doesn't even include it with the Top loader kit. The NES 7805 is good enough for NESRGB + EverDrive. You can always replace the stock 7805 with a 1.5A version.
Guspaz wrote:The ultimate destination is a PVM 14L2, although I'll need an OSSC or Framemeister if I want to loop that (and all my other RGB consoles) to my projector (which serves as my TV).
I guess you wired it for #CS / composite sync.
User avatar
Guspaz
Posts: 3150
Joined: Tue Oct 06, 2015 7:37 pm
Location: Montréal, Canada

Re: NESRGB board available now

Post by Guspaz »

leonk wrote:ground is ground is ground. Why go all the way back to the NESRGB if the best ground is the actual NES PCB 5mm away?? Also, you mentioned 5V. I guess you decided to use Tim's 7805 PCB. I throw those out. He doesn't even include it with the Top loader kit. The NES 7805 is good enough for NESRGB + EverDrive. You can always replace the stock 7805 with a 1.5A version.
Well, I wasn't eager to diverge too far from the instructions, considering it was my first such project, and I figured Tim probably knew better than I did for electronic stuff :) My understanding of the reasoning for not including the extra 7805 with the toploader kit was because the toploader has a much larger heatsink on the regulator. I was tempted to skip the power installation and just solder the jumper, but I figured, what the heck, I've got the thing, can't hurt to take some load off the NES 7805. It's true that it would have made for a cleaner install by eliminating two bundles of wires, though.
leonk wrote:I guess you wired it for #CS / composite sync.
Yes, although that would be quite easy to change that and connect to a composite breakout adapter if I really had to. I thought it best to avoid any potential interference in the questionable cable, and I knew my PVM was fine with csync. I mean, I was doing this work for myself, for my setup, not for someone else where maximizing compatibility would be preferable.
User avatar
Guspaz
Posts: 3150
Joined: Tue Oct 06, 2015 7:37 pm
Location: Montréal, Canada

Re: NESRGB board available now

Post by Guspaz »

I decided to just go for it tonight, and on top of re-securing the RGB socket with hot glue as leonk suggested (which worked great, might I add, thanks!), I went ahead and installed everything else that the NESRGB came with: the palette switch and the s-video port. Installing these was way easier than previous work due to a combination of experience from the first set of jacks, and from leonk's suggestions (hot glue backing the PCB instead of epoxy, trim the top pins to get to the bottom ones). Here's photos:

Inside: http://i.imgur.com/CzM1uSI.jpg

Rear: http://i.imgur.com/SSnOyVY.jpg

I tried to keep the hot glue as tidy as I could, didn't want it getting all over the place.

Anyhow, it's all working quite nicely. S-Video works, RGB works, audio works, palette switching works (wired for garish/natural/improved), and the ports feel a lot better with the glue now. There does seem to be one glitch, though: ever so often, I'll see a flash for one frame of part of one scanline that has some garbled pixels (mostly greenish ones, I think). Is this normal? Jason mentions something similar with the Playchoice PPU here: http://www.game-tech.us/mods/original-nes/
User avatar
Einzelherz
Posts: 1279
Joined: Wed Apr 09, 2014 2:09 am

Re: NESRGB board available now

Post by Einzelherz »

Is it the standard edge line that repeats/buffers (can't recall which) data and is usually a copy of the line that just disappeared on the opposite side of the screen?
User avatar
Guspaz
Posts: 3150
Joined: Tue Oct 06, 2015 7:37 pm
Location: Montréal, Canada

Re: NESRGB board available now

Post by Guspaz »

No, it's a horizontal line at a random place in the screen, a single scanline tall, a random length (typically around a third of the screen long), and lasting only for one frame. It doesn't happen often (maybe once per minute), and it's hard to be more specific since it doesn't stay for more than one frame.
leonk
Posts: 1080
Joined: Sun Mar 13, 2011 9:29 pm
Location: Toronto, Canada

Re: NESRGB board available now

Post by leonk »

Guspaz wrote:No, it's a horizontal line at a random place in the screen, a single scanline tall, a random length (typically around a third of the screen long), and lasting only for one frame. It doesn't happen often (maybe once per minute), and it's hard to be more specific since it doesn't stay for more than one frame.
sigh .. you forgot to remove the original composite video transistor didn't you. :)
User avatar
yxkalle
Posts: 135
Joined: Sun Feb 16, 2014 4:32 am
Location: Stockholm, Sweden

Re: NESRGB board available now

Post by yxkalle »

Guspaz wrote:No, it's a horizontal line at a random place in the screen, a single scanline tall, a random length (typically around a third of the screen long), and lasting only for one frame. It doesn't happen often (maybe once per minute), and it's hard to be more specific since it doesn't stay for more than one frame.
Does it display this sort of behavior in all games? Super Mario Bros. spews out random glitchy lines on both modded and unmodded consoles.

http://forums.nesdev.com/viewtopic.php?f=2&t=10104
User avatar
Guspaz
Posts: 3150
Joined: Tue Oct 06, 2015 7:37 pm
Location: Montréal, Canada

Re: NESRGB board available now

Post by Guspaz »

leonk wrote:sigh .. you forgot to remove the original composite video transistor didn't you. :)
No, I didn't see it in the instructions, so it didn't occur to me. I think the thing I noticed is different (see the second part of this post), but what is the composite thing meant to fix, and how would I go about doing it? Some googling seems to turn up references to pulling stuff out of the RF box, which doesn't seem practical.

yxkalle wrote:Does it display this sort of behavior in all games? Super Mario Bros. spews out random glitchy lines on both modded and unmodded consoles.

http://forums.nesdev.com/viewtopic.php?f=2&t=10104
Yeah, it looks exactly like that. I guess it's not a problem related to the modding, it's just something that happens. That's good to know.
leonk
Posts: 1080
Joined: Sun Mar 13, 2011 9:29 pm
Location: Toronto, Canada

Re: NESRGB board available now

Post by leonk »

too lazy to look it up. There's another post here about it. Game tech us also posted a while ago about how it interferes with ever drive as well as hi def nes device.

Ive always temoved them so never had issues. but a lot of people dont and find problems. its feedback from the transistor back into pin 21 / composite video out.
famicomboy
Posts: 4
Joined: Wed Jun 15, 2016 5:50 pm

Re: NESRGB board available now

Post by famicomboy »

I've been doing an NES RGB on an AV Famicom and had massive trouble desoldering a couple pins on the PPU. It looks like the solder mask between the pins got ruined. I don't know enough about the pinout and can't see the traces on the board well enough to know where they're supposed to connect to. Here's what the back of the board looks like with the IC connector soldered in:
Image

Does anyone know where I could connect those two pins to? (Pins 4 and 5 or 24 and 25 according to this pinout) Before I was getting a solid color screen with sound that would smoothly transition from green to pink and then end up on blue, but then I cut the original video line and now I get a black screen with no audio.

I'm also confused as to how to connect the NES RGB to the Multi out port. Do I just need R,G,B and Composite? (as per Tim Worthington's guide) I'll be using a EuroSCART GC PAL cable from Retro Gaming Cables hooked up to a XRGB Mini. I assume that means I don't need CSYNC but I'm unsure.
leonk
Posts: 1080
Joined: Sun Mar 13, 2011 9:29 pm
Location: Toronto, Canada

Re: NESRGB board available now

Post by leonk »

you got multiple issues here. so you need to solve them 1 at a time. I assume the PPU is socketed in the NESRGB. I assume the NESRGB is socketed in the famicom Av. So Just take the PPU out and stick it in the socket. Once you got composite video restored and working, focus on NESRGB. Multimeter is your friend here.

For famicom AV you need to connect R, G, B, CS#, Chroma, Luma. I also suggest cutting the original composite line ns running conposite to the multiAV from the NESRGB. See nintendo multiAV pinout on google to see which pins that is.
famicomboy
Posts: 4
Joined: Wed Jun 15, 2016 5:50 pm

Re: NESRGB board available now

Post by famicomboy »

If I plug the original ppu back into the motherboard, I get a black screen with no sound, so same as if it's plugged in the NESRGB.

I do have a multimeter but I'm unsure where to check for consistency. This is my first project like this and knew it was gonna be challenging, but I'm probably in over my head so far. I'm willing to put in the time to educate myself though, I'm not sure where to start.
mvsfan
Posts: 1209
Joined: Sat Oct 06, 2012 12:24 am

Re: NESRGB board available now

Post by mvsfan »

check your soldering on the ppu socket. it looks like you skipped a pin.

It also looks like you have cold solder joints. if your using rosin core solder it means your getting it too hot and evaporating all the flux.

if your using seperate flux, your not using enough.
copy
Posts: 232
Joined: Fri Apr 29, 2016 10:38 pm

Re: NESRGB board available now

Post by copy »

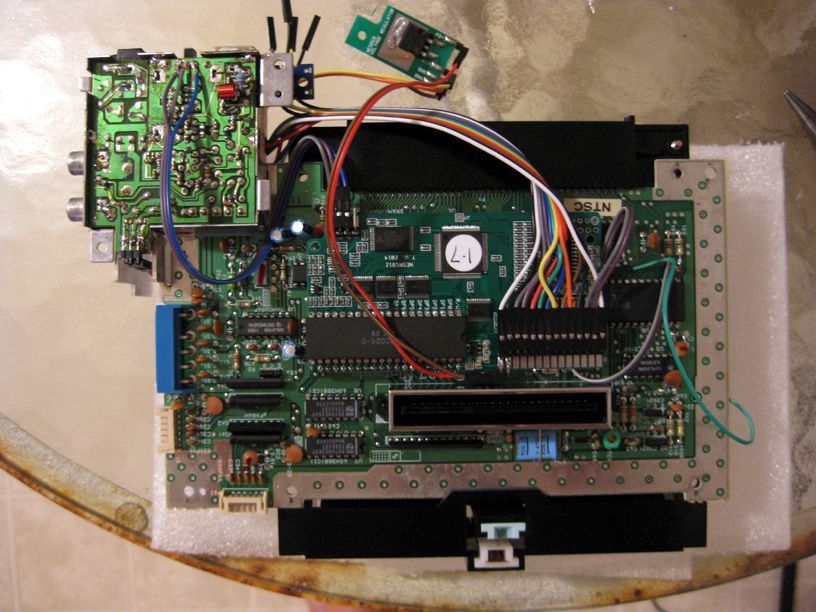
I just bought an NES pre-modded with the NESRGB. I'm mostly pleased so far, but I am slightly worried about the picture quality.

This particular modder installs SNES/N64 multi-out jacks, so I'm using SNES cables. I notice light diagonal bars in the s-video output, confirmed on two different cables which don't produce this effect on my SNES.

Using RGB SCART to the XRGB-Mini, I notice another issue. In motion it looks like flickering horizontal lines. If you imagine that the screen is divided into four horizontal sections, the noise seems concentrated in the second section from the top. Using the Mini's "freeze" function, I can see the noise as sort of blotchy, blocky looking artifacts. It shows up well against the sky in Super Mario Bros.

Theorizing about the cause: I confess I'm using this third-party power supply, but I hope it's not the problem because it's supposed to be a good quality adapter with regulated voltage. Unfortunately I can't find my original NES AC adapter at the moment to test (I'm sure it's packed away in a box somewhere). I also tried the same site's Genesis 1 power supply which is 1.25A as opposed to their NES adapter's 1.00A -- I thought the extra amperage might help, but no, same results.

Has anyone else experienced either of these types of noise? It's a bummer since I've been eagerly anticipating this mod for a long while.

Edit: Just made an interesting discovery. It seems the RGB noise is the worst in only one of the three palette switch settings. It is greatly reduced (maybe not even present at all) on the other palettes. Is it plausible that there could be a flaw with the switch, or its wiring?
leonk
Posts: 1080
Joined: Sun Mar 13, 2011 9:29 pm
Location: Toronto, Canada

Re: NESRGB board available now

Post by leonk »

Not enough info..

So many things have been known to cause issues.

- Not removing the original composite video transistor
- Replacing the 7805 with a switching transistor
- Poor SCART or S-Video cables (bad shielding)
- Poor install
- Using 3rd party switching power supply (use a real transformer, not switching PSU from China! The Sega Genesis Model 1 AC/DC adapter works great with NES!)
- People mistakenly thinking that the noise visible on the right edge of the screen in a flaw (NES always had it, the CRT TV overscan just hid it!)

Post pictures.
copy
Posts: 232
Joined: Fri Apr 29, 2016 10:38 pm

Re: NESRGB board available now

Post by copy »

leonk wrote:Not enough info..

So many things have been known to cause issues.

- Not removing the original composite video transistor
- Replacing the 7805 with a switching transistor
- Poor SCART or S-Video cables (bad shielding)
- Poor install
- Using 3rd party switching power supply (use a real transformer, not switching PSU from China! The Sega Genesis Model 1 AC/DC adapter works great with NES!)
- People mistakenly thinking that the noise visible on the right edge of the screen in a flaw (NES always had it, the CRT TV overscan just hid it!)

Post pictures.
The mod was done by Yurkie from the AtariAge forums. Most people seem to consider his work top-notch. No clue about the composite transistor. His page says "All NES consoles that I mod or sell include replacing the 7805 (1 amp) voltage regulator with the L7805CV (1.5 amp) voltage regulator and a replacement 2200 micro farad electrolytic capacitor."

The RGB cables are from retro_console_accessories (I tried both c-sync and sync-on-luma). Again, they work fine with my SNES. Can't remember the source of the s-video cables, but like I said they also perform okay with the SNES.

Just tried an authentic original Sega Genesis 1 AC adapter. Absolutely no change, the problem remains.

Not talking about overscan junk pixels. Again, flickery horizontal lines around the middle of the screen, stretching across it. It's only present on one out of the three palette switch positions. (This really seems like a potentially important clue to me.)

Unfortunately I lack any RGB/HDMI capture equipment. I think it would be exceedingly difficult to get a good picture of the problem from a camera, but I may try later.
copy
Posts: 232
Joined: Fri Apr 29, 2016 10:38 pm

Re: NESRGB board available now

Post by copy »

I didn't realize that the s-video diagonal lines are a known problem, experienced by Voultar who first mentioned them here. His picture in this post looks like what I'm seeing.
mvsfan
Posts: 1209
Joined: Sat Oct 06, 2012 12:24 am

Re: NESRGB board available now

Post by mvsfan »

Only replacing the large capacitor isnt the best idea. Ive seen nes before that had some of the smaller caps leaking as well.

On some nes rf boxes, you dont even have to unsolder the rf box to get to the other caps. just remove the big cap and you should be able to pick the rest out with tweezers.

as far as the diagonal lines in the video, havent run across that yet with nesrgb.
djdavedoc
Posts: 14
Joined: Sun Jan 26, 2014 5:12 pm

Re: NESRGB board available now

Post by djdavedoc »

I have severed the trace between the Transistor and where it would go to the PPU but I still get the lines. Interestingly if I plug the Famicom directly to my TV I get Jailbars rather than just the odd lines I showed in the picture previously. Any ideas for removing Jailbars?
leonk
Posts: 1080
Joined: Sun Mar 13, 2011 9:29 pm
Location: Toronto, Canada

Re: NESRGB board available now

Post by leonk »

mvsfan wrote:Only replacing the large capacitor isnt the best idea. Ive seen nes before that had some of the smaller caps leaking as well.

On some nes rf boxes, you dont even have to unsolder the rf box to get to the other caps. just remove the big cap and you should be able to pick the rest out with tweezers.

as far as the diagonal lines in the video, havent run across that yet with nesrgb.
The 2200uF cap is the only power cap there. The rest are for audio/video/RF and dont need to be replaced if you remove the composite video transistor (Q301?).

Ive done dozens and dozens of NESRGB consoles. Never saw a problem with S-Video. Keep in mind that the cables made by retro console accessories are for rgb only. svideo tend to be 3rd party china special. If you got rgb, why even bother with svideo. :)

as for the installer. Todd is a great guy, I'm sure the install was done correctly and professionally. Contact him. He'll fix it up if there's a problem.
copy
Posts: 232
Joined: Fri Apr 29, 2016 10:38 pm

Re: NESRGB board available now

Post by copy »

Doing some more reading in this thread, I found more posts by ms06fz and CkRtech describing similar problems in 2014. This post especially seems to match my experience of RGB noise, even down to only occurring on one palette:

http://shmups.system11.org/viewtopic.ph ... 1#p1025141
ms06fz wrote:"Shimmering" is a good description of what I've been seeing. The diagonal lines are there but barely visible, but there's a blotchy, flickering interference in certain large areas of color. Both effects become more apparent when using the Playchoice palette, and (it seems) less apparent when using the emulator palette. I wasn't able to spot the issue in TMNT I think, but I did see a bit of it in Rockman 3 (on the "boss introduction" screens mainly) and it was pretty easy to spot in Punch Out (in the first few bouts, over half the screen is filled with a blue that hits this issue)

(EDIT): OK, actually tried Punch Out again and the "shimmering" effect was worst in the standard palette and not so bad in the other two.
Also (http://shmups.system11.org/viewtopic.ph ... 8#p1025078):
CkRtech wrote:So I captured some footage using a elgato game capture HD, and TMNT's issues in the recorded video manifest as a shimmering like effect in the solid colors rather than rolling diagonal lines like they do on my plasma display. I could upload it somewhere later if needed.

Results:
NESRGB->xrgb->plasma = rolling diagonal lines in solid colors. Very obvious.
NESRGB->xrgb->game capture HD = shimmering
NESRGB->xrgb->LED monitor = shimmering, but then I changed the picture mode on the monitor and saw the diagonal lines in addition to the shimmering.

I suspect the game capture HD was possibly adding a bit of extra filtering of some sort, but the bottom line is that problem still exists - it just manifests in a different way. I've already made adjustments to filtering on the xrgb mini, and it seems like the xrgb is currently "doing its best" to filter it out.

Look forward to your results with my fingers crossed, ms06fz.
It sounds like my s-video diagonal lines and RGB noise are related, but seems like no one ever figured out the cause or solution.
leonk
Posts: 1080
Joined: Sun Mar 13, 2011 9:29 pm
Location: Toronto, Canada

Re: NESRGB board available now

Post by leonk »

copy: The only time I've seen diagonal (45 degree) faint lines was when I replaced the 7805 with a switching power regulator. Going back to regular 7805 got rid of them. Mind you I'm playing on a 20" Sony PVM that actually shows video noise MORE than an XRGB (the framebuffer / hdmi upscalling tends to actually remove some noise)

My point, this seems to be related to power. A frequency mismatch between FPGA and switch PSU. I would guess you are not using original Nintendo power brick? If not, try to source one and see if it removes it for you.
copy
Posts: 232
Joined: Fri Apr 29, 2016 10:38 pm

Re: NESRGB board available now

Post by copy »

I already said I can't find my original NES AC adapter at the moment, but I did try the Sega Genesis 1 AC adapter as you suggested. And Yurkie says he installs an L7805CV linear voltage regulator in his NES mods. I will keep looking for my NES adapter, but I have tried three totally different adapters so far with no change to the problems.

Why such resistance to the idea that I'm actually reporting a real problem? Believe me, I spent long hours this weekend checking and rechecking lots of variables (cables, power supplies, settings, etc.) and the problems persisted. The people I referred to earlier in the thread also talk of futilely trying multiple cables and other ideas.

Trust me, I don't want to be seeing these artifacts. In my ideal scenario, I would have turned it on and everything would have been perfect.

Does truly no one else find the palette switch factor to be an interesting aspect to the problem? (To reiterate, the RGB "shimmering" noise I am seeing only occurs on one palette setting; the s-video diagonal lines remain unchanged on all three palette settings.) I admit I know very little about electronics, but couldn't there be something to this? Maybe the palette switch circuit could be introducing noise or attracting interference to the RGB lines somehow? Is this angle really not worth investigating, at least for my RGB symptoms if not the s-video?
User avatar
Einzelherz
Posts: 1279
Joined: Wed Apr 09, 2014 2:09 am

Re: NESRGB board available now

Post by Einzelherz »

Afaik the palette switch isn't in line with any video signal.
leonk
Posts: 1080
Joined: Sun Mar 13, 2011 9:29 pm
Location: Toronto, Canada

Re: NESRGB board available now

Post by leonk »

copy: what about composite video?

the diag lines is noise in the video signal. As I said, power noise. Maybe the Luma (Y) wire is too close to a power source.

Whatever the problem is, given that you're not going to open the console, diagnose it using test equiptment, there's little we can do to help you
:D

What you are asking for is the equivalent of a car owner trying to figure out why their engine has a knocking noise by talking to people on the internet rather than just talk to the car mechanic that can actually look at the motor and notice the actual root cause of your problem.
Skips
Posts: 404
Joined: Tue Oct 22, 2013 3:03 am

Re: NESRGB board available now

Post by Skips »

leonk wrote:copy: what about composite video?

the diag lines is noise in the video signal. As I said, power noise. Maybe the Luma (Y) wire is too close to a power source.

Whatever the problem is, given that you're not going to open the console, diagnose it using test equiptment, there's little we can do to help you
:D

What you are asking for is the equivalent of a car owner trying to figure out why their engine has a knocking noise by talking to people on the internet rather than just talk to the car mechanic that can actually look at the motor and notice the actual root cause of your problem.
A knocking noise in your engine means you probably strippped a bearing. Sorry sir but your engine will need to be rebuilt.
I am no longer taking free or paid modding projects, please do not contact me asking for my services. Thanks :).
famicomboy
Posts: 4
Joined: Wed Jun 15, 2016 5:50 pm

Re: NESRGB board available now

Post by famicomboy »

mvsfan wrote:check your soldering on the ppu socket. it looks like you skipped a pin.

It also looks like you have cold solder joints. if your using rosin core solder it means your getting it too hot and evaporating all the flux.

if your using seperate flux, your not using enough.
Being a beginner, I'm not sure how you can see a pin skipped or cold solder joints. What kinds of clues can I look for to spot that? I look at them and can't see those issues.
I do have a flux pen now but didn't when I soldered those joints. I get worried about reflowing on these joints. I basically get worried about working on this at all anymore.

Edit:
Also I don't know if anyone is willing to take a look, but here's a quick album with some pictures of the current state:
http://imgur.com/a/jFa7u
User avatar
CkRtech
Posts: 668
Joined: Mon Aug 27, 2012 9:30 pm
Location: Seattle, WA

Re: NESRGB board available now

Post by CkRtech »

famicomboy wrote:I basically get worried about working on this at all anymore.
You may want to consider sending it to a modder to salvage it.
famicomboy wrote: Being a beginner, I'm not sure how you can see a pin skipped or cold solder joints. What kinds of clues can I look for to spot that? I look at them and can't see those issues.
The skipped pin that mvsfan was probably referencing was the third pin from the left at the top row of your pic. It looks like you added some solder to it since that shot based on the pictures you linked at the end of your last post.

Cold solder joints typically look like more of a ball than a cone - the ball is surrounding your pin rather than making contact with the solder pad surrounding the pin. "Checking for cold solder joints" can also simply mean walking the pins with your iron and some flux in order to reheat the solder and pad to make sure the two are making good contact. On the subject of flux - That is great that you have a pen now, however rosin core solder and a good iron should be enough.

I would write more, but it sounds like you are on the fence about touching it again. You could always send it off like I said but still continue to learn - just with a project that is a bit simpler.
Post Reply