NESRGB board available now

The place for all discussion on gaming hardware
eightbitminiboss
Posts: 450
Joined: Mon Sep 17, 2012 9:01 pm

Re: NESRGB board available now

Post by eightbitminiboss »

thebert wrote:
eightbitminiboss wrote:
thebert wrote:Anyone have any additional tips for desoldering those 4 pins of the ppu? I checked and triple checked that every other pin is completely free. I just cant seem to heat them all up at the same time to make it come loose. It gets hot in that section and it makes me nervous that i will burn out the ppu, if I try too long at one time. Any tips or success stories would be greatly appreciated! :?
Add more solder to the trouble pins. It'll heat up the older solder faster
Do you mean on the top side too? I did try adding more underneath, but I feel like I'm having trouble keeping all of them hot. Like, I can get 2 or three hot, but then the 4th is already solid again...
Oh, you're doing all 4 at once? I just do each individual one. Underside only.

Edit: I used a Radio Shack desoldering iron for that method.
thebert
Posts: 18
Joined: Fri Jan 24, 2014 2:01 pm

Re: NESRGB board available now

Post by thebert »

eightbitminiboss wrote:
thebert wrote:
eightbitminiboss wrote:
Add more solder to the trouble pins. It'll heat up the older solder faster
Do you mean on the top side too? I did try adding more underneath, but I feel like I'm having trouble keeping all of them hot. Like, I can get 2 or three hot, but then the 4th is already solid again...
Oh, you're doing all 4 at once? I just do each individual one. Underside only.

Edit: I used a Radio Shack desoldering iron for that method.
Oh I see. I was trying to do like the instructions for the front loader said where you heat up all the pins and just pull it out all at once while the solder is molten. ...maybe I just need to buy that desoldering iron... :?
Zets13
Posts: 142
Joined: Wed Nov 02, 2011 10:53 pm

Re: NESRGB board available now

Post by Zets13 »

thebert wrote: Do you mean on the top side too? I did try adding more underneath, but I feel like I'm having trouble keeping all of them hot. Like, I can get 2 or three hot, but then the 4th is already solid again...
Honestly, I didn't try the keep those pins hot and pull it out method. I too just kept adding new solder to any stuck pins and sucking it up using a cheap bulb/iron combo desoldering iron from Radio Shack and wiggled each pin to make sure they'd come free. Took some time, but it worked eventually. It is entirely possible that some trace amounts remaining solder just broke free when I pulled it out, but I got it out without damaging any pins.

I guess you could try using some of that Chip Quik stuff if you can't get it out.
User avatar
game-tech.us
Posts: 173
Joined: Fri Aug 23, 2013 12:24 am

Re: NESRGB board available now

Post by game-tech.us »

thebert wrote: Edit: I used a Radio Shack desoldering iron for that method.
...maybe I just need to buy that desoldering iron... :?
I'll sell you mine, I hate it, I like the soldapult better and love the hako 808.
markfrizb
Posts: 83
Joined: Fri Mar 25, 2011 2:32 pm

Re: NESRGB board available now

Post by markfrizb »

thebert wrote:Anyone have any additional tips for desoldering those 4 pins of the ppu? I checked and triple checked that every other pin is completely free. I just cant seem to heat them all up at the same time to make it come loose. It gets hot in that section and it makes me nervous that i will burn out the ppu, if I try too long at one time. Any tips or success stories would be greatly appreciated! :?
I use the cheap radio shack solder sucker for all the pins except the 4 that are the hardest. For the 4 pins that are all together on the ground plane, I use a hot air iron and I heat up,the 4 pins with the hot air. That heats them all up at once and then the chip just lifts out. :)
User avatar
darcagn
Posts: 607
Joined: Tue Mar 04, 2008 3:26 pm
Contact:

Re: NESRGB board available now

Post by darcagn »

I just used the cheap Radio Shack desoldering iron for the PPU as well. I've desoldered 2 CPUs and 3 PPUs using that method, it works great, but it requires patience and it requires lots of adding solder and removing solder until you get the leg completely free. I've never had to heat multiple legs at once.

ChipQuik is made for surface-mount, not through-hole components, although I think it could be useful for this scenario. Just keep in mind the stuff isn't cheap and you might end up using a lot of it.
User avatar
McCracAttack
Posts: 59
Joined: Fri Jan 24, 2014 4:01 pm

Re: NESRGB board available now

Post by McCracAttack »

I'll pile on and recommend getting a desoldering iron too. It was hard enough with the iron that I can't imagine using wick. Half way through I figured out I could see if the pin was free or not just by holding the board up to my desk lamp and looking through it. Another good indicator was how easily a pin would wiggle once it was really free. A free pin will move easily and then bounce back to where it was. A stuck pin won't bounce back because its being bent, not wiggled. Even after all that I still had to turn the board over and "shimmy" the PPU in place to get it to finally come free. I dunno, maybe that's a really bad idea that might break pins but that's how it went down for me.

But yeah, removing the PPU is the hardest part and I would recommend setting aside one whole day/evening just for that part. Even if it only takes a couple of hours you won't want to even look at a PCB once you're done.
User avatar
ApolloBoy
Posts: 938
Joined: Sat Jan 28, 2012 7:17 pm

Re: NESRGB board available now

Post by ApolloBoy »

I use an Aoyue desoldering station, makes removing the PPU a complete breeze.
TheRetromancer
Posts: 116
Joined: Fri Feb 07, 2014 9:27 pm

Re: NESRGB board available now

Post by TheRetromancer »

opt2not wrote:Thanks guys, I appreciate the pep-talk but I think I'm over my head with this, and frustrated enough that I'm going to send it off to a professional to help get it working.

Word of advice to those of you who're like me, with basic knowledge and skill with soldering -- get a proper desoldering iron. Don't rely on those suckers/braid and a soldering iron only... Unless you're super good at using them I guess.
Actually, using soldering braid is nearly as good as using a Radioshack Desoldering Iron. You do need to prep the materials properly, though - add new solder to the points to be removed, brush flux over the solder braid, and use a broad iron tip. As I mentioned earlier, the Hakko 808 is the best thing to use, but not everyone wants to drop $200+ on it.

Solder suckers are useless, though. The worst are those spring-loaded ones - complete wastes of time and money.
"Thanks for the nice reply. I do offer to do work without hot glue too if people prefer it that way." - Drakon
User avatar
Vigormortis
Posts: 61
Joined: Sun Jan 19, 2014 7:07 am

Re: NESRGB board available now

Post by Vigormortis »

I used a Radioshack desoldering iron on every pin then cleaned up stubborn pins with a wick on the top side. On extra stubborn pins, I would add fresh solder and repeat the desoldering iron followed by wick mopup. The wick was really good at soaking up that last bit of solder that would cling to the pin and the edge of the hole. You gotta use a real soldering iron with the wick to really press it into the corner where the chip's leg meets the board. Don't just try to poke the wick with the tip of the desoldering iron :P . This method has worked great for me so far.
User avatar
ninn
Posts: 119
Joined: Tue Jan 04, 2011 1:30 pm
Location: Vienna

Re: NESRGB board available now

Post by ninn »

I used to slam the pcb with the hot solder in the hole onto my table, throwing the hot solder out.
Never lost a board that way, but gives a wierd feeling after slamming it too often.

Be sure to add solder before removing it. Sounds a bit wierd, but makes it flow easier.

I'd prefer solder wick to a bad solder sucker.
Zets13
Posts: 142
Joined: Wed Nov 02, 2011 10:53 pm

Re: NESRGB board available now

Post by Zets13 »

ninn wrote:I used to slam the pcb with the hot solder in the hole onto my table, throwing the hot solder out.
Never lost a board that way, but gives a wierd feeling after slamming it too often.
I... I don't think I have ever heard of that method...
thebert
Posts: 18
Joined: Fri Jan 24, 2014 2:01 pm

Re: NESRGB board available now

Post by thebert »

Thanks for the tips everyone! I ordered some ChipQuik, and once I try it, I'll report how it works out. I know its designed for SMD desoldering, but some say it works for through-hole too. Worth a shot, I guess. If that doesn't work I'll try the Radioshack desoldering iron. And if that doesn't work, I'll probably end up resorting to Ninn's method out of sheer frustration :wink:
TheRetromancer
Posts: 116
Joined: Fri Feb 07, 2014 9:27 pm

Re: NESRGB board available now

Post by TheRetromancer »

Zets13 wrote:
ninn wrote:I used to slam the pcb with the hot solder in the hole onto my table, throwing the hot solder out.
Never lost a board that way, but gives a wierd feeling after slamming it too often.
I... I don't think I have ever heard of that method...
I've heard of it, and a former colleague of mine demonstrated it once in a 'For the love of all that's holy, DON'T DO THIS' training module on a late-80s motherboard. It WORKED, yeah, but it made the lot of us cringe. The sound that the PCB made as it hit the counter still gives me the woogies.

So, in case you newbies missed my point, FOR THE LOVE OF ALL THAT'S HOLY, DONT DO THIS!!!
"Thanks for the nice reply. I do offer to do work without hot glue too if people prefer it that way." - Drakon
User avatar
ninn
Posts: 119
Joined: Tue Jan 04, 2011 1:30 pm
Location: Vienna

Re: NESRGB board available now

Post by ninn »

Indeed, not a recommended technique.
Sorry for mentioning it, and not being clear about it. :oops:
alimadhi
Posts: 30
Joined: Sun Jan 26, 2014 12:53 pm

Re: NESRGB board available now

Post by alimadhi »

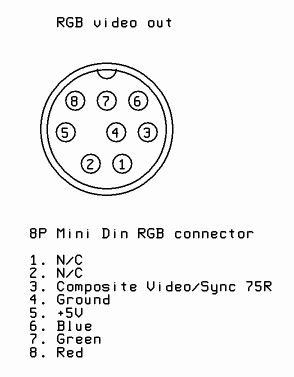
alimadhi wrote:need scart diagram for NESRGB i have just 8P mini din diagram, i will build my cable scart so i will use pin #1 for Audio

Image

i forgot to buy scart Cable with NESRGB Tim-W, please need diagrams Scart
User avatar
ApolloBoy
Posts: 938
Joined: Sat Jan 28, 2012 7:17 pm

Re: NESRGB board available now

Post by ApolloBoy »

alimadhi wrote:
alimadhi wrote:need scart diagram for NESRGB i have just 8P mini din diagram, i will build my cable scart so i will use pin #1 for Audio

Image

i forgot to buy scart Cable with NESRGB Tim-W, please need diagrams Scart
SCART diagrams are easily found online, just do a search for "SCART pinout" and there you go.
User avatar
Vigormortis
Posts: 61
Joined: Sun Jan 19, 2014 7:07 am

Re: NESRGB board available now

Post by Vigormortis »

Wooooo, AV Famicom came in today and so did the NESRGB adapter board from Gametech. This is by far the easiest system to NESRGB mod. The perfect connector is already there ready to be wired up :D . After finishing this project, I was reminded of something important though - my SNES SCART and s-video cables are crap lol. So much buzzing in the audio which is absent when I connect the audio through a separate wire.
alimadhi
Posts: 30
Joined: Sun Jan 26, 2014 12:53 pm

Re: NESRGB board available now

Post by alimadhi »

ApolloBoy wrote:
alimadhi wrote:
alimadhi wrote:need scart diagram for NESRGB i have just 8P mini din diagram, i will build my cable scart so i will use pin #1 for Audio

Image

i forgot to buy scart Cable with NESRGB Tim-W, please need diagrams Scart
SCART diagrams are easily found online, just do a search for "SCART pinout" and there you go.

what is about resister and capacitor ? and if you open Tim Scart you can see small kit I've seen it in youtube but the picture is not clear
User avatar
ApolloBoy
Posts: 938
Joined: Sat Jan 28, 2012 7:17 pm

Re: NESRGB board available now

Post by ApolloBoy »

alimadhi wrote:what is about resister and capacitor ? and if you open Tim Scart you can see small kit I've seen it in youtube but the picture is not clear
The NESRGB already has the resistors and caps you need so the SCART cable is wired straight through without extra components. That PCB inside Tim's SCART cable is a 12V pump circuit which is used for proper autoswitching on TVs with SCART. I assume you're not using autoswitching so you don't need the pump circuit.
alimadhi
Posts: 30
Joined: Sun Jan 26, 2014 12:53 pm

Re: NESRGB board available now

Post by alimadhi »

ApolloBoy wrote:
alimadhi wrote:what is about resister and capacitor ? and if you open Tim Scart you can see small kit I've seen it in youtube but the picture is not clear
The NESRGB already has the resistors and caps you need so the SCART cable is wired straight through without extra components. That PCB inside Tim's SCART cable is a 12V pump circuit which is used for proper autoswitching on TVs with SCART. I assume you're not using autoswitching so you don't need the pump circuit.

thank you brother :D
User avatar
Monstermug
Posts: 404
Joined: Thu Mar 31, 2011 7:58 pm
Location: London, UK

Re: NESRGB board available now

Post by Monstermug »

Will nesrgb boards be available to buy again soon Tim?
mufunyo
Posts: 176
Joined: Thu Jun 19, 2008 11:45 am

Re: NESRGB board available now

Post by mufunyo »

Tim, with the whole USB blaster flashing thing, do you think it's possible to patch in new palettes using a hex editor? If we're able to reflash the firmware, I'd love to see the opportunity to flash in custom palettes. Someone (doesn't have to be you) could even write a tool to make it easy for people to just load in a NESten .pal file and spit out a customised rom to flash.
markfrizb
Posts: 83
Joined: Fri Mar 25, 2011 2:32 pm

Re: NESRGB board available now

Post by markfrizb »

mufunyo wrote:Tim, with the whole USB blaster flashing thing, do you think it's possible to patch in new palettes using a hex editor? If we're able to reflash the firmware, I'd love to see the opportunity to flash in custom palettes. Someone (doesn't have to be you) could even write a tool to make it easy for people to just load in a NESten .pal file and spit out a customised rom to flash.
That's an interesting idea. Maybe custom load a pallet for Verses Vs games that need custom PPU's otherwise unavailable or unobtainable. You'd still have to use a NES PPU.
thebert
Posts: 18
Joined: Fri Jan 24, 2014 2:01 pm

Re: NESRGB board available now

Post by thebert »

Zets13 wrote:I guess you could try using some of that Chip Quik stuff if you can't get it out.
Hot diggity dawg! ChipQuik did the trick!!! :D I was able to add some to the trouble pins and it worked great!

For anyone interested, I added some and got it molten, and after a couple tries, was able to use my solder sucker to mostly clean up the hole. Then I added more into the hole, and was able to pull the chip out while those 4 pins were still molten. Hopefully if you're either an amateur like me, or don't have a Hakko 808 (like me), then this might help you change your expression from :evil: to :D

Now on to wiring!

Edit:
So I have it all wired up now, and I get audio, but no video. Right now, I have it set up using the s-video port, because I want to connect it to a multi-out, but I don't have one yet and don't have a mini-din cable for my xrgb-mini. I'm just testing with s-video for now. Just cause I was curious; when I plug in the yellow cable to the original composite port to my tv, I get a gray and white image that looks like the game (just no color), so I don't think I killed the ppu while desoldering. I was wondering if anyone has any recommendations for what I can check with my multimeter to find the problem? I'm installed in a front loader, NTSC, only shorted jumper J5. Thank you!
User avatar
moh
Posts: 1619
Joined: Tue Oct 18, 2011 9:26 pm
Location: Canada

Re: NESRGB board available now

Post by moh »

opt2not wrote:Thanks guys, I appreciate the pep-talk but I think I'm over my head with this, and frustrated enough that I'm going to send it off to a professional to help get it working.

Word of advice to those of you who're like me, with basic knowledge and skill with soldering -- get a proper desoldering iron. Don't rely on those suckers/braid and a soldering iron only... Unless you're super good at using them I guess.
I prefer using a solder sucker (yes, the spring-loaded ones) because it doesn't require me to press a hot iron against the pads (potentially burning them). When you're working with pcbs this old, you generally do not want to have your soldering iron on the pad itself when heating up joints, because they can easily be damaged. Using a solder sucker allows me to get the tool as close to the hole as possible, without worrying about damaging the pad.

And yes, I have successfully performed this mod with nothing by my trusty $3 solder sucker. Didn't even need the braid...
GaijinPunch wrote:Ketsui with suction cup.
Zets13
Posts: 142
Joined: Wed Nov 02, 2011 10:53 pm

Re: NESRGB board available now

Post by Zets13 »

thebert wrote: Edit:
So I have it all wired up now, and I get audio, but no video. Right now, I have it set up using the s-video port, because I want to connect it to a multi-out, but I don't have one yet and don't have a mini-din cable for my xrgb-mini. I'm just testing with s-video for now. Just cause I was curious; when I plug in the yellow cable to the original composite port to my tv, I get a gray and white image that looks like the game (just no color), so I don't think I killed the ppu while desoldering. I was wondering if anyone has any recommendations for what I can check with my multimeter to find the problem? I'm installed in a front loader, NTSC, only shorted jumper J5. Thank you!
Glad you got it out. Did you select a color palette, either by installing the switch or by bridging a palette to ground?
thebert
Posts: 18
Joined: Fri Jan 24, 2014 2:01 pm

Re: NESRGB board available now

Post by thebert »

Zets13 wrote:
thebert wrote: Edit:
So I have it all wired up now, and I get audio, but no video. Right now, I have it set up using the s-video port, because I want to connect it to a multi-out, but I don't have one yet and don't have a mini-din cable for my xrgb-mini. I'm just testing with s-video for now. Just cause I was curious; when I plug in the yellow cable to the original composite port to my tv, I get a gray and white image that looks like the game (just no color), so I don't think I killed the ppu while desoldering. I was wondering if anyone has any recommendations for what I can check with my multimeter to find the problem? I'm installed in a front loader, NTSC, only shorted jumper J5. Thank you!
Glad you got it out. Did you select a color palette, either by installing the switch or by bridging a palette to ground?
Yeah. I have the on-on-on switch, and it's wired like the top example on Tim's website (where it's just the three palettes and no off)
User avatar
opt2not
Posts: 1283
Joined: Fri May 20, 2011 6:31 pm
Location: Southern California

Re: NESRGB board available now

Post by opt2not »

moh wrote: And yes, I have successfully performed this mod with nothing by my trusty $3 solder sucker. Didn't even need the braid...
Well aren't you a fancy-ass dolphin! 8)
Congrats...it must be awesome looking on your set-up. :cry: :wink:
User avatar
ApolloBoy
Posts: 938
Joined: Sat Jan 28, 2012 7:17 pm

Re: NESRGB board available now

Post by ApolloBoy »

thebert wrote:
Zets13 wrote:
thebert wrote: Edit:
So I have it all wired up now, and I get audio, but no video. Right now, I have it set up using the s-video port, because I want to connect it to a multi-out, but I don't have one yet and don't have a mini-din cable for my xrgb-mini. I'm just testing with s-video for now. Just cause I was curious; when I plug in the yellow cable to the original composite port to my tv, I get a gray and white image that looks like the game (just no color), so I don't think I killed the ppu while desoldering. I was wondering if anyone has any recommendations for what I can check with my multimeter to find the problem? I'm installed in a front loader, NTSC, only shorted jumper J5. Thank you!
Glad you got it out. Did you select a color palette, either by installing the switch or by bridging a palette to ground?
Yeah. I have the on-on-on switch, and it's wired like the top example on Tim's website (where it's just the three palettes and no off)
I found some of those cheap on eBay recently and I ordered a few for an install I'm doing right now and for any future installs if people want a palette switch. I really don't like the slider switch that Tim used to include and it's fairly difficult to mount one in a top loader or AV Fami without it hitting the heat sink or being obtrusive.
Post Reply