
This is my personal system I finally got around to doing today, and the layout is identical to a system I modded for KindGrind earlier. The electronics may be slightly different for S-video. This layout lets me fit everything I want on the back panel unlike most other DC video mods I have seen, though I suppose it can be adjusted for different features. Space inside the Dreamcast towards the rear is extremely limited, however.
The whole process took me about 6-7 hours.
Also, please don't PM me requesting this mod as a service, I am already sick of doing it
Features:
-Region change, detailed in this thread. The system was originally NTSC-U, and has been changed to NTSC-J since my Japanese games outnumber my US games about 4:1. Note that this mod can only be done on a Dreamcast which is capable of reading CD-R discs.
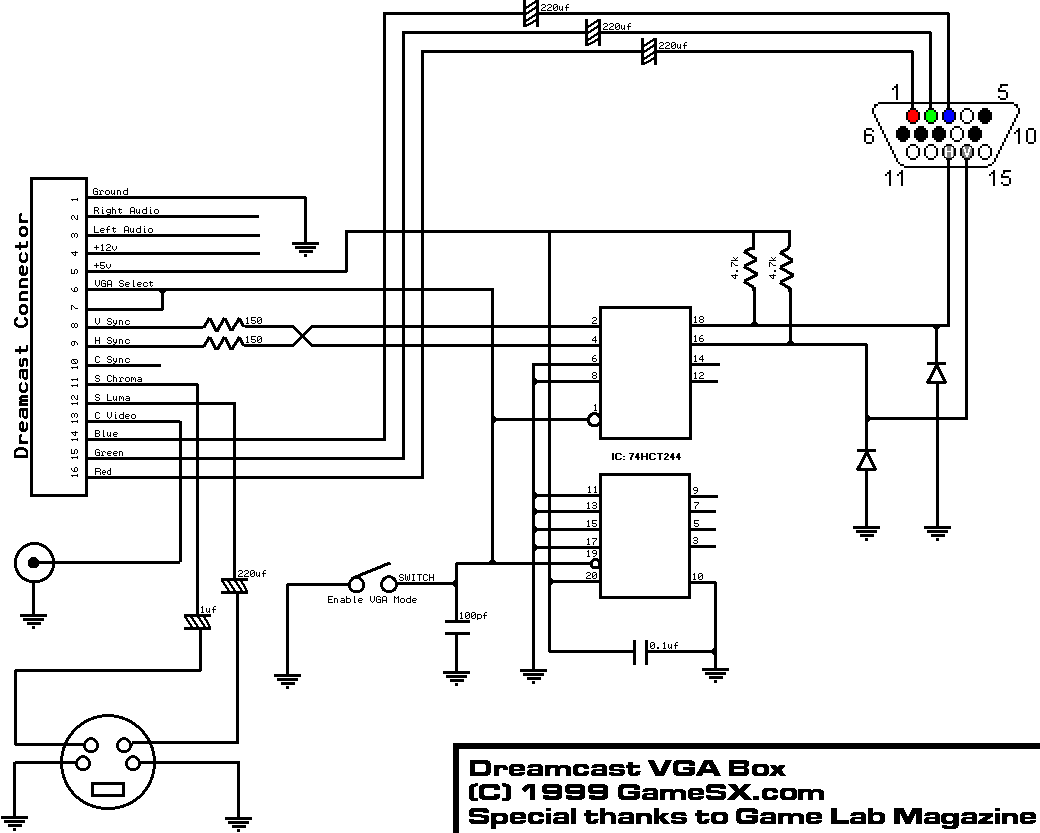
-Built-in VGA, based on schematic from gamesx. The IC has been omitted, so the RGB+HV lines go straight from the AV port to the VGA connector, with the appropriate capacitors and resistors. Also, instead of tying pins 6+7 together, they go to two different poles of a DPST toggle switch, so it is still possible to get 15 KHz RGB via a SCART cable.
-Built-in S-video, also part of the gamesx schematic. Can be used when not in VGA mode.
-Built-in headphone jack (gamesx again). No volume control as the lines go directly from the AV port to the headphone jack, so it is best to use headphones with an inline volume adjustment. It is there mainly for use with a 3.5mm stereo -> 2x RCA adaptor.
The process:

The parts: A strip of IDE ribbon cable (12 wires), 4x 220uF capacitors, 1x 1uF capacitor, 2x 150 Ohm resistors, 1x DPST toggle switch, 1x VGA connector w/ 5mm standoffs, 1x S-video port with mounting screws, 1x 3.5mm stereo headphone jack, 1x 3.5mm stereo -> RCA adaptor.
All of this should not cost more than $10 or $15.

Placement of the ports. The toggle switch placement must be very precise to fit between the modem and the lid sensor mechanism; there is less than 0.5 mm on either side. The placement of the other three items are a bit more generous, just watch out for the GD-ROM unit.

Ports temporarily mounted just as a check. Personally I find it better to solder the wires to the ports before mounting them.
The plastic shell was a bit too thick for my headphone jack, so I had to shave away a bit on the outer side so that I could sink in the threaded ring a bit.

Rear view of the top shell with ports mounted and the pencil lines erased. So far, so good, although my toggle switch is just a hair away from rubbing against the lid mechanism. Oops...

Top shell again, with the capacitors and resistors soldered to the VGA port, two capacitors on the S-video port (omitted in KindGrind's unit), and GND lines in place. All components have been tightly screwed in place now.
The three capacitors of the VGA port fit nicely into a triangular hole which will be away from the GD-ROM, likewise for the two on the S-video port. Basically the area of the black foam will be entirely occupied by the GD-ROM.

Taking a short break to show the region mod in its entirety - a single wire from R512 to +12V.

Close-up of the IDE ribbon cable soldered to the AV port at the motherboard. This is the most difficult part of the whole mod, do it with a very fine tip iron, and it might be better to use even thinner enameled wire, but IDE is what I had readily on hand, and the ribbon is much tidier than individual strands once the motherboard is screwed into place.

Motherboard screwed in place. It is OK to just fold the cable straight over and screw on the plate. The plate will even hold the cable tightly in place so that you are less likely to break any of the wires off the AV port if they are accidentally tugged, especially in the last step of putting the Dreamcast back together.
Also, make sure your connections at the AV port are strong, since even screwing down the plate has a high chance of breaking your wires.

All the soldering is finished. Just basically connect the ends of the ribbon cable to the components on the top shell. All that's left is to put the two halves together.
This takes a bit of squeezing, and there are several tricky things to handle at once.
Make sure that no wires get pinched between the GD-ROM and top shell. You should not see any wires from the top side when the lid disc is open.
The second thing to note is to make sure that no wires interfere with either the lid sensor itself, or the gear mechanism. There is the most room around the power supply area, so shove as much of the wire towards that side as you can.
Then, just squeeze until you can screw the shell together. If wires break, they will probably have broken at the component end, so just open the shell again and reattach them. Otherwise, if no wires broke, they are unlikely to break since there is nothing inside that would move them, as long as the GD-ROM and lid mech are clear. If that worked, then.....

...That's it! Enjoy the convenience of all your built-in ports! Once they are all tested and verified working, that is.
Testing checklist:
A: Action
R: Expected result
A: Lid mechanism test. Open and close the lid repeatedly.
R: Lid should open and close without any unusual resistance or noise.
A: Region test. Boot US game
R: Game does not start
A: Region test. Boot JP game
R: Game starts
A: Lid sensor test. Boot a game, and open the lid during gameplay.
R: Game boots with lid closed. Game terminates and system dashboard displays when lid is opened mid-game.
A: VGA test. Boot in VGA mode with monitor connected
R: Display on monitor with proper colour balance
A: VGA test. Boot in TV mode with monitor connected
R: No display on monitor
A: S-video test. Boot in VGA mode with television connected through S-video
R: No display on television
A: S-video test. Boot in TV mode with television connected through S-video
R: Display on television with proper colour balance
A: Stereo test. Play a game with easily distinguished left/right channels (e.g. Ikaruga), with headphones connected through headphone jack.
R: Left/right channels are separate and on their proper sides.
A: AV port test. Play a game using a Dreamcast composite cable. Ensure VGA mode is off.
R: Composite video still works through AV port
A: AV port test. Play a game using a Dreamcast S-video cable. Ensure VGA mode is off.
R: S-video still works through AV port
Troubleshooting:
If a colour is missing entirely, then a connection has likely been broken somewhere, probably during the last squeeze. Starting from the VGA connector, trace back towards the AV port until you find the break.
All this of course assumes that your lines are all in the right places. Look up the necessary pinouts and make sure you don't have the numbers backwards! This is a fairly straightforward mod, just the planning is tricky to get everything in a good spot.


