So without further ado, here's the ST.
The Game Screen
G.Rev cleverly took enough aspects from one of Sega's best titles and made it different enough to be considered a completely different game. The game I refer to is Virtual On, and before I go into detailed comparison between the two, let me show you the game screen G.Rev put on their How to Play section of their website first and explain what those numbers mean:
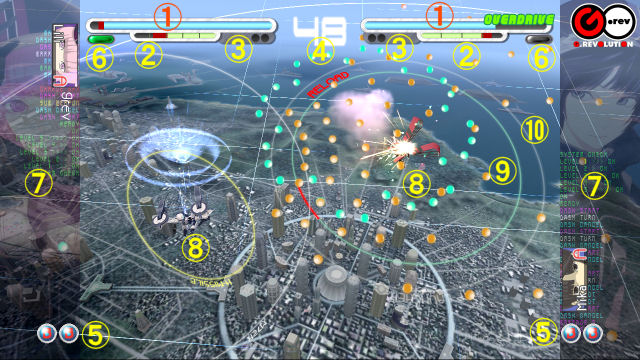
That's sure a lot of numbers on that screen. Here's what they mean:

1- Armor Gauge (aka- Lifebar)
This is your lifebar. Every time you get hit by something your opponent threw at you, the blue bar will begin to shorten in the direction towards the center of the screen. When the bar empties, it will flash "Vanish!" inside it, meaning that you need to take one more hit before losing the round.

2- Charge Gauge
This gauge allows you to perform you character's more unique attacks. By default, the meter slowly fills itself automatically. Although the size of the bar remians the same for all characters, the vertical markers for each character will differ in size, meaning that some characters are able to unleash their special moves at a fraction of the cost other characters would spend on.
Because the Charge Gauge plays an important role in this game, more information will be explained about it later.

3- Number of Rounds Won
Each dark circle represents a round, and each one filled in with a color signifies a round won for that player. The maximum number of rounds necessary to win a match is capped to 5.
4- Time Counter
Amount of time remaining for the round. If both players are still standing when the timer reaches zero, the player with the most life remaining will be awarded the round point. If both players have the same amount of life when the countdown timer reaches zero, they will both recieve a round point, and if you're playing a match against the AI in story mode or score attack, this counts as a loss for you.
When the Time Counter hits twenty seconds, the entire background will start flashing red.

5- B.O.S.S. Stock
Each B icon represents the number of times you can go into your character's B.O.S.S. mode. This is set to 2 per match, and I don't think there's any way to change the setting for this for a versus match.

6- Overdrive Gauge
This changes colors at random intervals.
Green- Overdrive is on standby.
Not blinking or Gray- Overdrive mode is permanently disabled.
Blue- Overdrive Mode is activated.
Red- Overdrive Mode is temporarily disabled. (usually occurs when your opponent enters B.O.S.S. mode)
More will be explained about what Overdrive does later.
7- Character Status Display
You cannot move into these areas no matter how hard you try. Mostly for show as it displays what commands you're pressing as well as what character you're using and the player's Gamertag right below it. You can complately eliminate these backgrounds in the game options, but it's not recommended because you'll be wondering why you can't go beyond where the B.O.S.S. icons are.
The next three parts of the screen, because they're so close to each other, will be displayed all in one screenshot I stole from G.Rev's website:

8- Rounder
That's you! And your opponent! One thing that is not mentioned on G.Rev's site though is that the left player's bullets and explosions will always have a green-blue hue while the right player's bullets and explosions will have an orange hue to them.
9- Sub Weapon Gauge
The innermost ring surrounding your Rounder displays the ammunition of your sub weapon as well as its name.
10- Main Weapon Gauge
The outermost ring surrounding your Rounder displays the ammunition of your main weapon as well as its name.
Game Controls
Okay, now that you've seen the screen, here's what the buttons do on an Xbox 360 controller.
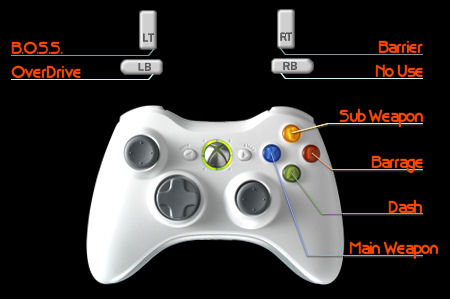
Main Weapon (aka-M or Main)
Like the name says, this is going to be the button you're going to be pressing most of the time during a match.
Sub Weapon(aka-S or Sub)
Also self-explanatory. This the other button you'll be pressing often, but not as much as the other I just mentioned.
Barrage (aka- M+S)
The 360 version maps this command to a seperate button, but before this, you had to activate it by pressing both the Main Weapon and Sub Weapon buttons simultaneously. Doing this generates a third unique attack. You'll also need press the Barrage button (or Main and Sub Weapon buttons simultaneously) last in a command string to initate your character's other special moves.
Dash
The 360 version mapped this command to a seperate button. While holding the directional pad or analog stick in any given direction and then pressing this button, your character will start moving faster in that direction. This is an integral part of the game, (just like it was in Virtual On) meaning that there's going to be some detailed explanations about this feature later in this post.
Barrier
Also mapped to a seperate button for the 360 version. When holding this button down, your character will move even slower than their normal speed and generate a force field in front of them. Note that your character doesn't have to be facing the direction of the projectile that's going to slam right into them in order for the Barrier to work; it just has to be on =\. Your character's Main Weapon and/or Sub Weapon may have different properties to them when the Barrier is on as well.
Act Old/Act New(aka- A)
Senko no Ronde originally had the Barrier and the Dash commands mapped onto one button, which was simply dubbed A. So technically, you can play the game with three buttons. In the inital release of Senko no Ronde, the rules for using the Barrier and Dash were these (Act Old):
When New Ver. was released in arcades, there was another method to use the Act button, which I prefer(Act New):Scott Tsai's FAQ at GameFAQs wrote: A(Dash) while the stick is neutral activates your Barrier. Using the Dash button in conjunction with a direction moves you in that direction;
- When A is first pressed, regardless if you were moving or not, your barrier will turn on.
- If you immediately release the button, your character will dash in the direction you were moving to.
You will need to manually remap your controller/arcade stick to use these commands if you want to do it the arcade way
B.O.S.S (aka- A+M+S)
Your character's Rounder transforms into their boss mode. Traditionally, you had to press the A, Main Weapon, and Sub Weapon buttons simultaneously to activate it, but the 360 version allows this command to be mapped to a single button. Activating this transforms your chracter into a huge and slow machine that bears firepower similar to those of shmup bosses. More will be explained on this aspect later.
Overdrive
Makes your Rounder enter Overdrive mode.
Weapon System
Senko no Ronde is a fighting game that was heavily inspired by Virtual On. The first thing that Senko no Ronde borrows is the weapon system. You have a limited duration in which any of your weapons can fire continuously.
However, unlike Virtual On, Senko no Ronde gives you a hard time trying to figure out how much ammunition you have left:
- You can't clearly tell how much you've used because the ring turns gray (usually for the Main Weapon). In this case, you have to stop firing that weapon to notice how much of the ring is filled counter-clockwise (with 12 o'clock always at whatever direction the front of your Rounder is facing) with red.
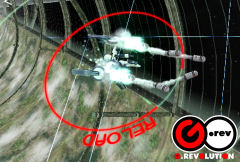
- If the entire ring is completely red, the name of that weapon will be replaced by the word "RELOAD," and you cannot use that weapon until the ring is completely green and the weapon name returns.
- Dashing makes your weapon rings spin all over the place in a stylish way in order to reorient itself when you're done doing it.
Also like in Virtual On, the properties of your weapons may or may not change when you dash and/or activate your Barrier.
Another thing to note about the weapons is that certain ones will immediately reload itself when you're not using it while others (usually the Sub Weapon) require you to completely empty it before the weapon can reload, and some will completely empty even though you didn't launch your entire salvo!
Facing Your Opponent
Your Rounder will always try to face your opponent. The only times you will lose track of facing (or won't turn at all to) your opponent is when:
- you fire a weapon
- you dash
- your Rounder is stunned by getting hit enough times
- you activate your Barrier. Your Rounder will try to face the direction you want to move to, but it won't turn too far away from where your opponent is.
Dashing
G.Rev literally stole all of the dashing mechanics that were found in Virtual On. The system works like this:
- Press Dash (or A) and a specific direction to dash there.
- To turn, move the character in the direction you want to turn to
- To stop your dash, press the Dash button (or A) again. Doing this will also immediately reorient your Rounder to face your opponent.
- (slightly different from Virtual On) To instantaneously change the vector of your dash (called a Watari Dash in Virtual On), press another direction and then press Dash(or A) to move there.
You can also fire your weapons while dashing. Like in Virtual On, however, this comes at a price. After you fire one of your weapons while dashing,
- You cannot turn until your dash ends.
- You cannot instantaneously dash in another direction until the dash ends.
- You cannot fire another weapon until your dash ends.
- You are unable to do anything for a split second after your dash ends. This also applies if you let your dash run its full course without interrupting it.
Also like in Virtual On, if your weapon only fires in the direction that the front of your Rounder faces, it will try to turn to your opponent while firing simultaneously (or if you're lucky, your Rounder will turn first towards the direction of your opponent before they fire their weapon). Make sure to be in a position where it won't waste your entire salvo before your Rounder actually faces your opponent.
Dash Cancel
Okay, I lied about not being able to do anything after you fire a weapon while dashing. There is a way to stop your dash trajectory after performing this action by pressing A immediately afterwards. If performed successfuly, your Rounder will stop their dash and will be able to perform another action immediately afterwards.
Be warned though that certain weapons used will prevent you from dash cancelling immediately after the attack, while others won't even allow you to dash cancel at all.

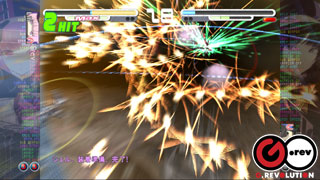
Weapon System- Close Combat (aka- CC)
Your Rounder can also perform melee attacks in this game, and the concept was also borrowed from Virtual On. However, don't fool yourself into thinking that your Barrier works at defending against them; unlike Virtual On, there's no way to "block" their attacks other than getting out of the way.
To get into CC range, you must move your Rounder close enough to your opponent so that your weapon gauge disappears. The first one to go is always the Main Weapon.
Main Weapon
- Pressing the Main Weapon when your Main Weapon Gauge disappears initiates a Chase CC. What this means is that your Rounder will dash a certain distance up to your opponent before your Rounder strikes with their melee attack. You can interrupt this by pressing the Main Weapon button repeatedly, which will then start your Rounder's attack animation.
- Your Rounder will always need a minimum "Chase CC Time" before they'll start swinging, so make sure not to use this attack when you're very close to your opponent.
- The Main Weapon Melee attacks consists of three swings for most Rounders. You can interchange one of the swings after the first with the Sub Weapon.
- If you think you'll get hit by your opponent before you land the first swing or of you think you can't cover the distance between you and your opponent, you can interrupt the Chase CC by pressing the Dash(or A) button to cancel and dash in a different direction. However, unlike Virtual On, your Rounder will pause to stop the animation before they are able to do anything else.
- Like in Virtual On you can perform the Chase CC while you're dashing to your opponent (if you're in range, of course). Your character will immediately stop their dash and then begin their Chase CC.
Sub Weapon Melee
The Sub Weapon Melee attack is one powerful strike. This attack doesn't initiate a CC Chase like the Main Weapon does, but the trade-off is that these attacks come out faster.
Be careful of what character you're using as each Sub Weapon melee attack is completely different: some will use it defensively by spinning in place while others will try use it offensively by drop kicking their opponent and fly off in the other direction until their attack animation finishes.
The Charge Gauge
The Charge Gauge, as mentioned before, is pretty important in Senko no Ronde. It provides energy for a few things:
- Your Barrier eats up small amounts of the Charge Gauge for every hit taken from a projectile in exchange for reduced damage taken as well as not getting stunned from them
- Your Barrage attacks and special moves will eat up the equivalent of one bar on the Charge Gauge.
- Your B.O.S.S. form slowly drains this meter when activated
- At certain situations, you can manually activate your Antifield at the cost of 50% of a full Charge Gauge
The Charge Gauge, by default, replenishes slowly. To speed it up, you need to:
- Deal damage to your opponent
- Recieve damage from your opponent
- Destroy your opponent's B.O.S.S. form
- Enter Overdrive
- Your Armor Gauge is empty and the word "Vanish!!" is flashing in it
Other than using your special abilities to drain your Charge Gauge, you can also lose a huge chunk of your reserves if you take considerable damage from your opponent, which usually comes from melee attacks, so be careful if you ever get that close.
Your Charge Gauge reserves carry over to the next round as well.
Special Attacks
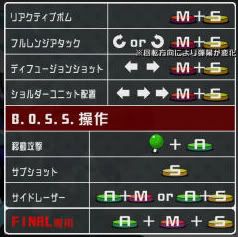
Each character also can use special moves, the easiest one being the Barrage attack. One thing that'll probably throw you off about the special moves in this game is how to execute them. Let's take a look at Mika's movelist for example:
If you've played a lot of fighting games before, you're probably thinking right now, "Wait a second. Is this assuming I'm facing right? What if my opponent is at the top of the screen and I'm at the bottom? When it says 'left-right-right+M+S,' does it mean I need to first move 'away' from my opponent and then move 'toward' them twice and then press 'M+S?'"
Aside from the 360 (har har!) directional rotations you need to input, it's not really that daunting to perform any of these moves, especially if you're familiar with Psychic Force; yes, G.Rev stole this system from Taito's game, but that's okay since G.Rev was once part of Taito's arcade division anyway.
Let's look at the the one move I mentioned earlier:

Now, if we use the numberpad on any keyboard and imagine it as a directional pad, here are all of the possibilites of executing that move:
- 4, 6, 6, M+S
- 6, 4, 4, M+S
- 8, 2, 2, M+S
- 2, 8, 8, M+S
- 9, 1, 1, M+S
- 1, 9, 9, M+S
- 7, 3, 3, M+S
- 3, 7, 7, M+S
All of these commands listed are correct for Mika to perform this special move. Unlike traditional fighting games, it doesn't matter what direction your character is facing your opponent. As long as you input a direction and then tap twice in the exact opposite direction and then press M+S, the move will execute.
... well, okay, this specific move will execute if Mika's Main Weapon is completely full and his Sub Weapon isn't reloading. That's another caveat to look out for: most motion-specific special moves require at least one of the weapons to be completely full and if you execute the special move while it's still reloading, your character will perform their Barrage attack instead, since Barrage attacks don't care that the specific weapon it uses is reloading; it'll still drain that weapon completely though.
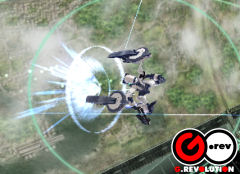
The Antifield
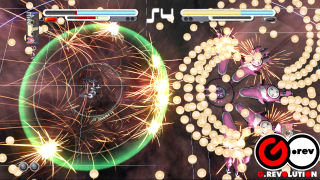
Certain projectiles will cause your opponent to stand still so they can take hits from the rest of your attacks. However, each character can only take a certain amount of hits before they're automatically knocked back and generate an Antifield. What the Antifield does in this case is generate a small shockwave that will destroy any bullets around it, and if the attacking Rounder is too close, they'll be pushed back to the edge of the Antifield as well as interrupting whatever they were doing in the process. Immediately after the Antifield is dispensed, the Rounder that generated it will be invincible and can move around freely for a few seconds, which is not unlike Virtual On.
There are two instances where you can activate your Antifield manually by pressing A+M+S:
- Your opponent has activated their B.O.S.S. mode
- You have no more B.O.S.S. stock
An Antifield activated manually has the same properties as one that was activated when you were hit enough times from your opponent. However, you are still in control of your actions when it activates, meaning you have about as much invincibility time as you do just after releasing your Mosquito ability in Mars Matrix (which is not very long). Remember to use this ability wisely, as it does eat up the equivalent of 50% of a full Charge Gauge.
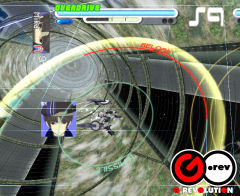
Overdrive
Going into Overdrive is a risky maneuver, and you can only use it once per round. You can use this ability anytime the Overdrive gauge is flashing green. Upon activating it, an Antifield disperses throughout the entire screen and the following attributes are applied to your Rounder:
- Charge Gauge recovery increases
- Damage inflicted is reduced
- Damage recieved is increased
- Your Armor Gauge slowly empties
Your Overdrive stops temporarily when your opponent enters B.O.S.S. mode (as indicated by the color change from blue to red color in the Overdrive gauge) and will reactivate once you survive it. You can manually deactivate overdrive mode by going into your B.O.S.S. form, and Overdrive mode automatically deactivates when you enter Armor Vanish regardless of whether you used it or not.
You can activate your Overdrive mode at anytime you can manually activate an Antifield.

Armor Vanish
When your Armor Gauge is completely gone, the last hit that emptied it (or if the Overdrive drained all of your armor) will have your Rounder knockback and generate an Antifield as though they were hit too many times. However, after the Antifield is released, your Rounder's core is exposed, (aka- your hitbox) and your Charge Guage regenerates as though you were in Overdrive. If you're hit one more time at this point, you lose the round.
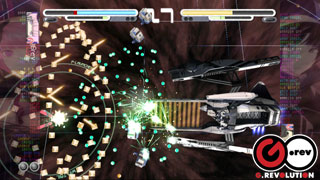
Booster of Over-armed Shell System (aka-A+M+S)
As the acronym implies, your Rounder will attach to some huge add-ons and will have the firepower and mobility of a shmup boss. There's a few incentives to go into B.O.S.S. mode:
- You can enter it at anytime, even as you're getting pummeled by your opponent
- Deal as much damage as you can to your opponent
- Recover any lost life
- Force your opponent into draining their Charge Gauge by using their Antifield
- Pause the countdown timer for the round
When you enter B.O.S.S. mode, you will get an additional lifebar that will take the damage, and the amount of B.O.S.S. life you get is proportional to how many bars are full in your Charge Gauge, rounded down (ie- 4 bars full, 5th one half-full, so the half-filled bar will automatically empty upon activation).
While B.O.S.S. mode is on, your Charge Gauge will slowly start to tick away, and you can go all out with your firepower because all of your attacks do nothing to help increase the rate in which the Charge Gauge disappears. When it's almost gone, you'll hear a warning sound going off, and the amount of life you recover is based on how large your Charge Gauge was before activation and the amount of damage you took from your opponent in this mode (less damage = better).
Your opponent also has incentive to destroy your B.O.S.S. form, since other than preventing you from recovering life, they'll also max out their Charge Gauge if they destroy it. They can also blow up destructible parts of your B.O.S.S. form to stun you and immediately fill up one bar on their Charge Gauge as well. Not only that, your Charge Gauge will completely empty if your B.O.S.S. form is destroyed, meaning you'll be at the mercy of your opponent's B.O.S.S. form!

If you activate B.O.S.S. mode when you are in Armor Vanish, you will go into your Final B.O.S.S. form. The rules are the same for activating Final B.O.S.S. except that you will NOT recover any life even if your opponent survives it and you take no damage. However, you will get to use your character-specific Final B.O.S.S. move as a perk. For most characters, activating the Final B.O.S.S. attack requires you to do this:

Two other bonuses of entering Final B.O.S.S. mode is that you take less damage than usual and your charge guage empties at a slower rate.
However, if your opponent destroys this form, you'll go down in a spectacular explosion. Also, you can only activate Final B.O.S.S. once in a round, so pray that you'll be able to finish the job once it's activated.
As mentioned before, you start each match with two B.O.S.S. in stock. If you lose a round in a versus match against a human player, you get an additional B.O.S.S. added to your stock to use in the next round.