System
Every game situation is clearable in multiple ways due to tactical approaching. Charge beam, rotatable pod, main shot, missiles and bombs will support. Next to the rotatable pod, the charge beam is the powerfullest weapon in this game. The remaining firepower like bombs and missiles are quite unimportant but they help to kill enemies and especially boss enemies faster.
Your initial ship is low and most bullets speedy. But with utilizing the rotatable pod with a bullet absorbing feature to compensate the slowness of the ship. You basicly have to move less around the screen, but make more use of the pod. Or course there're speed ups to increase the ship speed. When you loose your ship, you will loose the pod too. However, you can find many safe spots and use walls as defense. Take a look at this video to get the idea of Last Hope's tactical gameplay: http://www.youtube.com/watch?v=k6tl4rvbluw
The progress you make and your score are save-able on a memorycard by clearing a stage, so you can always progress further step by step.
Control
D-pad: Moves your ship in 8 directions
A: Shoot, hold to charge the beam
Y: Auto-fire
L-Trigger: Rotates the pod anti-clockwise
R-Trigger: Rotates the pod clockwise
Slightly tapping the triggers instead of pressing is favorable since the pod system is quite sensitive to allow quick and precise movements. At Pink bullets theres a pod sensitivity option that decides how strong you have to tap/press the shoulder buttons to make the pod rotate. I can only recommend to use default though unless some has trouble with it.
Offensive/Defensive Play
Last Hope offers both offensive and defensive gameplay. Which playing styles meets the needs is up to the actual player but from time to time both techniques are required.
By playing the game offensively, you get directly fyl up to the enemy to shoot them up before they can hit you. Particularly, those small cannons sitting on the ground and roof are very dangerous if not eliminated immediately with the pod's shot while locked into a 45° position. Shooting a big beam or a row of small beams will do too, when the cannons are more reachable and not covered by any obstacles. Good reflexes and adding missiles to the firepower are favorable.
By playing the game defensively you should soak up bullets with the pod in 360°, make out sweet spots, hide your ship between walls and then get out of the defense to take the enemy by surprise. When using the pod; there's a variety of bullets in color, shape and size. Not every type of bullet is blockable. Especially lasers aren't to absorb and should be dodged, so pay attention and find out via Trial & Error to which type a bullet belongs. You also shouldn't try to kill every enemy and just pick those who are really standing in your way. Adding bombs to the firepower is favorable but most important, the pod should be handled well.
Sometimes it's recommend to toggle between those playing styles, depending on the games situation. The most important thing with this game is to learn the enemy patterns, how enemies move and then find the right strategy to encounter them.
Weaponry
Primary
Charge beam: Hold A and let off to unleash the charged beam. Since the Charge beam is the powerfullest weapon you should make use of it as often as possible. Together with the pod it's one of the main tactical elements of the game. Even though, you do not have to always load the beam fully up, and just load it to the required minimum to unleash a smaller but still quite powerful beam. Then you can kill a chain of enemies more fast.
Pod: The Pod is rotatable in 360° and lockable in 8 gradations around the players ship. Simultaniously with the main shot, the pod can fire a slightly bigger and more powerfull shot then the main shot. The shot frequency is a bit lower then of the main shot and the pods main purpose is to absorb bullets. But not every type of bullet is cancelable. See bullets section below.
The pod itself can't destroy enemies, so they just slide through. Only small enemies like butterflies and midges are destroybale by with the pod. The pod is their to sniper at enemiy in 8 directions on all parts of the screen.
Main shot: Press A for several shots or Y to auto fire. The use of auto-fire is not recommend in this game and should be avoided. The main shot works as an adjustment if you missed an enemy with some of the enemies with the charge beam. It's easier to load up the beam to kill a row off enemies in the same blast, and only use the main shot to when necessary.
Auto-fire: My tip is to not use the auto-fire since this only lowers your shoot frequency. Considering a huge amount of enemies on screen this would only lead to quick death. Tapping more often on the fire button manually is the way to go. When you found that to exhausting, you should use the charge beam more often.
Secondary
Following weps are to support the firepower to clear the screen. Bombs and missiles increase power if more then one of the same power up is collected. While playing on score, these weps should be avoided since they could avert an chaining attempt.
Homing shot: Semi-intelligent shot with Seek & Destroy purpose.
Missiles: Especially good for defeating boss enemies quickly.
Bombs: Bombs are good to eliminate cannons off the wall and ground.
Bullets
There's a varity of bullets in color, shape and size. Some of these are absorbable with the pod while others are slip through.
Absorbable bullets
Sniper: Almost every enemy shoots this aimed bullet.
Greenshot: Points to the players ship position but is slower then the sniper bullet and flies like making a slalom.
Morphball: Twice the size of sniper bullet but it divides into smaller sized bullets with time. You better absorb them quick befor they can spread.
Non-Absorbable bullets
Lasers: Available in different appearances but mostly colored in blue.
Bigblue: Homing shoot, only appears in the asteroid belt.
Note: At Pink Bullets all bullets are absorbable and give score.
Power Ups & Items
Several power ups are to be collect.
Red Capsule for Speed Up: Increases ships speed.
Brown Capsule for Cluster Bomb: Anti Ground.
Yellow Capsule for Homing Shot: Semi-Intelligent.
Green Capsule for Carbon Missile: Air to Air.
Note: Power Ups are secondary, since the strongest wep (Charge Beam) is available from beginning and the second strongest wep (Pod) is more or less quickly available up after dying.
Bonus Item: Some enemies left bonus items after their dying, which are to be collect for increasing score. (See scoring for detail)
Interface
On the interface you can see how many lifes are left and your actual score. On the bottom of the screen there's a beam gauge. The beam gauge shows how much the beam is loaded before getting maximum power. Already a short loading of the beam is enough to fire a small beam. To get the maximum power you must hold A until the gauge is full and begins to blink.
Difficulties
4 different difficulties are selectable: Very Easy, Easy, Normal and Hard.
At Very Easy your ship can be hit twice by bullets. When the ship is getting hit, the shild will be activated and you can fly on. But the shild is only meant to survive sniper enemy bullets, so if you rush into a wall or getting hit by a laser, you will have a miss.
Note: Last Hope NGCD and Pink Bullets offer Devil difficulty.
Modes
Dreamcast
DC Mode and Arcade Mode can be selected in the main menu before starting the actual game. There are several differences between both modes.
DC Mode: Slow bullets, lower shoot frequency of enemies sniper bullets, less shrapnel on screen, rank disable.
AC Mode: Speed bullets, high shoot frequency of enemies sniper bullets, many shrapnel on screen, rank enable.
NEOGEO CD
Action Mode: Fast ship, strong weapon, slow bullet.
Normal mode: Slow ship, weak weapon, slow bullet.
Arcade mode: Slow ship, weak weapon, fast bullet.
Rank System
The rank system is based on surviving time, respectively how long the player gets trough the stage without a miss. When the rank gets active, the enemy bullets and partly the amount of enemies on screen will increase, when the player gets a miss, the rank will set back. This ranking system is Arcade mode only.
Scoring
The scoring system is just a simple multiplier when blasting off a chain of enemies. Additionally bonus item are collectable for scoring. All bonus items collected, without miss, will be added when accomplishing a stage.
After an accomplished stage you get a screen like this:
You killed: 265 enemies
Kill Ratio: 66%
You shot: 1801 bullets
Hit ratio: 37%
They shot: 516 bullets
You dodged: 145 bullets
Dodge Ratio: 28%
Score = 0077400
Best Surviving Time 00:05:48
Play Time 00:05:54
The dodge count shows, how much bullets you have absorbed with the pod.
Tip: At the Stage 2 Boss you can gain a load of score by using a small trick. Just try to kill the boss with a charged beam in his mouth while he spits an Orb enemy. This way the boss counts as a enemy chain and gives more score.
Last Hope: Pink Bullets Specific Scoring
You can raise up your score by making use of two multipliers. The first is the Bullet Absorb Multiplier and the second is the Beam Chain Multiplier. The individual score value of each enemy you destroy does multiply by both multipliers.
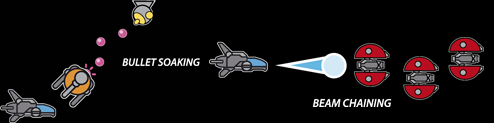
By absorbing enemy bullets you can increase your Bullet Absorb Multiplier. Additionally you can increase this multiplier by absorbing bonus containers and hidden special bonus items.
By chaining enemies with your full Charge Beam, you can increase your Beam Chain Multiplier. This Beam Chain Multiplier is decreasing by one point per second while you don't beam chain enemies, so be quick.
0000025379 x 028 x 046
From left to right: Score, Bullet Count and Beam Chain Counter
Basically: Bullet Soaking + Beam Chaining = Win
Technique
Some of these techniques are only necessary in certain stages.
Bullet Soaking: Your pod can absorb enemy bullets, so make wise us of it.
Bullet Pointing: Since each opponent fires sniper bullets, you can guide those bullets into a certain direction to make them better dodge-able. Especially cannons and also enemies on ground require this technique.
Sweet Spotting: Find the right spot on screen to have the best possibility for clearing it and staying alive.
Ship Hiding: Hide your ship between obstacles for a certain time, to get more defense to survive enemy bullets or the enemies themselves. Especially recommend in Stage 1, first checkpoint when a pod isn't available.
Pod Walking: Since your ship moves a bit more fast then the pod when it comes into the screen, it's possible to take it one the invisible leash and fly with it around without having it attached one the ship itself. This technique works especially fine in Stage 4 and 5.
Butterfly Collecting: In stage 2, you can collects the butterfly like enemy with turning the pod around.
Obstacle Pushing: Shoot the blobby enemies in stage 6, so they will move forward as long a you shoot at them. Due to this technique you can block alien cannons shooting their fire into the blobs instead of your ship.
See also the video in the System Section.
Stages
As usual in this sub-genre, every stage is subdivided into 3 sections besides stage 6. A stage begins with the first section and each additional section is a checkpoint. After dying you will start from the last checkpoint reached.
Stage 1, Dark Fear: This stage does offer many sweet spots, so you can easily hide you ship behind obstacles to be covered for enemy fire. You can also eliminate rail guns with use of the rotatable pod system and squeeze your ship between long snakes crawling out of the sand. Enemies who starting an kamikaze on you, are defeatable with the pod locked on the backside of the ship or alternativly when lacking of the pod you can point blank them and let them crush into walls. (see video)
Stage 2, Creepy Waters: In this stage you must've already learned to handle the pod well, otherwise you hardly will ever see daylight again. Due to the the claustrophobic level architecture and many cannons on roof and ground you have to now your flight pass well and know very well where to shoot and when not. Shoot the cannons asap and/or try to block them wit the pod. Take care of the channelfish enemy wich is sliding down the waterfall is spitting some butterfly enemies at you.
Stage 3, Burning Sun: Burning sun is splitted in three completely different sections. In the first section, you will participate of a huge space battle and have to survive an asteroidbelt. In the second section, you must squeeze your ship between some rail carriers and their little ships. In the third section, some bouncing lasers will teach you how to fear some hazardly threats.
Stage 4, Dark Seed: This stage is an idyllic landscape with floating continents. You have to squeeze your ship between those continents and take care of laser shooting enemies. An pretty big flying bug will follow your path
Stage 5, Melting Spirits: When flying through this steel melting factory, take care of moving crates and the many cannons and various other threats. Especially the kamikaze are pretty dangerously.
Stage 6, Xardian: This stage is full alien scum. In the third section you have to avoid alien guns to make the way to the last boss.
Stage Enemies
Only enemies, which need a certain strategy are listed.
Note: At Pink Bullets, Dark Fear is the second Stage while Creepy Waters is Stage 4.
Basic
Following enemies appear in every stages, so they all need the same tactics.
Worthless fish: The first opponent which appears in this game. The worthless fish moves up and down while snipering at you.
Cannons: Eliminate cannons as fast as possible from screen, thus their power will not to even show up since they're belong the most dangerous enemies in this game. There are different tactics for eliminating this enemy effectively. When a cannon covers the top ground and is easily attainable for the firepower, then charge the beam to defeat a complete row of them. In some situations, small beams will do too.
Stage 1
Vessels: Does a turn back out of the screen when reaching the middle of screen to shoot some v-shaped bullets and a line of blue lasers. Just avoid the laser and try to kill these enemies before they turn back, but if they do you can easily soak up the bullets for more clearness on screen if you have lost your pod.
Note: At Pink Bullets it's better to soak those shots up with the pod for score.
Nobi: Flies down from the roof and every single enemy off this chain detects the actual position to start a little kamikaze. If you don't change the aimed position you can hit the complete chain with a charge beam. You can also use the given obstacles to let the enemy crush into walls. (see video)
Sandcrawler: It's crawling in the sand and comes out of its defense to shoot a green shot seemingly directed to the players ship. You can soak those up with the pod locked in either 45° or 90° or try to point-blank the bullet in a direction where they won't get you.
Railguns: These cannons move along on a rail. Just shoot em up and absorb their remaining bullets with the pod.
Lurka: Looks like a bug with thin legs and moves around in the sand and spits spores at you. Try get this enemy with a charged beam as fast as possible to absorb their spores with the pod. That can be quite difficult since these bugs are mostly covered by obstacles or snakes, so try find the right spots to eliminate them.
Snake #1: These snakes are very long and moving along a fixed path. Since you can't kill this type of enemy, you have squeeze your ship through them.
Stage 2
Snake #2: This snake sporadically shoots a slightly bigger sniper bullet. You can absorb those with the pod by turning it around the full 360° like a morning star.
Rotator: Get rid off them with a charged beam, when enough of them are hittable in the same row. This enemy is flying a half circle.
Sligger: Starts up to the roof, when the player is close. Then the Sligger explodes and leaves Butterfly enemies. You can't kill Sliggers, so you need a strategy to deal with them.
Butterflies: This butterfly like enemy comes out of a Sligger and is detecting the player ship position but are sluggish in their movement. When the sligger explodes, immedently try to shoot an big beam or put you pod into the explosion to give outcoming butterflies not only one chance. When you miss that, you can easily collect 'em up with the pod.
Channelfish: Is plopping down the waterfall and stays on the waters surface. You can't kill this type of enemy. Nevertheless, some butteflies coming out of its bottom to be killed.
Gladius: Flies a zigzag. To be killed with a small beam in turn with the big beam. You can also just try to avoid them, but pay attention to the bullets coming out of their rear.
Stage 3
Beaser: Beasers are flying a chain that kinda looks like an s-formation tilted by 90°. As once this enemy appears on screen, you should fully load up the beam and don't unleash it before there's an empty space in the bullet pattern to fly trough. When flying through that sweet spot you can unleash the beam to hit a row these beasers. (see video)
Maverick: Is dropping blue balls which should be avoided or you just eliminate the blue bullets by shooting them.
Stage 4
Gigush: Similar to the worthless fish but more of them are simultaneously on screen. You should fire some big and/or small beams into them, to hit as many as possible.
Waterplant: Swims on the waters surface to spit some pollen. You can soak those pollen up and/or try to avoid them.
Lasersprayer: Lasersprayers are coming from roof and are shooting sprays of lasers. You can fly close to the enemy itself to shoot it, or just try to avoid it.
Monk: Beams itself into the screen on a fixed position. Unleash a beam into the bunch when they are hittable and use the rotatable pod to get all of them in behind of your ship.
Mottez: Makes an half-circle through the floating continents. You can break this chain of enemies with a big beam or you have to shoot every single enemy with the main shot and pod also.
Zuamama: Comes from left and shoots some morph bullets. When squeezing your ship through the floating continents, you should eliminate the cannons and pay attention to the morph bullets coming out of the enemy behind you. Try to block the morph bullets immedently, so they can't get more dangerously since they would break into another smaller morphballs.
Stage 5
Hunter: Turns out of the lava to seek and tray your ship. You have to eliminate this enemy ASAP. Just try to shoot em up when they changing their flying direction.
Kamikaze: Stays on the wall, but suddenly it starts an kamikaze ahead your ship. Just kill it with a charged beam to the right time.
Stage 6
Slider: Is flying a curve and leaves little green orbs, which must be destroyed to clear the way.
Orbs: You can't destroy those orbs but they will shift to the side when you shoot at them. Shift them on a position where they block cannon bullets and use them as defense.
Snake #3: Same as for snake #1.
Boss Enemies
As usual a boss enemy waits for you on the end of every stage to get bashed.
Grimreaper: Just fly up the screen and try to hit the mask on the near top of this boss. This way you destroy his mask and the boss shows it's ugly skull. Now avoid the bouncing lasers and soak up the color fading disco shot with coming out of its thorax, with the pod locked at the front of your ship. Then you should toggle between, avoiding, soaking and hitting the skull.
Attacks: Soul Absorb, Soul Orbs, Reflection Laser
Hitzone: Mask/skull
Blind-Giger: Before the actual boss fight start you must fly above or below the long snake coming out of the boss mouth and soak up the green aming shots. Now charge your Beam and unleash it into the mouth to hit its tongue. Besides the mentioned snakes, the boss will also spit some grey organic containers at you, so try to get those with the beam before it can spread some butterflies. From now on you can repeat this until the boss is dying.
Attacks: Snake, Butterflies, Aiming Shot
Hitzone: Tongue
Gumbanos: When this bossfight begins, a blue sphere will appear and shooting a sourrounding laser. This sphere is one of the hitzones.
Just kill the midges coming out of the boss. Then it spreads plant like enemies, which will move directly to your current ship position, so try to navigate those plants where they won't annoy you. You should preferbay fly a zigzag down to the water and hit the blue sphere, so they won't reach you in the water. Now to escape you can shoot yourself back to the top or try to slide under the boss to its otherside. From now on, repeat this tactic.
Attacks: Midges, Plants, Surround Laser
Hitzone: Top and down sphere
Zupapa: There's none specific tactic for this boss, so you have to kill the enemies and try to hit the boner. When collecting multiple carbon missile powerups, you will defeat this boss easier.
Attacks: Walkers, Explosive Containers, Aiming Shot
Hitzone: Boner
Machine: Watch out for the long enemy beam, fly through the moving crates, kill the hunters and cannons to hit red sphere. Then, the front part of the boss splits up and moves into the middle of the screen to spray a lot of bullets. Since there's a shild in front of the left side of the sphere you have to turn around on the other side and do the opposite after a couple of hits. Try to find the right timing to change the sides and don't rotate your pod overhasty to block the bullets. Some speed ups could support.
Attacks: Bullet Whip, Vessels, Beam
Hitzone: Red sphere
Alien: Just try surviving this beast.