
Introduction
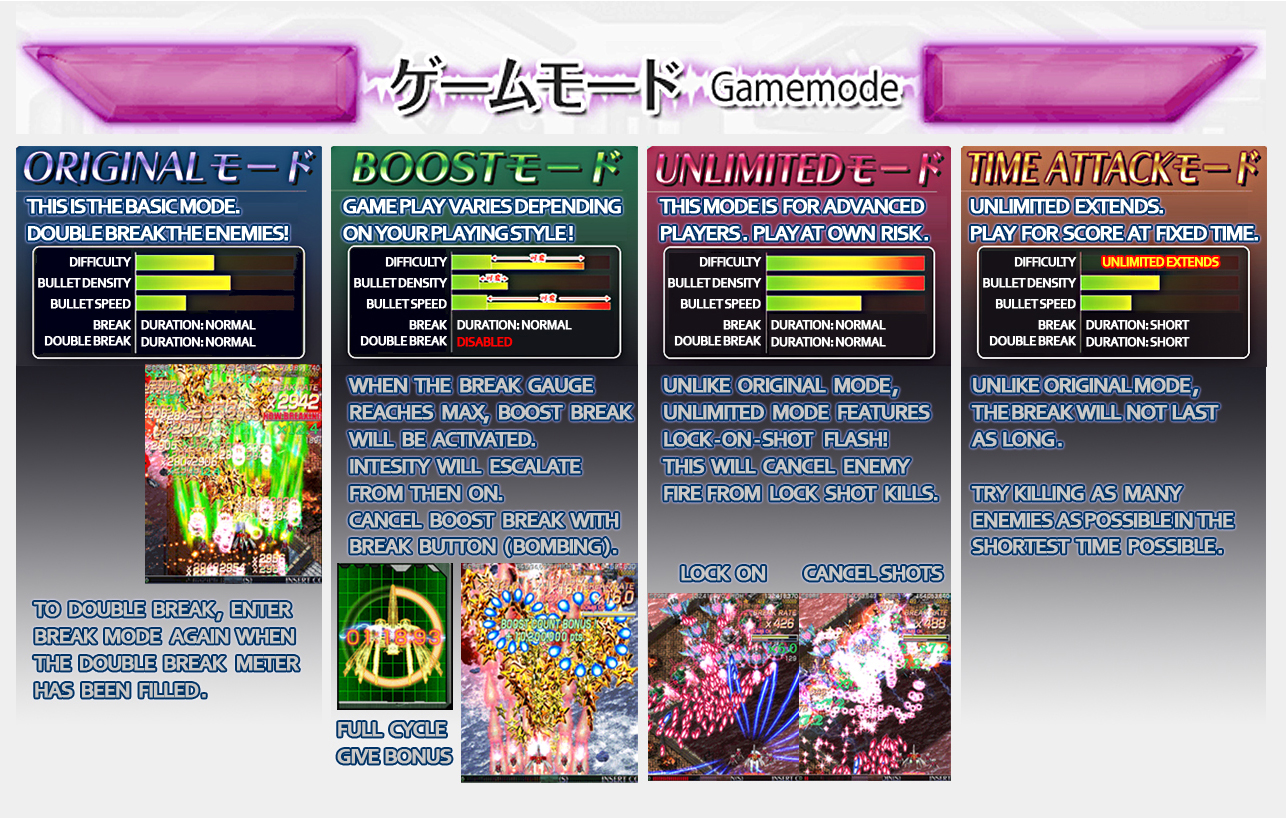
Unlimited is in some ways a "more extreme" version of Original - with many nearly impossible to dodge patterns and an added bullet cancel mechanic. On the other hand, your multiplier is way easier to maintain and carry over and getting breaks is easier than in Original, making survival and scoring go hand in hand with bomb spamming no longer being viable. While the overall survival difficulty is quite high(comparable to SDOJ Expert I would say), not a lot of difficult dodging is involved - the vast majority of the difficulty comes from the final boss and having only 6 lives combined with the length.
Changed mechanics from the doujin release
- Partial bullet cancels are now possible with partial lock - losing the full lock at the last frame no longer results in getting rekt
- Lasers are no longer cancelled along with the bullets - makes the end of stage 5 way harder
- Reduced break duration and greatly reduced invincibility duration after breaking
- Increased max multiplier values and break rate gain speed
- Break rate gain adjusted for every stage - probably an attempt to make scoring relevant in every stage of the game - 4 bars for stage 1 and 2, 2 for stage 3, 3 for stage 4 and 1 for stage 5 - less bars = slower break rate gain
- Changed patterns and added enemies in some places, an entirely new TLB2
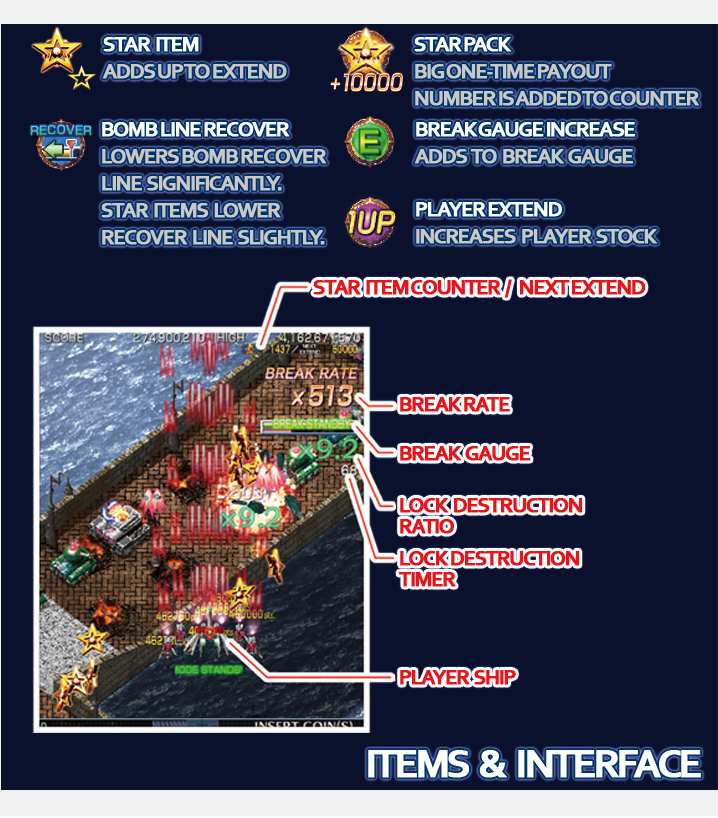
- Lives are now gained through stars obtained - at 100k, 250k, 450k and 700k. There is also 1 mercy extend from a midboss if you have no lives left.
- Bomb gauge usage starts at 20% and increases with every bomb deployed, goes back down on death and after picking up recovery items.
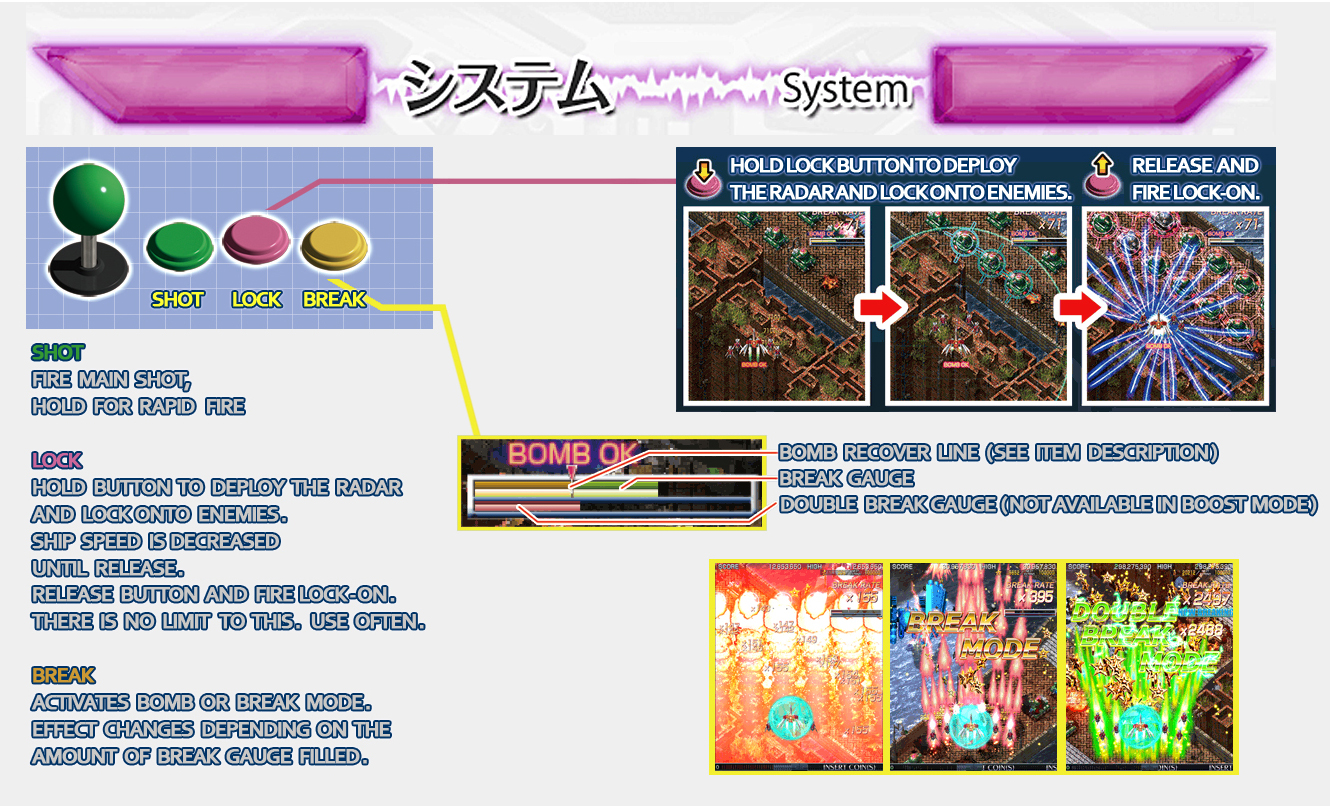
Break mechanics
- Break gauge gained from hitting enemies is greatly increased at point blank, lock on hits also give break gauge(so don't try to milk the bosses without locking)
- (CONFIRMATION REQUIRED) Multiplier does not seem to affect break gauge gain - got some different opinions though, would be nice to get more testing and confirmations
- Killing enemies with lock charges both primary and secondary gauge at once, more bullets cancelled=more gauge gained
- Dying gives around 15% break gauge(not recommended at all)
- Energy pickups give 75% break gauge
- Firing your lock on shot at the TLB while he's invincible(and shortly after) results in him firing counter lasers to block them - this gives a considerable amount of break gauge, so spam him with lasers at close range
- Secondary gauge seems to represent around 95% of the primary - with both gauges full, you need to hit enemies some more after breaking before you can activate a double break
- Default max lock is 24/x9.6 multiplier, single break increases it to 28/x11.2 and a double to 30/x12.8
- Breaking makes hitting enemies drop a ton of stars, double breaking even more so - important if you want to reach the 700k extend
- Fast movement speed is increased in break mode, even more so in double break mode - when focused/locking, speed is the same for all 3 modes
- Bombing while breaking instantly drains the break timer to zero
- If single break mode runs out, the break gauge you had during the break is cut in half
- Double breaking adds 2 extra options to your ship
- Points gained are enemy value * break rate * multiplier
- Chip damage on bosses/big enemies is also affected by the break rate and multiplier
- Break rate is temporarily doubled in break mode and quadrupled in double break mode
- Break rate is gained faster according to your multiplier
- (CONFIRMATION REQUIRED) Breaking does not seem to affect break rate gain - it's only doubled/quadrupled according to the current break mode, then reduced back to x1
- More break rate is gained when hitting an enemy at point blank - works even for invincible enemies(stage 2 laser cannons, stage 3 flowers, any enemy at the top of the screen
- The higher your break rate, the faster the natural decay is
- 30% of break rate is lost after dying
- Around 12% of break rate is lost after bombing
- Multiplier carries over to normal mode even after your break/double break mode runs out
- Max multiplier timer is 999 - this value is apparently in frames, so around 16,6 seconds
- Killing enemies helps maintain the current multiplier, although not as effectively as cancelling unless you're killing a huge amount of enemies
- Breaking with bullets/enemies onscreen seems to increase the multiplier timer instantly
- End of stage bonus is doubled in Unlimited mode, divide those values by 2 to get Original ones
- Bonuses are awarded for no miss(seems to be stage * 20 billion)+stars gained in the stage(stars * 200,000)+total stars gained so far(stars * 200,000)
- End of game bonus is 50 billion per life
- Finishing off a boss with a full lock makes him drop a lot of large stars worth a considerable amount of points
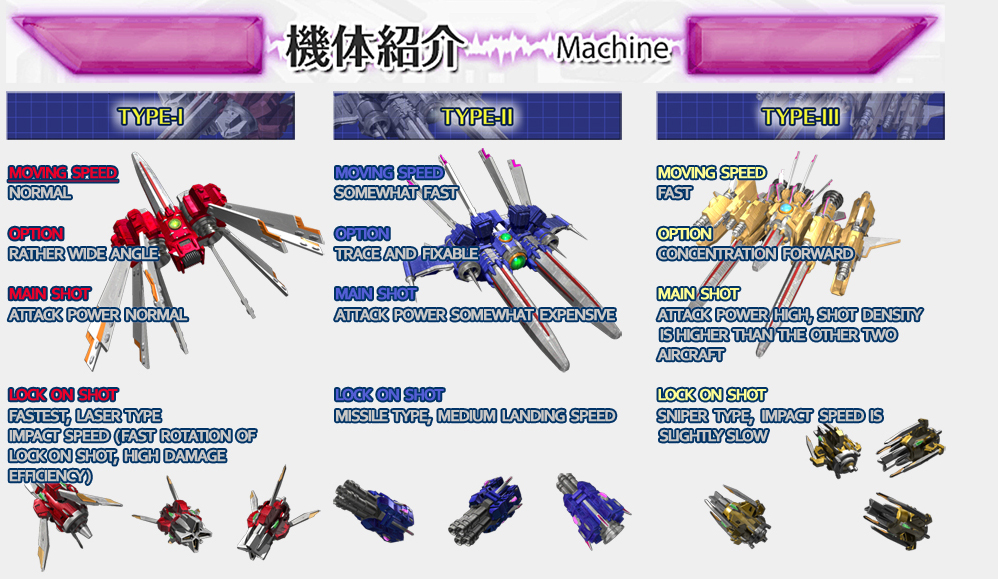
Scoreboards are split by shot type, so feel free to pick the one you feel the most comfortable with instead of the highest potential one. Type III is probably the worst one for this mode though.
Type I
- Slowest and weakest ship
- Low delay on lock damage
- Easy to handle
- Increased spread in break/double break
- Slightly faster and stronger than Type II
- Adjustable Mushihimesama/Gradius trace options, allowing for point blanking from further away, adjusting your spread or even hitting enemies behind you
- Lock is apparently a few frames slower than Type I, lock on seems to be stronger than Type I(unconfirmed)
- Difficult to handle, high scoring potential, options might confuse you when trying to dodge
- Low/no spread increase in break/double break
- Fastest ship, slightly weaker shot than Type Z
- Highest delay on lock shot damage
- Small spread increase in break/double break
- Probably the worst ship for Unlimited by far, hitbox might be hard to get used to
- Around 50% stronger than Type I, strongest shot
- Low delay on lock shot damage
- Slightly faster than Type II outside of slow movement
- Greatly increased break gauge gain
- Huge spread even outside of break
- No downsides except for making the game a lot easier if that's a downside for you
- By holding down the break button while selecting your ship, the ship's looks changes to one similar to Type I
tl;dr guide
- Pointblank for more break gauge and more break rate
- Cancel bullets with high level lock for both primary and secondary break gauges
- Always have a high multiplier active, else you won't get much score or break rate
- Never die, never bomb
- Finish off bosses with full locks
- Strategically break to maximize score while making survival easier/possible
- Speedkill enemies to make more appear(to be added later)
- Milk the stage 4 boss(to be added later)
The only run I found online, Type II ALL by Seldia(possibly the current WR holder) - the rest of the run is in the related videos
Ship speed/shot power comparison by SOGO Omiya
Various mechanics explanation(mostly for Boost, although some stuff is the same)by SOGO Omiya
To be added
Specific strategies for stages/bosses, videos of different routes, possibly images, better layout as currently it might be a bit hard to read
Also feel free to point out errors or any stuff I happened to miss


 | My games -