NESRGB board available now
-
Ed Oscuro

- Posts: 18654
- Joined: Thu Dec 08, 2005 4:13 pm
- Location: uoıʇɐɹnƃıɟuoɔ ɯǝʇsʎs
Re: NESRGB board available now
Yeah, I wouldn't be surprised, though I was thinking more in the range of $10-$20 (maybe that price drop has already happened in fact), which will be a big help to many people. There is an upside though; like Canon or Nikon lenses, a Hakko is a pretty good investment if you aren't sure you will stay in the hobby and find yourself selling it on later.
-
leonk
- Posts: 1098
- Joined: Sun Mar 13, 2011 9:29 pm
- Location: Toronto, Canada
Re: NESRGB board available now
Don't take this the wrong way, but I find it amusing to read that Hakko 808 is compared to a Ferrari.. or people think it's "expensive".
No professional / industrial lab will use or rely on the Hakko 808. It's the cheapest desoldering device Hakko makes. It's made for the hobbiest at best. Professional desoldering station are not hand held. They have stand alone workbench pumps, some are controlled with foot peddles, and many cost 5-25 times what the Hakko 808 costs. I'm not saying the 808 is crap .. but lets call it for what it is. A great device for the hobbiest that is relatively cheap.
Don't believe me? Take a look at what a good Agilent scope costs, or multimeter from Fluke. The Hakko 808 suddenly seems like a great deal!
-
darcagn

- Posts: 607
- Joined: Tue Mar 04, 2008 3:26 pm
- Contact:
Re: NESRGB board available now
The Hakko 808 is neither intended for hobbyists or professional labs. It is designed for portability. The target audience of the Hakko 808 is professionals who do repairs in the field. For example, warranty repairs of larger television sets are usually done at the house of the customer, and the repairman would recap a board using something like a Hakko 808. Having an all-in-one tool that can operate without a workbench is important for field repairs, and the relatively low cost means if it is damaged or stolen in the field, it is not that big of a deal either.leonk wrote:Don't take this the wrong way, but I find it amusing to read that Hakko 808 is compared to a Ferrari.. or people think it's "expensive".
No professional / industrial lab will use or rely on the Hakko 808. It's the cheapest desoldering device Hakko makes. It's made for the hobbiest at best. Professional desoldering station are not hand held. They have stand alone workbench pumps, some are controlled with foot peddles, and many cost 5-25 times what the Hakko 808 costs. I'm not saying the 808 is crap .. but lets call it for what it is. A great device for the hobbiest that is relatively cheap.
Don't believe me? Take a look at what a good Agilent scope costs, or multimeter from Fluke. The Hakko 808 suddenly seems like a great deal!
It just so happens to also appeal to hobbyists as they often don't have the dedicated space to support a desktop station, and it's affordable as well.
-
CkRtech

- Posts: 668
- Joined: Mon Aug 27, 2012 9:30 pm
- Location: Seattle, WA
Re: NESRGB board available now
Metaphor arguments aside, I'll keep it simple - Most people should just run down to Radio Shack and buy what they need. There is absolutely no reason to purchase a Hakko 808 if you don't do a lot of electronics work or are just getting into the field. If you have money to blow on it, <shrug> I guess you could buy the best stuff out there and setup your own electronics shop.TheRetromancer wrote:Is the Hakko 808 expensive? Sure. Quality is always going to cost you. But think about this - what is it worth to a person to free them from the fiddly annoyance of using desoldering braid, desoldering pumps, or any of the other, cheaper methods of desoldering through-hole components? Is it worth a one-time payment of about $200 to cut down desoldering time by 80% or more for the lifespan of the device? I've had my 808 for about a year, and unless this thing shoots my dog, sleeps with my wife, and punches me in the face, I'm never going to get rid of it.
Naturally, the end decision is up to the individual user. It's worth it to me. WELL worth it, in fact. I will always encourage others to take the path I've gone, because I truly believe the investment is worth it, and as a somewhat nice guy, I want to give others the benefit of my experiences.
Here endeth the lesson.
But let's face it - The Hakko 808 is something people brag about. They brag about how awesome it is, how they have one, or how badly they "need one," and hobbyists have gotten by just fine without it for years. Heck - I may buy one myself, but I have to weigh how much time I will spend with other hobbies aside from NESRGB and other electronics work. It's expensive, and purchasing a solder sucker, a bulb-based desoldering iron, and some solder braid is altogether quite a bit cheaper when it comes to getting the job done.
Here endeth the lesson.
-
Corredor X

- Posts: 24
- Joined: Wed Dec 04, 2013 10:05 pm
Re: NESRGB board available now
I bought one NESRGB board from the first batch, but for a couple of reasons I was only able to install it now. Almost couldn't do it, because even with a desoldering iron and lots of patience, I still managed to break some of the PPU's legs  I was dealing with those three pins that needed to be heated together and accidently forced the IC too hard on the other side. Like you can see in the picture, I was able to carve the pins with a dremel and solder new legs to it. Not exactly pretty, but it worked
  The resulting image is amazing, thanks Tim again for this board. Just an interesting note: I tried an old bootleg multicart (60-in-1, it came with a popular NES clone in Brazil back in the day) and the selection screen had some weird color effects, just like the Duck game that someone posted here many pages ago. The games itself worked nice, so it's no big deal, I imagine they never intented to make the intro screen for RGB graphics anyway


-
CkRtech
- Posts: 668
- Joined: Mon Aug 27, 2012 9:30 pm
- Location: Seattle, WA
Re: NESRGB board available now
Wow! Way to hang in there! The results paid off.Corredor X wrote:Like you can see in the picture, I was able to carve the pins with a dremel and solder new legs to it. Not exactly pretty, but it worked
-
Voultar

- Posts: 550
- Joined: Fri Jan 10, 2014 8:29 pm
- Location: USA
Re: NESRGB board available now
I know that in my case with S-Video, the diagonal lines disappear when lifting the chroma signal. So whatever the problem is, it's in the color.
-
RGB32E

- Posts: 1400
- Joined: Thu Nov 05, 2009 12:50 am
Re: NESRGB board available now
I really like the output on your installation. I'm thinking of doing something similar for my next top loader install. Enlarging the RF opening for the provided 8MDIN connector and using hot glue between the inside of the case and the 8MDIN PCB to secure it looks like it should work well. I'm thinking that audio could be carried on the 8MDIN as well if a 8MDIN cable is constructed with cable stock using separate mini coaxes. However, using a separate connector for audio would be easier when connecting to a separate component for audio (e.g. hi-fi/sound system).Corredor X wrote:
-
CkRtech
- Posts: 668
- Joined: Mon Aug 27, 2012 9:30 pm
- Location: Seattle, WA
Re: NESRGB board available now
Posted this in the Framemeister thread, but probably best to run it here - I have a little bit of a hook in the image at the top left corner (and possibly a matching one in the top right corner). Pretty sure it is a sync issue. Was wondering if any of you guys had encountered it. I am using PPUV from the NESRGB.
-
mvsfan
- Posts: 1209
- Joined: Sat Oct 06, 2012 12:24 am
Re: NESRGB board available now
I have a new way of getting the ppu out and it works quite well.
I found a large, square transformer based soldering iron in my garage when we were moving. I had forgotten about it. It has a big tip on it and the tip gets red when you pull the trigger. So i tried it on that ground plane that those stubborn pins are attached to and it has no trouble at all heating the whole thing up at once.
So now i just hold that on the ground plane with one hand and get my desoldering iron in the other and suck up the solder while its already hot from the big soldering iron. It also works great on getting the stubborn RF box out of the nes to install helders multi-out.
Works like a charm. Problem solved.
-
Corredor X
- Posts: 24
- Joined: Wed Dec 04, 2013 10:05 pm
Re: NESRGB board available now
Yeah, I wasn't sure if it would work, the first time I turned it on there was no image or sound at all. All I thought was "I fried the PPU". But it was only the removable connector of the board signals that was a little off, just connected it to the end and stare for some minutes to that Super Mario Bros./Duck Hunt intro screen like it was the first time I saw it. The image is simply unbelievable good.CkRtech wrote:Wow! Way to hang in there! The results paid off.
RGB32E wrote:I really like the output on your installation. I'm thinking of doing something similar for my next top loader install. Enlarging the RF opening for the provided 8MDIN connector and using hot glue between the inside of the case and the 8MDIN PCB to secure it looks like it should work well.
Thanks! I think it looks good too, and it is also the simplest solution. For the audio plug, you just need to dig a very small round dent above and under the channel selection slot, the sides didn't need to be touched at all, being the exact same size of the connector's outer ring they won't even appear. For the mini DIN connector, along with enlarging the RF hole just a little bit, you also need to dremel a little tab on the inside that's near the rear part of the energy plug, or else the little green board that connects to the DIN won't fit.
-
keropi

- Posts: 323
- Joined: Sat Sep 20, 2008 9:33 am
- Location: Ioannina , Greece
Re: NESRGB board available now
some times I get some pixel shifting in the lower part of the screen , I am using V though (since that nesrgb's generated composite signal)CkRtech wrote:Posted this in the Framemeister thread, but probably best to run it here - I have a little bit of a hook in the image at the top left corner (and possibly a matching one in the top right corner). Pretty sure it is a sync issue. Was wondering if any of you guys had encountered it. I am using PPUV from the NESRGB.
I am getting something similar to this, but the shifting occurs also in some subsequent pixels:

image borrowed from fudoh's site
-
RGB32E
- Posts: 1400
- Joined: Thu Nov 05, 2009 12:50 am
Re: NESRGB board available now
Using Y or V for sync on the mini can cause this effect on a number of games. That's why I've switched to using PPUV for sync on my top loader and AV fami.keropi wrote:some times I get some pixel shifting in the lower part of the screen , I am using V though (since that nesrgb's generated composite signal)
I am getting something similar to this, but the shifting occurs also in some subsequent pixels:
image borrowed from fudoh's site
1. Do you notice this on every game you've tried?CkRtech wrote:Posted this in the Framemeister thread, but probably best to run it here - I have a little bit of a hook in the image at the top left corner (and possibly a matching one in the top right corner). Pretty sure it is a sync issue. Was wondering if any of you guys had encountered it. I am using PPUV from the NESRGB.
2. Is this happening only with a flash cart?
3. Is using Zoom 90 a solution for you?
4. Are you using a direct wire connection with no external components on the PPUV line?
5. This is on a front loader?
6. Have you tried tapping sync from the original video output jack instead of from the output pin on the RGBNES PCB, or vice versa?
-
keropi
- Posts: 323
- Joined: Sat Sep 20, 2008 9:33 am
- Location: Ioannina , Greece
Re: NESRGB board available now
ah, thanks for that info, I had no idea this was "normal" with V/Y ... I'll try that on my famicomAV next time I open it upRGB32E wrote:[...]
Using Y or V for sync on the mini can cause this effect on a number of games. That's why I've switched to using PPUV for sync on my top loader and AV fami.
[...]
-
CkRtech
- Posts: 668
- Joined: Mon Aug 27, 2012 9:30 pm
- Location: Seattle, WA
Re: NESRGB board available now
Thanks, RGB32E. I did notice it on each of the games I tried that had non-black backgrounds. The Zoom 90 seems like a possible solution.RGB32E wrote: 1. Do you notice this on every game you've tried?
2. Is this happening only with a flash cart?
3. Is using Zoom 90 a solution for you?
4. Are you using a direct wire connection with no external components on the PPUV line?
5. This is on a front loader?
6. Have you tried tapping sync from the original video output jack instead of from the output pin on the RGBNES PCB, or vice versa?
I played a bit of SMB after zooming, and the swimming stage (2-2) suddenly had the interference back that I had been experiencing prior to my recent changes. Very interesting. I saw the same stage a few nights ago (prior to zooming) and didn't notice it at all. I'll have to try it again and turn off the zoom to see if not zooming actually "masks" my ability to detect interference with my own eyes. Who knows - maybe even changing the palette will make a difference there.
SO close. It is so close now that I am starting to notice how good the games look rather than what sort of image issues I might have. The return of interference on just one stage kinda made my heart sink. Ha!
-
CkRtech
- Posts: 668
- Joined: Mon Aug 27, 2012 9:30 pm
- Location: Seattle, WA
Re: NESRGB board available now
So I did a bit more testing. This time, I paused on the swimming level and flipped the palette switch to the different options. Default "original" seems to be OK, but the other two options seemed to bring out the interference. It also added a bit of ghosting in the underwater plants - kinda like when you turn sharpness up way too high on a TV set.
It would seem that there is still something (EMI or otherwise) there, but it manages to go undetected on some screens/palette settings and then jumps out at you on others.
As a side note, my TV was on THX (eliminating all possible overscan)...so I elected to change presets and disable zoom on the framemeister to take care of hiding the little hook at the top.
-
CkRtech
- Posts: 668
- Joined: Mon Aug 27, 2012 9:30 pm
- Location: Seattle, WA
Re: NESRGB board available now
I can definitely "control" the interference with the palette switch, but there is no defacto "This setting is good for all games, and this other setting causes interference for all games." It changes based on which game is being played. Garish might be better on one game and terrible on another.
I therefore assume (perhaps quite incorrectly), it has to do with color output and intensity in combination with the external cable I am using.
It sure would be nice if it *only* was my 8 pin mini din cable and replacing that would solve all problems. It is *so* close to perfect.
I therefore assume (perhaps quite incorrectly), it has to do with color output and intensity in combination with the external cable I am using.
It sure would be nice if it *only* was my 8 pin mini din cable and replacing that would solve all problems. It is *so* close to perfect.
-
viletim
- Posts: 565
- Joined: Mon Aug 07, 2006 6:44 am
- Location: Sydney, Australia
- Contact:
Re: NESRGB board available now
I have not been following this thread lately. I'll try to keep up from now on...Voultar wrote: Something a little more relative to the thread. Has anyone encountered an issue with diagonal lines plaguing solid colors when using S-Video? My RGB setup isn't complete yet, so S-Video is my current way to go. There is nothing wrong with the picture, only these forsaken lines! Official power adapters are being used, I've wired in both a Multi-Out with true S-Video cables and a standard DIN S-Video port and coupled with a high quality S-Video cable. Multiple televisions have been tested, and it's a problem that's consistent with all of the NESRGB mods that I've installed.
The NESRGB is pulling power from the 5v rail on the PPU. And I've reviewed the datasheet of the encoder Tim selected to use. I'm not very familiar with the bh7236af, but it seems like your everyday standard encoder, with your everyday standard application circuit.
This is a close up of some good 'ole blocks in Castlevania III. I have screen grabs from other CRT TV's but there's no sense in uploading them all if the same effect is consistent across the board.

The from the photo above it looks like the lines are not much more than a pixel apart and are apparently not moving. The NES pixel clock is around 5 MHz so it seems very likely this is chroma interference which is around 3.6 MHz (NTSC) and synchronous. PAL video has chroma at 4.4 MHz so I suppose the angle of the lines would be steeper for PAL.
I have only one s-video lead (2 metres long). I used it to connect a Famicom w/NESRGB a CRT TV and a 1084 series monitor in turn. In both cases I couldn't see the reported interference.
I then thought to slice open the s-video lead to check its construction. It turns out to be an ordinary four core shielded cable. No different to what you might find coming from a PS2 keyboard. Capacitive coupling could be a problem.
There are two signal wires (Y/C) and two ground wires. In this cable the two signal wires are white and yellow. I slit the sheath for half the length and pulled the wires out. Then I twisted the two signal wires together in an attempt to increase coupling.
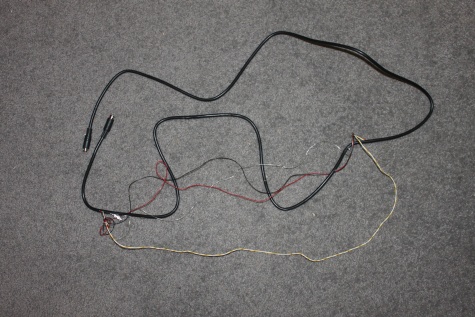
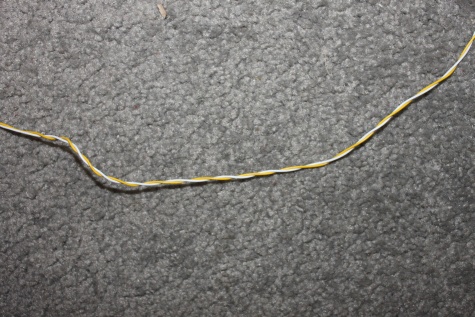
I connected the cable (in this state) to the NESRGB. The interference was visible and matched the screen shot from Voultar above. I separated the signal wires again and the interference went away.
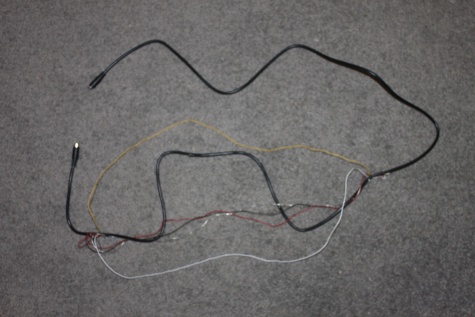
I think some cables that provide some separation between Y and C is all that's required.
Another way around the problem is to attenuate the C signal - add a 75 ohm resistor in series and another 75 ohm resistor to ground. The ACC in the TV should be able to compensate for the lower signal level without any adverse affects. An attenuated C signal is less likely to be coupled into the Y signal. I'm not sure this method is as effective as a good cable but it may work if the diagonal line interference is not too string to begin with.
When using RGB and either V or PPUV for sync the chroma from these signal may couple into one or more of the RGB lines in the same way. Try using Y or CS# instead. If that's not possible try placing a 10 nF capacitor between the V or PPUV signal and ground. This will (drastically) attenuate the chroma part of the signal while leaving the sync (mostly) untouched.
-
CkRtech
- Posts: 668
- Joined: Mon Aug 27, 2012 9:30 pm
- Location: Seattle, WA
Re: NESRGB board available now
I switched back to CS#, and things seem to be the same. I would like to assume that everything with the NES, NESRGB, and extra voltage regulator are fine and that my problems are due to coupling either with either:viletim wrote:When using RGB and either V or PPUV for sync the chroma from these signal may couple into one or more of the RGB lines in the same way. Try using Y or CS# instead. If that's not possible try placing a 10 nF capacitor between the V or PPUV signal and ground. This will (drastically) attenuate the chroma part of the signal while leaving the sync (mostly) untouched.
1: The external cable I am using
2: The internal wiring I use to run RGBS and Gnd from the NESRGB board to the 8 pin mini din
3: Both.
Ideally, I just need to upgrade the external cable to something even "more shielded." Sadly, this is already my second cable that I thought would be better than the first.
-
Voultar
- Posts: 550
- Joined: Fri Jan 10, 2014 8:29 pm
- Location: USA
Re: NESRGB board available now
If it's a cabling issue, that's most unfortunate.
My NES is equipped with a multi-out, and I've even tried using an official Nintendo S-Video cable. With the same results, consistently. Not to mention all of the cables that I've tested with perform flawlessly on my SNES, N64, and Gamecube systems.
I know there are several others who are experiencing this issue as well.
Post from Hamburglar waay back.
EDIT:
Also Tim, I wired up a 75ohm resistor in series to both the Chroma output and ground. It made the picture far, far worse.

The lines aren't scrolling, they're stationary. But interestingly enough, if you pause a game, the lines change from going this way (//////) to this way (\\\\\\\)
Any other ideas?
My NES is equipped with a multi-out, and I've even tried using an official Nintendo S-Video cable. With the same results, consistently. Not to mention all of the cables that I've tested with perform flawlessly on my SNES, N64, and Gamecube systems.
I know there are several others who are experiencing this issue as well.
Post from Hamburglar waay back.
Damn...Has anyone figured out the fix/cause of the issue where s-video gives some picture noise? I had posted about it a few weeks ago and some people agreed they had the issue too, but no fix was posted.
I am not complaining, just wondering. This is the best NES-related purchase I have ever made, and the image quality is even a bit better than my console modded with the PC10 PPU. It's just that over s-video (RGB is fine) there is some checkerboarding in the image. I'm using a high quality s-video cable, and the issue goes away once running through the XRGB Mini, so I was just curious if there was a fix anywhere. All grounds are properly wired.
Thanks again for this incredible product, Tim.
EDIT:
Also Tim, I wired up a 75ohm resistor in series to both the Chroma output and ground. It made the picture far, far worse.
The lines aren't scrolling, they're stationary. But interestingly enough, if you pause a game, the lines change from going this way (//////) to this way (\\\\\\\)
Any other ideas?
-
darcagn
- Posts: 607
- Joined: Tue Mar 04, 2008 3:26 pm
- Contact:
Re: NESRGB board available now
The cabling issue actually makes complete sense to me.
With my first NESRGB installation, I used a cheap generic 8-pin mini-DIN cable off of eBay and V for sync. I got the checkerboarding.
Later on, I switched sync to CS# and no longer got the checkerboarding, with the same cheap generic cable.
With my latest NESRGB installation, I used a 3D-printed multi-out, so both V and CS# are connected to the connector.
I am using the "fully shielded" multiout SNES cable from retro_console_accessories. She sells cables that use cvideo for sync as well as ones that use csync for sync.
I purchased one that uses cvideo for sync. Thus, I'm back to using V for sync. However, with this fully shielded cable, I experience no checkerboarding.
Here are some screenshots for comparison, comparing various cables. I don't have the miniDIN NES assembled right now, so I didn't test that one, but I have a cheap PlayAsia SCART cable that will fill in for it--with checkerboarding. The checkerboarding is across the entire screen, but is most visible on the green pipe:
Spoiler
PlayAsia cheap multiout SCART cable:

Generic multi-out S-video cable from eBay:

retro_console_accessories "fully shielded" multiout SCART cable:

Generic multi-out S-video cable from eBay:
retro_console_accessories "fully shielded" multiout SCART cable:
-
Voultar
- Posts: 550
- Joined: Fri Jan 10, 2014 8:29 pm
- Location: USA
Re: NESRGB board available now
Interesting. Meh, it's a shame that I can't even utilize an official SNES S-video cable, though. I'm not going to crack it open, but I'm sure that it's just twisted pair. I suppose I'll just take the multi-out housing of the generic S-video cables and create my own shielded S-Video cables, if it's truly a matter of cross-talk between the C/Y signals. The bh7236af must be quite sensitive to noise variations.
-
darcagn
- Posts: 607
- Joined: Tue Mar 04, 2008 3:26 pm
- Contact:
Re: NESRGB board available now
By the way, a friend of mine discovered another title that does appear properly under v1.3 firmware: The Fantastic Adventures of Dizzy, an unlicensed Camerica title. After suggesting to upgrade to the v1.4 firmware, this title was fixed for him. Tim, he emailed you about it earlier, but since we got it fixed, you might want to update your background_fault page to reflect that the v1.4 firmware fixes this title as well as the Bisqwit Castlevania II.
-
juji82
- Posts: 349
- Joined: Sat Nov 16, 2013 3:05 am
- Location: Tokyo, Japan
Re: NESRGB board available now
Hello there guys, I would like to get in the Famicom world. Currently I live in japan so I can easily buy jpn famicom versions. I would like to ask what is the best model/revision to use with nesrgb? Is there sort of a guide to install it and make rgb output?
Thanks
Thanks
-
TheRetromancer
- Posts: 116
- Joined: Fri Feb 07, 2014 9:27 pm
Re: NESRGB board available now
The AV Famicom is generally regarded as the best 'regular' Famicom, particularly by fans in the West, as it has full expansion audio without modification, is FDS compatible, AND has the SNES/N64/GC-style AV out instead of RCA Composite outs. This last makes it very easy to mod for RGB.juji82 wrote:Hello there guys, I would like to get in the Famicom world. Currently I live in japan so I can easily buy jpn famicom versions. I would like to ask what is the best model/revision to use with nesrgb? Is there sort of a guide to install it and make rgb output?
Thanks
At the high end of the spectrum is the Famicom Titler, which is very easy to mod for RGB out as it is the only Famicom game system that has a PPU that natively outputs RGB signals. However, it is going to cost you over $1000, owing to its scarcity and desirability.
In my opinion, however, the Sharp Twin Famicom is the ultimate Famicom. Not only does it look very cool, but it isn't terribly expensive, has a built-in FDS, and is fairly common. Modding it for RGB is a little more difficult than the other systems, but it's not terrible and just takes a little bit more time. Biggest downside? Replacing the FDS belt is TIME CONSUMING LIKE NOTHING ELSE.
"Thanks for the nice reply. I do offer to do work without hot glue too if people prefer it that way." - Drakon
-
mvsfan
- Posts: 1209
- Joined: Sat Oct 06, 2012 12:24 am
Re: NESRGB board available now
Id have to say i like either the A/V Famicom or the sharp twin famicom.
Both have adapters that ship with the nesrgb for relatively easy installation and when your done, it looks great.
the original famicom i would stay away from as right now theres no easy, neat way to install a nesrgb.
You have to use a bunch of wires to hook it up.
but supposedly Tim is working on an adapter and power board for the original famicom to facilitate an easy, neat install so in the future there really wont be a version to stay away from.
-
juji82
- Posts: 349
- Joined: Sat Nov 16, 2013 3:05 am
- Location: Tokyo, Japan
Re: NESRGB board available now
thanks for the advices guys! i will try and look for an av famicom or the sharp twin this golden week i will report my findings!
-
ms06fz
- Posts: 103
- Joined: Mon Apr 14, 2014 8:48 pm
Re: NESRGB board not available now
Would anybody even bother with the Titler at this point? Prior to NESRGB I would've been all over it, but now... NESRGB delivers comparable output but with a better palette and compatibility (Titler has the same PPU as the Playchoice, right?) It seems like a waste to pay outrageous prices for a Titler just for the sake of RGB output.TheRetromancer wrote:At the high end of the spectrum is the Famicom Titler, which is very easy to mod for RGB out as it is the only Famicom game system that has a PPU that natively outputs RGB signals. However, it is going to cost you over $1000, owing to its scarcity and desirability.juji82 wrote:Hello there guys, I would like to get in the Famicom world. Currently I live in japan so I can easily buy jpn famicom versions. I would like to ask what is the best model/revision to use with nesrgb? Is there sort of a guide to install it and make rgb output?
Thanks
Incidentally, I don't think anybody provided a link to the install guides in response to this question. They're all on the NESRGB site. For most systems you're putting the NESRGB board in place of the original PPU, and mounting the PPU to the board, then running new signal lines from the boards out to the back of the machine. For the original Famicom, it's a little more complicated, due to space limitations among other things.
Good luck with your mod, juji!
-
Pasky

- Posts: 699
- Joined: Mon Oct 21, 2013 3:58 am
Re: NESRGB board available now
Titler caters more to purists, which do exist.
Also, the Hakko FR-300 is now available on TEQuipment.net.
Also, the Hakko FR-300 is now available on TEQuipment.net.
-
ms06fz
- Posts: 103
- Joined: Mon Apr 14, 2014 8:48 pm
Re: NESRGB board not available now
I get that - and in a way high quality output out of a Famicom seems a bit unnatural to me, no matter what the solution... And putting modern PLDs or microcontrollers into an old 6502 machine seems almost perverse. It's like, how much can you change a Famicom before it's not a Famicom any more? I'm enough of a purist to be concerned about such things, but not purist enough to let them stop me.Pasky wrote:Titler caters more to purists, which do exist.
Playchoice PPUs and the Titler are at least vintage solutions. I didn't mean to suggest that no one would be or should be interested in the Titler... (though that's totally what I wound up saying) Just that if someone's just after a Famicom with good video output, from a practical standpoint Titler's not the best solution, because of price and palette.