
This guide is meant to document Deathsmiles Mega Black Label. Please let me know of any changes and corrections as most of this guide is coming from my me.
-----------------------------------------------------------------------------------
UPDATES:
04/26/13 added info to section 8.0 and 6.0.
04/27/13 added section 1.1 for character speed, info on 2.0, 3.0, Reformatting
05/01/13 added section 0.1, 4.1, 5.0, 6.0, 7.1, 7.2, updated info on 3.0, 4.0, reorganized.
05/13/13 added section 0.2 for default settings, 10.0 for Bosses, 10.1 for Item Counter During Boss fights, 11.0 for Bloody Jitterbug, 14.0 for Techniques that may or may not help you, 16.0 for Useless information, Reorganized.
05/14/13 added info to section 15.0 for Xbox 360 arcade vs 360 slowdown
05/15/13 add info to 13.0 for stage item and variables, 14.0 for techniques, 12.0 for Bombing
06/24/13 clarification on section 12.0 for bombing
-----------------------------------------------------------------------------------
0.0 - Basics
MBL has the same controls as the original. For reference:
Shot (Tap A or Tap B) – Tap A to fire left. Tap B to fire right.
Laser (Hold A or Hold B) – Hold A or B to fire a stronger shot. Your option also fires their projectile when using laser.
Lock shot (A+B) – Lock on to enemies by having them enter the target area around your character or your option.
Power up (A+B) – Initiates power ups when item counter is at a certain value.
Bomb (C) – Clears the screen of bullets and SOME enemies.
0.1 - Extends
Extends are given at 50,000,000 and 300,000,000.
0.2 - Default settings
These settings are from the Xbox360.
Life - 3
Difficulty - 2
Enemy damage - 4
Bullet damage - 5
Bomb - 3
EX - on
Remember,
-A half of damage is received if you touch an enemy, environmental element, bosses, or a boss's object (ex. Whroon's apples, flying rocks in volcano, ect...).
-One life is lost if you get hit by a bullet or a suicide bullet.
If you are finding yourself getting hit more than 2 times before losing a life, then you have the wrong settings (ie. it's either 1 life or 0.5 of a life).
1.0 - New Character
Sakura
Age: 15
Height: 5’1”
Blood type: AB
Born in England
Sakura is now a character you can choose. She has a separate story in which she desperately tries to stop her father, Jitterbug, in opening the portal to the real world. She has two options instead of one. Both of the options move and shoot opposite of your movements.
-Shot: Sakura fires 3 rows of bullets that flare out wide and her options fires a stream of bullets. Options are not stationary when moving.
-Laser: Sakura fires 3 rows of bullets and becomes concentrated. Her options fire a star which on impact becomes a seal which "sticks" to the enemy. Options are locked in place when in laser.
-Lock: A target area forms around the two options and are locked in place when moving.
In the ending sequence, you have two options:
-Leave Gilverado, her friends, and her dying mother and start a massive business empire with Jitterbug.
-Refuse to go with her father and stay with her mother and friends.
1.1 - Character Speed
Character speed in [ ] is when character is in Power Up mode.
1.2 - Ending sequence
Choose any ending you want, but none of the options are going to affect your score.
If you choose to stay in Gilverado, wait for the credits to end and you can see a cutscene that bridges the gap between Deathsmiles and Deathsmiles II.
2.0 - New Stage
A new stage called Ice palace has been added to the game. It is considered an extra stage along with Canyon.
Ozier is the stage's boss. His score values are:
1st Phase at default rank - 500,000
2nd Phase at default rank - 500,000
1st Phase at lvl999 rank - 5,000,000
2nd Phase at lvl999 rank - 5,000,000
3.0 - Rank
A new rank level 999 was added to rank selection. It is the hardest and highest rank you can play in MBL. You are able to choose lvl999 as many times as you want. Lvl999 includes some aesthetic changes, different bullet patterns, and scoring opportunities.
When you are in lvl999, you are automatically in “death mode.” However, it is different from lvl3 death mode. Enemy and boss bullet patterns are much denser and faster. There are less suicide bullets, but their speed is greatly increased.
For the first six stages, lvl999 rank can be manually chosen. However, for the EX stages, castle, and ballroom, they must be "unlocked."
Minimum requirements to unlock lvl999 the EX stages, castle, and ballroom is to do 4 out of the 6 beginning stages at lvl999. You must maintain a no miss during all 4-1, 4-2, 5-1, 5-2 stages to be at lvl999. For instance, if you do the Ice Palace and Canyon both at lvl999 and you lost a life during Canyon, the castle and ballroom stage will default to lvl3.
4.0 - Counters
There are two different counters in MBL. Both of these counters carry on to the next stage.
Item counter
This is represented as a large pulsing number on the bottom left corner of the game screen. The value of the counter is 0-1000. This counter can be filled up by destroying enemies and collecting the items.
Overall Counter
A smaller counter below the Item counter. The value of this counter is 0-100000.
This value will not decrease during the stage, but will decrease during boss fights. A general rule is the higher the stage rank, the faster your overall counter will decrease.
4.1 - Counters After Lost Life
Both Item and Overall counters will decrease by 30% if a life is lost. The number is not rounded up to the nearest whole number. In other words, 191.8 is 191
5.0 - Fever Mode
It can be considered that each counter has a “Fever Mode,” but associate the true “Fever Mode” to the overall counter.
Item Counter
When your counter is at 1000, enemies will produce Gold Crowns. Typically they produce one crown. (see 7.3)
Overall Counter
When your Overall counter is maxed out at 100000, Fever Mode will initiate and enemies will produce approximately 4-15 times as much Gold Crowns. (see 7.3)
6.0 - Power Up
Power up can be initiated when the Item counter is between 500 – 1000 and A+B is pressed.
If you power up between 500-999, the Item counter will start counting down from 500 and bullets are turned to medium sized items. If your Item counter is at 1000, it will count down from 1000 and bullets are turned to large sized items.
The duration time when bullets are transformed into items is increased to 80 frames.
When power up ends bullets are nullified.
7.0 - Items
The item values are as follows:
Break down of items is the same as the original.
1 Gold Crown = 2 Heart Lockets or 4 Skull Rings
1 Heart Locket = 2 Skull rings
7.1 - Item Production During Power Up.
When in Power Up, item can be produced from the options’ projectile. To do this, simply fire the projectile on an enemy. In MBL, the size of the item dropped from the projectile differs depending on the rank and the Item counter.
During lvl1/2/3
When your Item counter is between 0-1000, small items are produced from the projectile.
During lvl999
When your Item counter is between 0-500, small items are produced from the projectile.
When your Item counter is between 501-1000, medium items are produced from the projectile.
Item Production
For a certain amount of frames, an item will be produce by the projectile. The numbers differ per character and it also depend if you powered up at 500 or 1000.
(Number of items produced/Frame):
7.2 - Items and Your Counters at Power Up Mode.
The key in scoring is to manage items, counters, and Power Up.
Not In Power Up
When the Item counter is filled up to 1000, items will start to add +1 to the Overall counter. All items added to the Overall counter are worth the same. The value of item is also added to the value of the counter at the time.
Example: Your Overall counter is +70000. You collect one Skull Ring then one Gold Crown. Your Overall counter is now +70002 and the value added to your score is (100+70001) + (2000+70002) = 142103
During Power Up
When Power Up is initiated, all items are worth the same +value. The +value is what helps build the overall counter. The value of item is also added to the value of the counter at the time.
The key thing is to let items break into skulls and collect as many as possible.
Example: One enemy produced 1 Gold Crowns and your Overall counter reads 70000. You let them break into 4 skulls. Your counter now reads 70036. The value added to your score is (100+70009) + (100+70018) + (100+70027) + (100+70036) = 280490
7.3 - Enemy Item Production
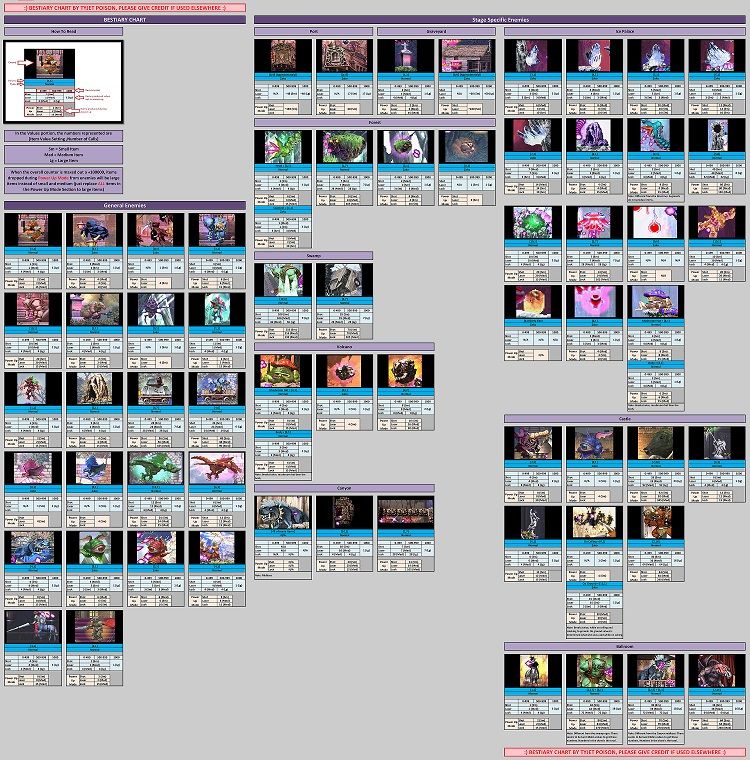
Each enemy in the game has a different item drop value. There are two values that is assigned to the enemy that determine how many items are dropped, which depend on the shot you are using, your item counter number, and if power up has been activated. Also, the types of items dropped depends if the enemy is Normal or a Zako.
The enemy is assigned two numbers:
Item Value Setting (アイテム設定値) and Number of Calls (呼び出し回数). To make things simple, let's abbreviate Item Value Setting to "IVS" and Number of Calls to "Call Number"
Based on the enemy's item setting value there are three different scenarios you must consider.
For enemies that have an Item Value Setting of 0:
For enemies that have an Item Value Setting of 1 or more:
Normal Enemies:
Zako Enemies:
For when you are in Power Up:
Normal Enemies:
Zako Enemies:
When the overall counter is maxed out a +100000, items dropped during Power Up Mode from enemies will be large items instead of small and medium (just replace ALL items in the Power Up Mode Section to large items).
Due to the complex way everything is calculated, here is a chart I made that lists all enemies as well as their drop rates so you can see what shot is the best to use. This chart is incredibly tedious to research and involves endless amount of math, so use as a reference/baseline only.
Below is a preview due to the massive size. Here is a direct link to the high quality version:
8.0 - Suicide bullets and What You Need to Know
Suicide bullets act differently than in the original game. They do not add to you item counter nor do they add to the overall counter.
When not in Power Up
Suicide bullet values are based off your Item counter when not in power up mode.
When your Item counter is between 0-999, suicide bullets are only worth the value of the counter at the time.
Example: The item counter is 753. You absorbed one suicide bullet. The value of that bullet is worth 753. You then collect one gold crown and now your counter reads 762. You absorbed another bullet and now it is worth 762.
When your Item counter is at 1000, they are only worth 100 (1/10 of the item counter).
When in Power Up
Suicide bullet values are based off your Overall counter when in power up mode.
When your Overall counter is between 0-9999, suicide bullets are worth the value of the counter at the time plus 100.
When your Overall counter is between 10000-99999, suicide bullets are only worth 1/10 of you Overall counter plus 100. This value is not rounded for decimal places.
Example: The Overall counter is 76593. You absorbed one suicide bullet. The value of that bullet is worth 100+7659. In other words, the value added to your score is 100 + (76593/10) = 7759
When your Overall counter is maxed out at 100000, they are worth 10000 plus 100 (1/10 of maxed out Overall counter plus 100).
9.0 - Life and Bomb Refills
Life and bomb drops are the same for lvl1-lvl3, but drops in lvl999 are not that frequent. (Another reason why lvl999 is difficult)
For lvl999
-Two 0.5 life items appear in the port stage when you kill the two large Ogres, but only if you chose the stage as Chapter 3-1.
-One bomb Item will appear if you kill the midboss in the canyon stage. Canyon can be chapter 4-1 or 4-2.
-One 2.0 life item will appear once you defeat and do not bomb during the castle boss “Jitterbug.” Going through the EX stages is not requirement for it to appear.
10.0 - Bosses
Known safespots were removed on Whroon’s 2nd phase and Jitterbug’s 2nd phase. When you activate death mode, suicide bullets shoot out from boss’s object when destroyed.
At lvl999, the changes include the ones stated above except the attacks are MUCH denser and faster. You also get more point for each phase destroyed.
10.1 - Item Counter During Boss fights
You can gradually rebuild the Item Counter, by using shot or laser on the boss. For this to happen, you must have your option “overlap” the boss. The rate in which you can refill the counter differs depending on the character, shot, and stage rank. The number added to the item counter is base on every 2 frames:
11.0 - Bloody Jitterbug
A new boss called Bloody Jitterbug is added in the castle stage. It is the true life boss in MBL.
His score values are:
1st Phase - 50,000,000
2nd Phase - 50,000,000
Bloody Jitterbug can only appear if certain requirements are met in the game:
-Go through the first stages 6 stage at lvl999.
-No miss Canyon and Ice palace at lvl999.
-No miss Castle and Ballroom at lvl999.
-No miss Jitterbug boss.
-You can miss or even continue when you reach Tyrannosatan. Bloody Jitterbug will appear after you defeat Tyrannosatan.
Helpful notes:
*Bombing is permitted throughout the run. It will not affect how you get to the TLB.
*Half damage is permitted throughout the run.
*A full life loss is permitted ONLY during the first 6 stages and Tyrannosatan.
*After you defeat Tyrannosatan’s second phase, Bloody Jitterbug will certainly appear if Jitterbug does not fall out of its mouth.
*There is no strict order of the two chapter 4 stages. You can do Canyon and then Ice Palace or vice versa. Most people seem to go through the Ice Palace and then the Canyon only because of the difficulty of the stage and boss.
I tried doing these combinations to unlock Bloody Jitterbug, but these methods do not work:
1. In the beginning 6 stages, do 2 at lvl3 and do 4 at lvl999 to unlock the later stages at lvl999. Go through the Ice Palace, Canyon, Castle, and Ballroom at lvl999. No missed Jitterbug and Tyrannosatan at lvl999, but Bloody Jitterbug did not appear.
2. Go through the first 6 stages at lvl999. Go through the Ice Palace, Canyon, Castle, and Ballroom at lvl999. However, I lost a life in the Ballroom. Defeated Jitterbug and Tyrannosatan at lvl999, but Bloody Jitterbug did not appear.
3. Go through the first 6 stages at lvl999. Go through the Ice Palace, Canyon, Castle, and Ballroom at lvl999. Lost a life during the fight with Jitterbug at lvl999. Defeated Tyrannosatan at lvl999, but Bloody Jitterbug did not appear.
12.0 - Bombing
Bombing is the same as the original. The following explains how bomb works. For the purpose of explaining examples, take in consideration the play field is 640x480 in resolution.
The distance between the character and where the bomb explodes is about half the width of the screen size. In other words, about 320 pixels if the screen resolution is 640x480.
Bomb is usually released at the angle the option is facing. For example, if the option is facing 45 degrees, the bomb will be release at 45 degrees 320 pixels away. Most of the time, if your character is either Windia, Follett, Casper, or Rosa, the bomb will release directly in front of them because their options are facing left or right. However with Sakura, the bomb can be release at any angle.
If the character is facing the edge of the screen and the distance between them and the edge is less than 320 pixels, the bomb will be released on the edge of the screen. The angle mention above still applies.
If the player is in lock shot, bomb will be release at the exact location where the character is at the time.
If the player is locked on to an enemy, the bomb will be released at the exact location where the enemy is at the time.
Typically bombing will clear the screen of bullets, but for enemies it is not always the case. The general rule is the closer the enemy is to the bomb explosion, the more damage it receives. Larger enemies such as the castle ogres cannot be killed on just bombs alone.
13.0 - Stage Items and Variables
It is important to know what environment variables can be damaging during the game for survival and strategizing. Unless indicated, damage value is the same while being in Power Up Mode and not in Power Up Mode.
14.0 - Tips that may or may not help you
-Generally when items are breaking during power up, the game usually favors absorbing small items rather than the medium and big items, which is great for score.
-After you destroy Ozier and he is producing items, there is a solid ground in which you can break your items. The ground is shown off screen.
-Enemies will not emit suicide bullets if you “sit” on top of them and kill them. You have a small area around you where bullets do not produce. Of course, you need to be in power up mode for this to happen.
-Enemies can be “shoved” off screen. If an enemy is near the edge the screen, move to the opposite side of the screen to have the play area “cover” them. This only works if the enemy is on the top or bottom of the screen. Once “shoved” off screen they disappear for good.
-MBL fixed how your option is positioned if you push opposite against the edge of the screen. The option no longer ends up at the lower left corner of the character. It moves opposite of your movement.
-If you sit on top of an enemy, your character can damage the enemy/boss. It is a very small amount, but it does make a difference in certain scenarios. The damage is so small that it does not even kill a zako.
-If you are planning to get a high score, avoid the lvl999 Ice Place. This is because there are less suicide bullets during the stage.
-It is ok for you to lose a life to refilled the item and the bomb counters during a HIGH ranked scoring run.
15.0 - Xbox 360 Arcade vs 360 Slowdown
In the Xbox360 there are two versions of MBL. Both versions are different from each other and below lists the biggest issues.
Arcade mode:
-The amount you can choose lvl1 and lvl2 are limited.
-Graphics are straight from the arcade PCB.
-There is plenty of slowdown during the first 6 stages, but the boss fights are lacking slowdown.
-When you get to the Canyon, Ice Palace, Castle, and Ballroom, it is the opposite. The stage is lacking slowdown, but the bosses have more slowdown.
360 mode:
-You can choose lvl1 and lvl2 as many times as you want.
-Graphics have been slightly altered and recolored for high definition purposes.
-The first 6 stages are lacking slowdown, but there is plenty of slowdown during the boss fights.
-When you get to the Canyon, Ice Palace, Castle, and Ballroom, it is the opposite. The stage has plenty of slowdown, but the bosses are lacking slowdown.
So what mode is recommended for general and casual runs?
Generally you want to go with 360 mode. But my recommendation for scoring runs is to use Arcade mode for EX-Off runs and 360 mode for EX-On runs.
16.0 - Useless Information
Here’s some fun stuff.
-The blue rose graphic during character and stage selection is broken in MBL Xbox 360 mode.
-Ice Palace is not graphically located on the map in MBL 360 mode, but is on the MBL Arcade mode.
-Sakura is written サキュラ (Sakyura), but her name is spelled Sakura in the game.
-The gameover screen in Deathsmiles is St. Peter's Basilica (dome above the Baldacchino). Which is Baroque style not Gothic.
-The on screen display flickers if enough items are produced on screen. It happens in both original and MBL.
-There’s a village located high on top of a mountain in the canyon stage.
-In 360 mode, new ending music will be played during the ending credits.
17.0 - Bibliography
USA Xbox360 Deathsmiles Manual
Mushihimesama Futari Black Label x Deathsmiles Mega Black Label DVD Manual
Everything else is from playing the game


