DoDonPachi (New Thread #4)
-
Lance Boyle
- Posts: 243
- Joined: Thu Nov 11, 2010 7:30 pm
Re: DoDonPachi (New Thread #4)
Hey Prometheus, can we get a picture of your keyboard? 
-
PROMETHEUS

- Posts: 2453
- Joined: Tue Feb 27, 2007 1:00 am
- Location: France
Re: DoDonPachi (New Thread #4)
I had tried using shot to slow down 2-3 midboss pattern but it didn't work well. I suspect it will be useless with C-L.Zetzumarshen wrote:But the first tip probably applicable at stage 2-3 midboss, I have to try that sometime. I rather deal 3-4 wave of slow pattern rather than pressing my luck for 2 waves. Or everywhere else that I deem hard. I am regretting not to chose C-S now as the ship generate more shot sprite thus decreasing the number of enemy bullet sprite to trigger the slowdown
However here is a tip for this one :
When the four purple spheres explode, you must keep looking at the spot where the sphere closest to you was when it exploded, while you dodge. If you move your look closer to your ship like it seems natural to do for nearly all patterns, you will see the fastest moving shots too late (and some of them are spawned 1 or 2 seconds after the explosion). By keeping your look on the explosion spot, you are ensuring a really good vision of the explosion's structure, and in that case it is more valuable than a more accurate detail of your ship's danger area. Only move your eyes back to your ship's area when the explosion has already spawned all/most of its particles (that's about 1,5 seconds after the explosion. Seems like nothing but it makes a big difference !). With some practice and good skills you should be able to get more consistant like this.
I personnally miss or bomb there about 20% of the time I think.
Last edited by PROMETHEUS on Fri Nov 19, 2010 2:05 am, edited 4 times in total.
Scores, replays, videos || I have written a guide about getting good at shmups. Check it out !
Follow me on Twitch
Follow me on Twitch
-
PROMETHEUS
- Posts: 2453
- Joined: Tue Feb 27, 2007 1:00 am
- Location: France
Re: DoDonPachi (New Thread #4)
Well it's a Saitek Eclipse keyboard as seen on this link : http://www.florisporro.com/wordpress/wp ... -kb-21.jpgLance Boyle wrote:Hey Prometheus, can we get a picture of your keyboard?
Really my STG setup is just your standard gaming PC, 19" yoko position screen and a nice gaming keyboard and mouse. I think it's pretty important to have a keyboard with quality keys but I'm not sure how much, I've not played with a different keyboard in ages.
Scores, replays, videos || I have written a guide about getting good at shmups. Check it out !
Follow me on Twitch
Follow me on Twitch

Re: DoDonPachi (New Thread #4)
Just wondering PROMETHEUS - how do you fare in arcades when you need to use a stick?
Congrats on the huge score also.
Congrats on the huge score also.


Re: DoDonPachi (New Thread #4)
Pretty sure C-L's laser is actually the most powerful.
Oh, and congrats on the sick score/run, Prometheus, you were one unfortunate death away from an even more amazing score Keep it up!
Oh, and congrats on the sick score/run, Prometheus, you were one unfortunate death away from an even more amazing score
-
Zetzumarshen

- Posts: 153
- Joined: Tue Jun 30, 2009 4:11 pm
- Location: Indonesia
Re: DoDonPachi (New Thread #4)
Are you an esper? How could you know how I'd play?PROMETHEUS wrote: I had tried using shot to slow down 2-3 midboss pattern but it didn't work well. I suspect it will be useless with C-L.
However here is a tip for this one :
When the four purple spheres explode, you must keep looking at the spot where the sphere closest to you was when it exploded, while you dodge. If you move your look closer to your ship like it seems natural to do for nearly all patterns, you will see the fastest moving shots too late (and some of them are spawned 1 or 2 seconds after the explosion). By keeping your look on the explosion spot, you are ensuring a really good vision of the explosion's structure, and in that case it is more valuable than a more accurate detail of your ship's danger area. Only move your eyes back to your ship's area when the explosion has already spawned all/most of its particles (that's about 1,5 seconds after the explosion. Seems like nothing but it makes a big difference !). With some practice and good skills you should be able to get more consistant like this.
Massive tips, it works very well! Hard not to get panic and look back at my ship. And it's true, no good trying to slow down the pattern, (about 50-50, sometimes the ship won't spawn enough bullets, and it only need 1 to hit my ship).
I know I shouldn't be lazy, but any advice to take down 2-3 big bastard without using bombs? I'd like to 2-all the game but continuing MAX bonus up until 2-5 is a very juicy prospect.
-
PROMETHEUS
- Posts: 2453
- Joined: Tue Feb 27, 2007 1:00 am
- Location: France
Re: DoDonPachi (New Thread #4)
Well I've played many times on arcade cabs at meetings. It's difficult for me to compare because I've rarely had a chance to play a game on a cab that I know how to play with a keyboard well. The few times I tried DDP, I couldn't chain anything and missed much more often. Made it to 2-4 or 2-5 though. I've played DDP DOJ black label a few times also and made it to 2-4, again failing most chains. I've 1CC'd Futari Black Label Maniac with 400M, scored a little under 2B in God Mode... stuff like that. Nothing crazy, but enough to have some good fun.spl wrote:Just wondering PROMETHEUS - how do you fare in arcades when you need to use a stick?
Congrats on the huge score also.
In short I cannot perform anywhere near the best of my ability but I still play well enough to enjoy myself.
Last edited by PROMETHEUS on Fri Nov 19, 2010 4:35 pm, edited 2 times in total.
Scores, replays, videos || I have written a guide about getting good at shmups. Check it out !
Follow me on Twitch
Follow me on Twitch
-
Subterranean Sun

- Posts: 176
- Joined: Tue Feb 02, 2010 5:21 am
- Location: China
Re: DoDonPachi (New Thread #4)
Holy crap, can't belive I didn't notice this until today. Watching your replay almost make me want get back at the game, but I've got tons of homework to do. Some of your dodges in 2-6 are downright insane. I wonder if you forgot to bomb or it's your choice to not bomb.
Your strategy at the middle section of 1-6 is very smart. Just tried it and I was surprised how effective it is. Now I can no-miss-no-bomb the stage fairly easily. Well, until I get to the boss, at least.
Your strategy at the middle section of 1-6 is very smart. Just tried it and I was surprised how effective it is. Now I can no-miss-no-bomb the stage fairly easily. Well, until I get to the boss, at least.
Uh, I don't think there is any trick when dealing with this abomination. One of my friend told me that, if you destroy all 4 turrets at bottom (and thus make the cover boards on side turrets automatically remove theirself), the side turrets will start with less HP. I am not very sure about this, though. I would suggest you to use at least one bomb during this battle, as it will make your life MUCH easier. If you want keep your maximum bonus to 2-5, I wish you good luck. You will need it. (I think I no-miss-no-bombed him for once, but I was extremely lucky that time. Also, I would like to know if Prometheus has got the same problem.)Zetzumarshen wrote: I know I shouldn't be lazy, but any advice to take down 2-3 big bastard without using bombs? I'd like to 2-all the game but continuing MAX bonus up until 2-5 is a very juicy prospect.
-
PROMETHEUS
- Posts: 2453
- Joined: Tue Feb 27, 2007 1:00 am
- Location: France
Re: DoDonPachi (New Thread #4)
Don't keep your look on the explosion for too long either, if you see something threatening your ship too much you might want to move it back to it asap.Zetzumarshen wrote:Hard not to get panic and look back at my ship.
There is a second bonus to looking at the explosion longer, is that sometimes it makes "branches" which have much less bullet density than the rest. If such a "branch" goes near your ship, you will realize it's less dense more quickly and be able to move there out of threat very early.
Yeah I have precise methods for this one that I need to follow closely to stay consistant. I used to call that boss the "Guardian" or "Run Breaker" because it was the point in second loop where I was most likely to screw up (before 2-5). I allowed myself 1 bomb there, it is reasonable because you get another bomb in 2-4 second half. Only worth it if you can continue the MAX bonus up to half 2-5 though. Now I'm much more consistant there and often destroy it without bombing or dying.Zetzumarshen wrote:I know I shouldn't be lazy, but any advice to take down 2-3 big bastard without using bombs? I'd like to 2-all the game but continuing MAX bonus up until 2-5 is a very juicy prospect.
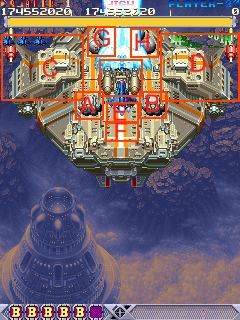
So the methods :
1) Start by lasering + aura the two small rotative turrets at the front (A and B).
2) As soon as B is destroyed, move to laser + aura C. Your aura can be touching E and F while you do this, damaging them while they open (at least I can do it with A-L, think it works with C-L). At least, your aura is also touching A so A will be destroyed before it can shoot anything. That's why at 1), it's best to prioritize shooting B down, and then move asap to 2).
3) The second C is destroyed, move to the bottom of the screen. Stay in front of C so as to kill the rotative turret that it was covering, and that has started shooting. The second that turret is destroyed, move to 4).
4) A little tricky. Move in front of the center part which I forgot to name on the image (let's call it X). You will be hitting E and F when they open. Now X is going to start its patterns. Watch which of the 3 patterns start now (it's random). I'll call the 3 patterns "circular barriers", "sniper" and "spiral spam", hopefully you'll know which is which :p. When it's the "circular barriers", the G and H turrets will bother you a lot unless you move to the hole in the next "circular barrier" at the last moment (cause if you move too early where the hole is going to be, the turrets will be shooting right there and you'll be blocked because their shot is faster than the barriers). So, unless it's the "circular barriers", move to laser D right now, staying at the bottom of the screen. If it IS the "circular barriers", wait until the first barrier is close to your position, and at the last few seconds move to a hole that puts you in position to hit D with your laser.
5) When D is destroyed, kill E, F and the turret that D was covering as fast as possible.
6) Destroy G and H as fast as possible. If you can, hit the last turret you're going to destroy before you destroy the second last turret, so that you can come back to the last turret and kill it very fast. That way it will annoy you less with it's faster shot.
7) Now it's just the 3 last patterns.
* Sniper : usually here you're lasering X while it is sniping at you, forcing you to move laterally. Of course, move as slowly as possible to hit it as long as possible before you have to make the move to go to the other side of the sniping bullets. When you think you want to make the move, first go up a little (closer to the boss), then switch to shot, and move left, then down. Your move to the left has spread the sniping bullets and created a little hole, that's where you're going. Moving up before moving left serves to create a larger hole by the way. Then repeat on the other side.
* Spiral Spam : nothing special, except don't try to stay in front of X when the pattern is at its tightest. It's better to dodge the tight phase on the side where it's less dense and there is a curvy corridor.
* Circular Barriers : that's the hardest. First watch for easy holes on either sides of the center. If there are none, then at the next second check the center for a super easy hole. If there is none, you will have to dodge by entering the barrier in a hole, and make a few hard lateral dodges inside the barrier. To do this, never wait until the barrier reaches the very bottom of the screen, because that's when the game's speed will go up. Also it's better not to stay at the very bottom so that you have just a little bit of space to move down in your dodges should you need to. So move up just a little bit to get to the hole you want to squeeze into, and then... pull off the dodges if your skill is enough ! Switch to shot for more speed when you think you need to.
8) When the boss is destroyed, be manner to him and type "GG".
Scores, replays, videos || I have written a guide about getting good at shmups. Check it out !
Follow me on Twitch
Follow me on Twitch
-
PROMETHEUS
- Posts: 2453
- Joined: Tue Feb 27, 2007 1:00 am
- Location: France
Re: DoDonPachi (New Thread #4)
Didn't make any "forget to bomb" errors in 2-6 in that run. There was one moment when I hesitated shortly (before I passed through the tight wall of green shurikens). In that kind of moment you really don't have time to think so you have to make a decision super fast. Here I thought I could pull off going through the wall since I have done it quite a few times in practice, so I decided to just move into position and not bomb. I wanted to keep the chain for max 2-6 points, but hadn't noticed it already broke a few seconds ago (my focus was not on chain counter :p).Subterranean Sun wrote:Holy crap, can't belive I didn't notice this until today. Watching your replay almost make me want get back at the game, but I've got tons of homework to do. Some of your dodges in 2-6 are downright insane. I wonder if you forgot to bomb or it's your choice to not bomb.
Scores, replays, videos || I have written a guide about getting good at shmups. Check it out !
Follow me on Twitch
Follow me on Twitch
-
Subterranean Sun
- Posts: 176
- Joined: Tue Feb 02, 2010 5:21 am
- Location: China
Re: DoDonPachi (New Thread #4)
"Screw the tension! And screw Hachi, too! This time... This time I shall destroy you!"
S.S - 135,552,940 - A-L - 2-7 - 497
I did it. It took me 7 months, but I finally did it. I made my way to Hibachi.
I must give my thanks to Prometheus. Watching your replay helped a lot... Really a lot. Many thanks, sir.
Inp here (Lagless 0.99, Jap version)
S.S - 135,552,940 - A-L - 2-7 - 497
I did it. It took me 7 months, but I finally did it. I made my way to Hibachi.
I must give my thanks to Prometheus. Watching your replay helped a lot... Really a lot. Many thanks, sir.
Inp here (Lagless 0.99, Jap version)
Re: DoDonPachi (New Thread #4)
Wow, congratulations!Subterranean Sun wrote:"Screw the tension! And screw Hachi, too! This time... This time I shall destroy you!"
S.S - 135,552,940 - A-L - 2-7 - 497
I did it. It took me 7 months, but I finally did it. I made my way to Hibachi.
I must give my thanks to Prometheus. Watching your replay helped a lot... Really a lot. Many thanks, sir.
Inp here (Lagless 0.99, Jap version)
Re: DoDonPachi (New Thread #4)
PROMETHEUS - awesome run, I have really enjoyed watching it, 2 ships left even though some silly deaths spoiled it a bit. You managed Hibachi amazingly.
I think you should upload your input to http://replay.marpirc.net/ so more people can enjoy your awesome gameplay (its a site with mame inputs where players play for score),
I think you should upload your input to http://replay.marpirc.net/ so more people can enjoy your awesome gameplay (its a site with mame inputs where players play for score),
-
PROMETHEUS
- Posts: 2453
- Joined: Tue Feb 27, 2007 1:00 am
- Location: France
Re: DoDonPachi (New Thread #4)
Thank you !apatia77 wrote:PROMETHEUS - awesome run, I have really enjoyed watching it, 2 ships left even though some silly deaths spoiled it a bit. You managed Hibachi amazingly.
That's a good idea. I've looked into this but I'm not sure they have the appropriate version of MAME on their site. If I pick MAME32 0.99 (Win32 GUI), will it work despite my inp having been recorded on the lagless version of MAME 99 ? Let's try it out.apatia77 wrote:I think you should upload your input to http://replay.marpirc.net/ so more people can enjoy your awesome gameplay (its a site with mame inputs where players play for score)
Edit : well their MAME link is broken anyway.
Scores, replays, videos || I have written a guide about getting good at shmups. Check it out !
Follow me on Twitch
Follow me on Twitch
Re: DoDonPachi (New Thread #4)
PROMETHEUS wrote:Thank you !apatia77 wrote:PROMETHEUS - awesome run, I have really enjoyed watching it, 2 ships left even though some silly deaths spoiled it a bit. You managed Hibachi amazingly.
That's a good idea. I've looked into this but I'm not sure they have the appropriate version of MAME on their site. If I pick MAME32 0.99 (Win32 GUI), will it work despite my inp having been recorded on the lagless version of MAME 99 ? Let's try it out.apatia77 wrote:I think you should upload your input to http://replay.marpirc.net/ so more people can enjoy your awesome gameplay (its a site with mame inputs where players play for score)
Edit : well their MAME link is broken anyway.
Trust me, they will be able to play it, you just mention when uploading the input that you used wolfmame 0.99 and thats it
You will make a lot of people happy by uploading it over there
They also verify all inputs ie they watch it and check the score.
EDIT: I see you already uploaded it over there.
EDIT2: I played it back just fine using wolfmame 0.99 but when I try to play it using normal mame 0.99 it just crashes. I think you might have entered misleading description. What is a lagless mame? Wolfmame or some other special version of mame 0.99?
-
PROMETHEUS
- Posts: 2453
- Joined: Tue Feb 27, 2007 1:00 am
- Location: France
Re: DoDonPachi (New Thread #4)
Special version of MAME 0.99, as seen in this topic, second post :apatia77 wrote:EDIT2: I played it back just fine using wolfmame 0.99 but when I try to play it using normal mame 0.99 it just crashes. I think you might have entered misleading description. What is a lagless mame? Wolfmame or some other special version of mame 0.99?
http://shmups.system11.org/viewtopic.ph ... 42#p563842
It has one less frame of input lag in DoDonPachi, making it the best performing MAME.
If it works with wolfmame plus 0.99 I could just select it as the MAME used to record the replay then.
Scores, replays, videos || I have written a guide about getting good at shmups. Check it out !
Follow me on Twitch
Follow me on Twitch
Re: DoDonPachi (New Thread #4)
I didn't actually realize that you uploaded some other input with even higher score onto MARP. I can't wait to get home to watch it. I got your input (505m) from the first page of this thread. So I have not actually tested this 547m input with any version of mame yet.Special version of MAME 0.99, as seen in this topic, second post :
http://shmups.system11.org/viewtopic.ph ... 42#p563842
It has one less frame of input lag in DoDonPachi, making it the best performing MAME.
If it works with wolfmame plus 0.99 I could just select it as the MAME used to record the replay then.
My apologies for any confusion.
MARP has got a lot of rules etc but it's a great source of shmups inputs. Sometimes I just watch how other people 1cc arcade games, I just love it
How come this thread hasn't got your your higher score uploaded/updated?
-
PROMETHEUS
- Posts: 2453
- Joined: Tue Feb 27, 2007 1:00 am
- Location: France
Re: DoDonPachi (New Thread #4)
Eheh that's ok.
I shared a link to it on page 14, Ravid just seems to have been inactive lately so he hasn't updated it yet.apatia77 wrote:How come this thread hasn't got your your higher score uploaded/updated?
Scores, replays, videos || I have written a guide about getting good at shmups. Check it out !
Follow me on Twitch
Follow me on Twitch
Re: DoDonPachi (New Thread #4)
I see, I've just watched your other input and OMG you are AMAZING! Even though you got lucky so many times in stage 2-6 you rock in this game, it was flawless all the way until the silly death at boss 2-5.
-
PROMETHEUS
- Posts: 2453
- Joined: Tue Feb 27, 2007 1:00 am
- Location: France
Re: DoDonPachi (New Thread #4)
I don't remember any lucky dodges in 2-6, all or most of them were fully controlled and intentional ! (of course lucky dodges happen sometimes in my runs but as you get better they become rarer and rarer)apatia77 wrote:Even though you got lucky so many times in stage 2-6 you rock in this game, it was flawless all the way until the silly death at boss 2-5.
Does anyone know where I could find a high scoring C-S video ? (preferably over 500M, showing all chains...)
Scores, replays, videos || I have written a guide about getting good at shmups. Check it out !
Follow me on Twitch
Follow me on Twitch
-
PROMETHEUS
- Posts: 2453
- Joined: Tue Feb 27, 2007 1:00 am
- Location: France
Re: DoDonPachi (New Thread #4)
Just watched your replay, nice job ! I see good work on routes up to stage 2-6. I like your 80% laser chaining style in the first few levels, it's not optimal but original and fun. I think you can probably work a laser-centered style that scores well in most stages. It does have a "maximum damage" perk to it, killing a lot of stuff very fast before they get a chance to shoot anything. Just have to sneak as much additional laser usage as you can in scoring routes that you use as models.Subterranean Sun wrote:"Screw the tension! And screw Hachi, too! This time... This time I shall destroy you!"
S.S - 135,552,940 - A-L - 2-7 - 497
I did it. It took me 7 months, but I finally did it. I made my way to Hibachi.
I must give my thanks to Prometheus. Watching your replay helped a lot... Really a lot. Many thanks, sir
Scores, replays, videos || I have written a guide about getting good at shmups. Check it out !
Follow me on Twitch
Follow me on Twitch
Re: DoDonPachi (New Thread #4)
Something like this? No sound but 572M.PROMETHEUS wrote:
Does anyone know where I could find a high scoring C-S video ? (preferably over 500M, showing all chains...)
http://www.youtube.com/watch?v=C1Poqecp4z0
Well worth watching.
-
PROMETHEUS
- Posts: 2453
- Joined: Tue Feb 27, 2007 1:00 am
- Location: France
Re: DoDonPachi (New Thread #4)
Aah yes that's great ! Anywhere the video is hosted for downloading ?apatia77 wrote:Something like this? No sound but 572M.
http://www.youtube.com/watch?v=C1Poqecp4z0
Well worth watching.
Scores, replays, videos || I have written a guide about getting good at shmups. Check it out !
Follow me on Twitch
Follow me on Twitch
-
Zetzumarshen
- Posts: 153
- Joined: Tue Jun 30, 2009 4:11 pm
- Location: Indonesia
Re: DoDonPachi (New Thread #4)
Thanks for 2-3 boss advice Prometheus! I have to drill practice that method often in the future. I'm sorry coming so late.
Meanwhile

.ASP - 232,849,860 - C-L - 2-5 - 778 hits - Replay
Finished loop 1 with no bomb, 2 spares. 2 misses at stage 4, and missed 1-3 1up, even though its already on the screen. Some superplayer say never throw a losing run, and here I am reaping the results.
Carried the bomb bonus until the 1up battleship 2-3 (Yes! Thanks for the midboss advice!) then literally forgot thow to do 2-4 and 2-5.
Sadly, I still need to look up the art of bombing for 2-3 abomination of a boss
Meanwhile
.ASP - 232,849,860 - C-L - 2-5 - 778 hits - Replay
Finished loop 1 with no bomb, 2 spares. 2 misses at stage 4, and missed 1-3 1up, even though its already on the screen. Some superplayer say never throw a losing run, and here I am reaping the results.
Carried the bomb bonus until the 1up battleship 2-3 (Yes! Thanks for the midboss advice!) then literally forgot thow to do 2-4 and 2-5.
Sadly, I still need to look up the art of bombing for 2-3 abomination of a boss
Re: DoDonPachi (New Thread #4)
Damn, just realized I've forgotten to congratulate Prome on this brilliant effort! This stuff is top-notch. :D
No kidding! I watched this run a couple days ago, and it's very much that: dodges on 2-6 were so brilliantly executed, that in my spoiled opinion (I definitely watch superplays too much) they put many Japanese players to shame, let alone us poor scrubs. :) It was especially convincing seeing that you knew exactly how to go around all that shit (these hilariously elaborate dodges surely didn't have anything in common with Mushi-style blind bullshitting), watching you graze these hair-thin bullet corridors without clipping them was very exhilarating. Nice execution on Hibachi as well, very clever all in all, although I do believe that's not your best performance to date.captpain wrote:That stage had some of the most clever and agile dodging I've ever seen in a superplay.

Matskat wrote:This neighborhood USED to be nice...until that family of emulators moved in across the street....
-
PROMETHEUS
- Posts: 2453
- Joined: Tue Feb 27, 2007 1:00 am
- Location: France
Re: DoDonPachi (New Thread #4)
Thank you moozooh !
I do a lot of Hibachi practice for fun so I know exactly the risks I'm taking when I try something there.
Yeah indeed, I approached Hibachi differently this time. I wanted to take zero risk to ensure at least one or two spare lives at the end, cause naturally I wanted to beat the dubious 530M score. So my approach was to bomb more than usual, and I didn't try any of the harder dodges that I can do. Had I tried them, I might have gotten more spare lives and executed more beautiful dodges, but if something went wrong, I might have died a few times with bombs in stock, and ended with 1 or 0 spare lives. Maybe even not 2-ALL at all if I really really messed up !moozooh wrote:Nice execution on Hibachi as well, very clever all in all, although I do believe that's not your best performance to date.
I do a lot of Hibachi practice for fun so I know exactly the risks I'm taking when I try something there.
Scores, replays, videos || I have written a guide about getting good at shmups. Check it out !
Follow me on Twitch
Follow me on Twitch

Re: DoDonPachi (New Thread #4)
Bomb the circular barrier pattern, but not the spirals. I also suggest bombing if you get trapped while destroying the side turrets (the pink needles in combination with circular barriers are deadly). A good bomb early on can make the later parts much easier.Zetzumarshen wrote:Sadly, I still need to look up the art of bombing for 2-3 abomination of a boss


Re: DoDonPachi (New Thread #4)
Took you long enough to beat my old score. ;)PROMETHEUS wrote:... I wanted to beat the dubious 530M score.
-
PROMETHEUS
- Posts: 2453
- Joined: Tue Feb 27, 2007 1:00 am
- Location: France
Re: DoDonPachi (New Thread #4)
Right buddy ;]sikraiken wrote:Took you long enough to beat my old score. ;)PROMETHEUS wrote:... I wanted to beat the dubious 530M score.
I think I have finished writing the Full Extent Of The Jam. I'll just work a little bit on the layout some time this week and then post it to you guys. I have added a "Techniques" section where I describe (with screenshots and text) some of the very common dodging / bullet herding techniques that I use all the time. The whole thing is a pretty fat 43 pages document, but it has some pictures and spacing and I think everything I wrote in there should be useful to someone.
Zetsumarchen > can't download your replay !
Scores, replays, videos || I have written a guide about getting good at shmups. Check it out !
Follow me on Twitch
Follow me on Twitch
Re: DoDonPachi (New Thread #4)
I don't think it is really. You can get the input from MARP but it was recorded using some very old version of mame and you need the old version of dodonpachi rom to play it correctly.PROMETHEUS wrote:Aah yes that's great ! Anywhere the video is hosted for downloading ?apatia77 wrote:Something like this? No sound but 572M.
http://www.youtube.com/watch?v=C1Poqecp4z0
Well worth watching.
Just download it from youtube. Quality isn't the best but should be good enough for some training.